Audiovox XMCK10 User Guide - Page 12
Basic Operation - home kit
 |
UPC - 044476030666
View all Audiovox XMCK10 manuals
Add to My Manuals
Save this manual to your list of manuals |
Page 12 highlights
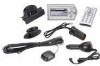
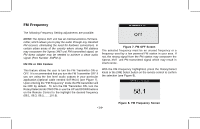
BASIC OPERATION With the Xpress XM7 unit properly installed, activated and connected to your home/vehicle audio system or boom box, proceed as follows: Turning Xpress ON and OFF NOTE: If this is the first time using the Xpress XM7 unit, the screen will alternately display the preview channel screen and a number of messages, including: "Activate Your XM7 1-800XM RADIO". If not, go to channel 1 using the Rotary/Select Knob on the Xpress XM7 unit or the CH Up/Down buttons on the remote control. Set up your Audiovox Xpress XM7 unit using the installation instructions included in this Kit (Home Kit, or Boom Box Kit), or with the help of a professional installer. NOTE: Refer to Antenna Aiming during the installation procedure. Press the Power button to turn the unit ON. When the unit turns ON the XM7 logo will appear for 3-seconds (curved lines on either side of the XM7 logo gradually appear) (see Figure 4) followed by the Audiovox logo. These screens will be followed by the active channel (see Figure 5), which defaults to the last tuned channel setting prior to power being turned OFF. When the unit is shut OFF the XM logo will appear and the curved lines on either side of the XM7 logo gradually disappear. Figure 4. XM and Audiovox Logo Power ON Screen -12- Figure 5. Active Channel Screen
-
 1
1 -
2
-
3
-
4
-
5
-
6
-
 7
7 -
 8
8 -
 9
9 -
 10
10 -
 11
11 -
 12
12 -
 13
13 -
 14
14 -
 15
15 -
 16
16 -
 17
17 -
18
-
19
-
20
-
21
-
22
-
23
-
24
-
25
-
26
-
27
-
28
-
29
-
30
-
31
-
32
-
33
-
34
-
35
-
36
-
37
-
38
-
39
-
40
-
41
-
42
 |
 |
