Audiovox XMCK10 User Guide - Page 15
Audio Level
 |
UPC - 044476030666
View all Audiovox XMCK10 manuals
Add to My Manuals
Save this manual to your list of manuals |
Page 15 highlights
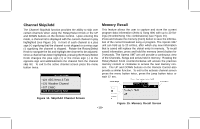
Brightness + Contrast This feature allows the user to adjust the brightness and contrast of the unit's display (see Figure 9). Upon entering either the brightness or contrast adjustment mode, a horizontal bar graph is displayed with a minus (-) sign on the left and a plus (+) on the right. Use the Rotary/Select Knob to highlight the contrast or the brightness adjustment. Once the desired adjustment is highlighted, press the Rotary/Select Knob to enter the adjustment mode. If there is no activity for 12 seconds, the unit will exit to active channel screen. NOTE: When the Receiver is to be used in battery-operated accessories, such as the Xpress Boom Box (XMB10), to maximize battery life, it is suggested that the brightness setting be reduced to a minimal level. Brightness mode: Turn the Rotary/Select Knob CW or use the UP arrow on the Remote Control to increase the screen's bright- Figure 9. Brightness and Contrast Screen ness. Turn the Rotary/Select Knob CCW or use the DOWN arrow on the Remote Control to decrease the screen's brightness. Once the desired setting is obtained, press the menu button twice to return to the active channel screen. Audio Level This feature allows the user to set the audio output signal level (see Figure 10). Upon entering the audio level mode, a horizontal bar graph is displayed with a minus (-) sign on the left and a Contrast Mode: Turn the Rotary/Select Knob CW or use the UP arrow on the Remote Control to increase the screen's contrast. Turn the Rotary/Select Knob CCW or use the DOWN arrow on the Remote Control to decrease the screen's contrast. Once the desired setting is obtained, press the menu button twice to return to the active channel screen. plus (+) on the right. Use the Rotary/Select Knob to adjust the audio level. When the Rotary/Select Knob is turned CW the audio level signal is increased. When the Rotary/Select Knob is turned CCW the audio level signal is decreased. The UP and DOWN buttons on the Remote Control also provide a similar function. When the desired setting is achieved, press the Rotary/Select Knob or (XM) Select Button on the Remote Control to confirm. -15-
-
 1
1 -
2
-
3
-
4
-
5
-
6
-
7
-
8
-
9
-
 10
10 -
 11
11 -
 12
12 -
 13
13 -
 14
14 -
 15
15 -
 16
16 -
 17
17 -
 18
18 -
 19
19 -
 20
20 -
21
-
22
-
23
-
24
-
25
-
26
-
27
-
28
-
29
-
30
-
31
-
32
-
33
-
34
-
35
-
36
-
37
-
38
-
39
-
40
-
41
-
42
 |
 |
