Avanti DWF24V0W Install Manual
Avanti DWF24V0W Manual
 |
View all Avanti DWF24V0W manuals
Add to My Manuals
Save this manual to your list of manuals |
Avanti DWF24V0W manual content summary:
- Avanti DWF24V0W | Install Manual - Page 1
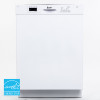
DISHWASHER / LAVAPLATOS / LAVE-VAISSELLE INSTALLATION MANUAL / MANUAL DE INSTALACION MANUEL D'INSTALLATION Model Number Número de modelo Numéro de modèle DWF24V0W DWF24V1B DWF24V3S BEFORE USE, PLEASE READ AND FOLLOW ALL SAFETY RULES AND OPERATING INSTRUCTIONS. Avanti has a policy of continuous - Avanti DWF24V0W | Install Manual - Page 2
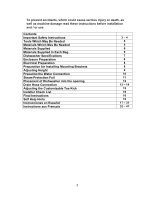
To prevent accidents, which could cause serious injury or death, as well as machine damage read these instructions before installation and / or use. Contents Important Safety Instructions Tools Which May Be Needed Materials Which May Be Needed Materials Supplied Materials Supplied In Each Bag - Avanti DWF24V0W | Install Manual - Page 3
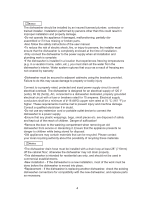
. Save these installation instructions and pass them on to any future user. When installing the dishwasher, follow basic precautions, including the following: •The dishwasher could only be converted from cord-connected to permanently connected by an authorized service representative. (If needed - Avanti DWF24V0W | Install Manual - Page 4
it has missing or broken parts. •Also follow the safety instructions of the user manual. •To reduce the risk of electric shock, fire, or Remove the door to the washing compartment when removing an old dishwasher from service or discarding it. Ensure that the appliance presents no danger to children - Avanti DWF24V0W | Install Manual - Page 5
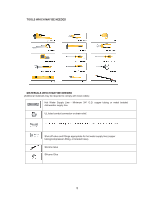
TOOLS WHICH MAY BE NEEDED MATERIALS WHICH MAY BE NEEDED (Additional materials may be required to comply with local codes) Hot Water Supply Line - Minimum 3/4" O.D. copper tubing or metal braided dishwasher supply line. UL listed conduit connector or strain relief. Shut-off valve and fittings - Avanti DWF24V0W | Install Manual - Page 6
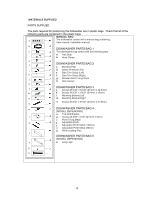
in plastic bags. Check that all of the following parts are contained in the plastic bags. MANUAL BAG The dishwasher comes with a manual bag containing: User manual, Installation manual DISHWASHER PARTS BAG 1 This dishwasher bag comes with the following parts: a. Test Strip b. Hose Clamp DISHWASHER - Avanti DWF24V0W | Install Manual - Page 7
DISHWASHER SPECIFICATIONS (253998/1m6m") 57(202m7m/16") (263005/m8"m) 860mm-910mm (33 ⁷/8" -35 ⁷/8") 860mm-910mm+opt 50mm (33 ⁷/8" -35 ⁷/8"+opt 1 ⁷/8") (opt +50 mm) (opt+1 15/16") 105(4m1m/8") (opt +2 23/64") (1 31/32") 57(02m2 7m/16") TECHNICAL FEATURES Load capacity Permissible water - Avanti DWF24V0W | Install Manual - Page 8
ENCLOSURE PREPARATION ELECTRICAL PREPARATION WARNING The dishwasher is designed for an electrical supply of 120 V, 60 Hz, AC, connected to a dishwasher- dedicated, properly grounded electrical circuit with a fuse or breaker rated for 15 amperes. PREPARATION FOR INSTALLING MOUNTING BRACKETS The - Avanti DWF24V0W | Install Manual - Page 9
arrows will take the dishwasher feet down. (c):Rear foot level adjusting point If the height of the enclosure s 33 7/8 "to 35 7/8" (860mm-910mm) use short supports as shown in the figure. opt.(+50) H= 35 7/8" - 37 3/4" (910mm-960mm) If the height of the enclosure s above 35 7/8 "(910mm) use long - Avanti DWF24V0W | Install Manual - Page 10
WATER SUPPLY CONNECTION Water supply may be connected to the dishwasher in one of two ways: - With metal braided hose. - With copper tubing BRAIDED HOSE/COPPER TUBING After connections are made turn on the water supply to check for leaks. Hot water supply line: Use minimum 3/4" O.D. copper tubing or - Avanti DWF24V0W | Install Manual - Page 11
STEAM PROTECTION FOIL Steam will be released when the dishwasher door is opened during the operation of the dishwasher and after completion of the working cycle. In order to prevent the resulting steam from collecting and damaging at the underside of the counter top, use a steam protection foil - Avanti DWF24V0W | Install Manual - Page 12
to connect all hoses and electrical connections according to UL 749 CLAUSE 8.3.3 The installation instructions provided with a cord-connected undercounter appliance shall include the following instructions or equivalent information: a) The power-supply receptacle for the appliance shall be installed - Avanti DWF24V0W | Install Manual - Page 13
the hole. 7. Take caution not the damage the drain hose when installing the dishwasher on the floor, wall, or cabinet. To prevent leaks or drainage problems, make sure the drain hose is not damaged, kinked, or twisted. 8. Do not cut the wrinkled area of the drain hose to fit the size - Avanti DWF24V0W | Install Manual - Page 14
Use hose clamp that shown at the Figure 4. for drain hose assembly to the sink. D E 14 - Avanti DWF24V0W | Install Manual - Page 15
can be adjusted to the height and depth needed for your kitchen. 1. p t A. If the height is 33 7/8" to 35 7/8"(860mm-910mm) and use short supports; adjustable plinth metal with 80 mm length (v), toe kick brackets(o) are installed. Mounting is done using Screws Ø 5/32" x 7/32" (Ø 4mm x 6mm) with - Avanti DWF24V0W | Install Manual - Page 16
sure that the drain/hopper plug has been removed. FINAL INSTRUCTIONS 1. Press the On/Off button to turn the dishwasher on your dealer to schedule an authorized service agent to inspect your new dishwasher and keep it with this manual and register your dishwasher. Notice : If the dishwasher does not - Avanti DWF24V0W | Install Manual - Page 17
INTRODUCCIÓN Cuando use el lavaplatos, siga cuidadosamente las precauciones de estas instrucciones, especialmente las instrucciones de seguridad. Estos se proporcionan para ahorrarle tiempo y esfuerzo y ayudar a garantizar un rendimiento óptimo del lavaplatos. Asegúrese de observar todas las - Avanti DWF24V0W | Install Manual - Page 18
á dañado, no funciona bien, está parcialmente desmontado o si le faltan piezas o están rotas. • Siga también las instrucciones de seguridad del manual del usuario. • Para reducir el riesgo de descarga eléctrica, incendio o lesiones a las personas, el instalador debe asegurarse de que el lavaplatos - Avanti DWF24V0W | Install Manual - Page 19
• Retire la puerta del compartimiento de lavado cuando retire de servicio un lavaplatos viejo o lo deseche. Asegúrese de que el aparato no presente ningún peligro para los niños mientras se almacena para su eliminación. • Los electrodomésticos viejos pueden contener materiales que pueden reciclarse. - Avanti DWF24V0W | Install Manual - Page 20
HERRAMIENTAS QUE PUEDEN SER NECESARIAS MATERIALES QUE PUEDEN SER NECESARIOS (Es posible que se requieran materiales adicionales para cumplir con los códigos locales) Línea de suministro de agua caliente: tubería de cobre con un diámetro exterior mínimo de 3/4" o línea de suministro de lavaplatos con - Avanti DWF24V0W | Install Manual - Page 21
ástico. Compruebe que todas las piezas siguientes estén contenidas en bolsas de plástico. BOLSA MANUAL El lavaplatos viene con una bolsa de manual que contiene: Manual de usuario y manual de instalación, BOLSA DE REPUESTOS PARA LAVAPLATOS 1 Esta bolsa para lavaplatos viene con las siguientes partes - Avanti DWF24V0W | Install Manual - Page 22
ESPECIFICACIONES DEL LAVAPLATOS (253998/1m6m") 57(202m7m/16") (263005/m8"m) 860mm-910mm (33 ⁷/8" -35 ⁷/8") 860mm-910mm+opt 50mm (33 ⁷/8" -35 ⁷/8"+opt 1 ⁷/8") (opt +50 mm) (opt+1 15/16") 105(4m1m/8") (opt +2 23/64") (1 31/32") 57(02m2 7m/16") CARACTERÍSTICAS TÉCNICAS Capacidad de carga 12 - Avanti DWF24V0W | Install Manual - Page 23
PREPARACIÓN DEL CUBIERTO PREPARACION ELECTRICA ADVERTENCIA El lavaplatos está diseñado para un suministro eléctrico de 120 V, 60 Hz, CA, conectado a un circuito eléctrico dedicado al lavaplatos y debidamente conectado a tierra con un fusible o disyuntor de 15 amperios. PREPARACIÓN PARA INSTALAR - Avanti DWF24V0W | Install Manual - Page 24
AJUSTE DE ALTURA Primer paso: Antes de colocar el lavaplatos en el gabinete, las patas delanteras se cierran hasta el final y el lavaplatos se coloca en el gabinete. Segundo paso: Ajuste el nivel del antepié con un destornillador plano para estabilizar el lavaplatos y levántelo a la altura del - Avanti DWF24V0W | Install Manual - Page 25
Línea de suministro de agua caliente: Utilice una tubería de cobre de un diámetro exterior mínimo de 3/4 "o una línea de suministro de lavaplatos de metal trenzado. •"La válvula de entrada de agua del lavaplatos tiene una dimensión de rosca de acoplamiento de entrada de 3/4" -11.5NH de acuerdo con - Avanti DWF24V0W | Install Manual - Page 26
LÁMINA DE PROTECCIÓN CONTRA VAPOR Se liberará vapor cuando se abra la puerta del lavaplatos durante el funcionamiento del lavaplatos y después de completar el ciclo de trabajo. Para evitar que el vapor resultante se acumule y dañe en la parte inferior de la encimera, use una lámina protectora contra - Avanti DWF24V0W | Install Manual - Page 27
COLOCACIÓN DEL LAVAPLATOS EN LA APERTURA Ahora coloque el lavaplatos en la abertura y prepárese para conectar todas las mangueras y conexiones eléctricas de acuerdo con UL 749 CLAUSULA 8.3.3 Las instrucciones de instalación provistas con un electrodoméstico debajo del mostrador conectado con cable - Avanti DWF24V0W | Install Manual - Page 28
Basurero Con un espacio de aire Entrehierro Sin espacio de aire Manguera de drenaje Abrazadera de la manguera B. Con eliminación Abrazadera de la manguera Verifique el tamaño del conector de la manguera de drenaje del fregadero. Si es necesario, corte la manguera de drenaje de modo que su - Avanti DWF24V0W | Install Manual - Page 29
1 in. ¾ in. 5/8 in. (25 mm) (19 mm) (16 mm) Si es necesario, corte la línea de puntos de la manguera de drenaje para que se ajuste al tamaño. . C Use la abrazadera de manguera que se muestra en la Figura 4. para el ensamblaje de la manguera de drenaje al fregadero. D E 29 - Avanti DWF24V0W | Install Manual - Page 30
AJUSTE DE LA PATADA MÓVIL (SEGÚN EL MODELO) Ahora que ha instalado correctamente el lavaplatos, debe colocar la punta del pie en el lavaplatos. La patada de dos piezas se puede ajustar a la altura y profundidad necesar io para su cocina. o 4. p t 1. El número de zócalos ajustable se determina de - Avanti DWF24V0W | Install Manual - Page 31
el lado derecho de la puerta interior de su lavaplatos, como se muestra arriba. Aviso : Haga una copia de su factura y consérvela con este manual y registre su lavaplatos. Aviso : Si el lavaplatos no funciona correctamente, consulte las sugerencias de autoayuda. 31 - Avanti DWF24V0W | Install Manual - Page 32
évitée, peut entraîner des dommages au lave-vaisselle, à la vaisselle, à l'équipement ou à l'environnement. IMPORTANT CONSIGNES DE SÉCURITÉ En plus de ces instructions, le lave-vaisselle doit être installé: * Conformément à tous les codes locaux ou, en l'absence de code local, * Aux États-Unis, avec - Avanti DWF24V0W | Install Manual - Page 33
par un représentant de service autorisé. (Si nécessaire, contactez votre revendeur pour programmer un agent de service agréé pour une conversation Le lave-vaisselle doit être fixé aux armoires adjacentes à l'aide des supports fournis. Le non-respect de cette consigne peut entraîner des dommages mat - Avanti DWF24V0W | Install Manual - Page 34
• Retirez la porte du compartiment de lavage lors de la mise hors service d'un ancien lave-vaisselle ou de sa mise au rebut. Assurez-vous que l'appareil ne présente aucun danger pour les enfants lors de son - Avanti DWF24V0W | Install Manual - Page 35
OUTILS POUVANT ÊTRE NÉCESSAIRES MATÉRIAUX QUI PEUVENT ÊTRE NÉCESSAIRES (Des matériaux supplémentaires peuvent être nécessaires pour se conformer aux codes locaux) Conduite d'alimentation en eau chaude - Tubes en cuivre de diamètre extérieur minimum de 3/4 po ou canalisation d'alimentation tressée en - Avanti DWF24V0W | Install Manual - Page 36
en bois h. Couvercles de trous SAC DE PIÈCES POUR LAVE-VAISSELLE 3 j. Vis Ø 5/32 "x 53/32" (Ø 4mm x 42,5mm) q. Vis Ø 5/32 "x 19/32" (Ø 4mm x 15mm) r. Support de montage gauche s. Support de montage droit n.Vis Ø 5/32 "x 27/32" (Ø 4mm x 21,5mm) SAC DE PIÈCES POUR LAVE-VAISSELLE 4 (MODÈLE SELON - Avanti DWF24V0W | Install Manual - Page 37
SPÉCIFICATIONS DU LAVE-VAISSELLE (253998/1m6m") 57(202m7m/16") (263005/m8"m) 860mm-910mm (33 ⁷/8" -35 ⁷/8") 860mm-910mm+opt 50mm (33 ⁷/8" -35 ⁷/8"+opt 1 ⁷/8") (opt +50 mm) (opt+1 15/16") 105(4m1m/8") (opt +2 23/64") (1 31/32") 57(02m2 7m/16") CARACTÉRISTIQUES TECHNIQUES Capacité de - Avanti DWF24V0W | Install Manual - Page 38
montage dans le sac en plastique doivent être utilisés lorsque le lave-vaisselle est installé dans les armoires. L'utilisation de pièces autres que les supports de montage peut entraîner des dommages matériels ou corporels. Si le matériau du panneau de comptoir est en bois, etc. Si le - Avanti DWF24V0W | Install Manual - Page 39
du boîtier. (c): Reglez de pied arrière Si la hauteur de l'enceinte est comprise entre 33 7/8 "et 35 7/8" (860 mm-910 mm), utilisez des supports courts comme indiqué sur la figure. opt.(+50) H= 35 7/8" - 37 3/4" (910mm-960mm) Si la hauteur du boîtier est supérieure à 35 7/8" (910mm), utilisez de - Avanti DWF24V0W | Install Manual - Page 40
APPROVISIONNEMENT EN EAU LIEN L'alimentation en eau peut être raccordée au lave-vaisselle de deux manières: - Avec tuyau tressé en métal. - Avec tube en cuivre TUYAU TRESSÉ / TUYAU EN CUIVRE Une fois les connexions effectuées, ouvrez l'alimentation en eau pour vérifier les fuites. Conduite d' - Avanti DWF24V0W | Install Manual - Page 41
FEUILLE DE PROTECTION VAPEUR De la vapeur sera libérée lorsque la porte du lave-vaisselle est ouverte pendant le fonctionnement du lave-vaisselle et après la fin du cycle de travail. Afin d'éviter que la vapeur résultante ne s'accumule et ne s'abîme sous le plan de travail, utilisez une feuille de - Avanti DWF24V0W | Install Manual - Page 42
PLACEMENT DU LAVE-VAISSELLE DANS L'OUVERTURE Maintenant, placez le lave-vaisselle dans l'ouverture et préparez-vous à connecter tous les tuyaux et les connexions électriques conformément à la CLAUSE 8.3.3 de la norme UL 749. a) La prise d'alimentation électrique de l'appareil doit être installée - Avanti DWF24V0W | Install Manual - Page 43
Élimination des ordures Avec un entrefer Trou d'air Sans entrefer Tuyau de drainage Collier de serrage Avec élimination Collier de serrage Vérifiez la taille du connecteur du tuyau de vidange de l'évier. Si nécessaire, coupez le tuyau de vidange pour que son extrémité s'adapte au connecteur de - Avanti DWF24V0W | Install Manual - Page 44
1 in. ¾ in. 5/8 in. (25 mm) (19 mm) (16 mm) Si nécessaire, coupez la ligne en pointillé du tuyau de vidange pour l'adapter à la taille. C Utilisez le collier de serrage illustré à la figure 4. pour l'assemblage du tuyau de vidange vers l'évier. D E 44 - Avanti DWF24V0W | Install Manual - Page 45
880x2 890x3 900x4 910x5/6 s 860 870x1 880x2 890x3 900x4 910x5/6 s 3. En fonction de la profondeur désirée, le verrouillage du socle (y) est fixé au support de pied de pied (o). 4. Afin de placer le socle dans la machine, les bords libres doivent être fermement pressés l'un vers l'autre. 5. Enfin - Avanti DWF24V0W | Install Manual - Page 46
, assurez-vous que le bouchon de vidange / trémie a été retiré. INSTRUCTIONS FINALES 1. Appuyez sur le bouton Marche / Arrêt pour mettre le lave-vaisselle étapes: Contactez votre revendeur pour demander à un agent de service agréé d'inspecter votre nouveau lave-vaisselle pour toute défaillance li - Avanti DWF24V0W | Install Manual - Page 47
Remarquer : Veuillez faire une copie de votre facture et la conserver avec ce manuel et enregistrer votre lavevaisselle. Remarquer : Si le lave-vaisselle ne fonctionne pas correctement, reportezvous aux conseils d'auto-assistance. 47 - Avanti DWF24V0W | Install Manual - Page 48
48
-
 1
1 -
 2
2 -
 3
3 -
 4
4 -
 5
5 -
 6
6 -
 7
7 -
8
-
9
-
10
-
11
-
12
-
13
-
14
-
15
-
16
-
17
-
18
-
19
-
20
-
21
-
22
-
23
-
24
-
25
-
26
-
27
-
28
-
29
-
30
-
31
-
32
-
33
-
34
-
35
-
36
-
37
-
38
-
39
-
40
-
41
-
42
-
43
-
44
-
45
-
46
-
47
-
48
 |
 |
1
DISHWASHER / LAVAPLATOS / LAVE-VAISSELLE
INSTALLATION MANUAL / MANUAL DE INSTALACION MANUEL D’INSTALLATION
BEFORE USE, PLEASE READ AND FOLLOW ALL SAFETY RULES
AND OPERATING INSTRUCTIONS.
Avanti has a policy of continuous improvement on its products and reserves the right to change
materials and specifications without notice.
Avanti Products LLC
P.O. Box 520604 - Miami, Florida 33152
www.avantiproducts.com
Telephone: 1-800-220-5570
DWF24V0W
DWF24V1B
DWF24V3S
Model Number
Número de modelo
Numéro de modèle