Axis Communications 214 PTZ 214 PTZ - Installation Guide - Page 4
AXIS 214 Installation Guide, far as it will go. - camera
 |
View all Axis Communications 214 PTZ manuals
Add to My Manuals
Save this manual to your list of manuals |
Page 4 highlights
Page 4 2. Attach the second bracket (B) to the base of the camera, using 3 of the supplied screws. The retaining wire should be attached to screw 3. 3. Tighten the screws a little at a time in the numbered order shown here, until all are securely fastened. 4. Insert the hooks on bracket (B) into the slots on bracket (A) and push bracket (B) back as far as it will go. Ceiling bracket (A) AXIS 214 Installation Guide Retaining wire Ceiling bracket (B) 5. Push up on the front of the camera and fasten it using the supplied screws, starting at the front. 6. Connect the power and network cables to the sockets on the rear panel. Ceiling bracket (B)
-
 1
1 -
 2
2 -
 3
3 -
 4
4 -
 5
5 -
 6
6 -
 7
7 -
 8
8 -
 9
9 -
 10
10 -
11
-
12
-
13
-
14
-
15
-
16
-
17
-
18
-
19
-
20
-
21
-
22
-
23
-
24
-
25
-
26
-
27
-
28
-
29
-
30
-
31
-
32
-
33
-
34
-
35
-
36
-
37
-
38
-
39
-
40
-
41
-
42
-
43
-
44
 |
 |

Page 4
AXIS 214 Installation Guide
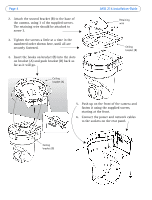
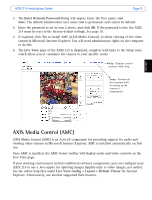
2.
Attach the second bracket (B) to the base of
the camera, using 3 of the supplied screws.
The retaining wire should be attached to
screw 3.
3.
Tighten the screws a little at a time in the
numbered order shown here, until all are
securely fastened.
4.
Insert the hooks on bracket (B) into the slots
on bracket (A) and push bracket (B) back as
far as it will go.
Ceiling
bracket (B)
5.
Push up on the front of the camera and
fasten it using the supplied screws,
starting at the front.
6.
Connect the power and network cables
to the sockets on the rear panel.
Ceiling
bracket (A)
Ceiling
bracket (B)
Retaining
wire