Axis Communications 240Q 240Q Blade - Installation Guide - Page 7
Connecting the video server to the rack, AXIS 240Q Video Server User°s Manual
 |
View all Axis Communications 240Q manuals
Add to My Manuals
Save this manual to your list of manuals |
Page 7 highlights
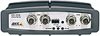
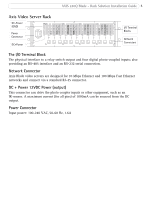
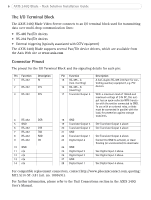
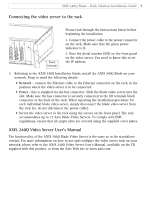
AXIS 240Q Blade - Rack Solution Installation Guide 7 Connecting the video server to the rack Power Indicator Please read through the instructions below before beginning the installation. 1. Connect the power cable to the power connector on the rack. Make sure that the green power indicator is lit. 2. Note the Serial number (S/N) on the front panel on the video server. You need to know this to set the IP address. 3. Referring to the AXIS 240Q Installation Guide, install the AXIS 240Q Blade on your network. Keep in mind the following details: • Network - connect the Ethernet cable to the Ethernet connector on the rack, in the position where the video server is to be connected. • Power - this is supplied via the bus connector. Slide the blade video server into the slot. Make sure the bus connector is securely connected to the I/O terminal block connector at the back of the rack. When repeating the installation procedure for each individual blade video server, simply disconnect the blade video server from the rack (i.e. do not disconnect the power cable). • Secure the video server to the rack using the screws on the front panel. The rack accommodates up to 12 Axis Blade Video Servers. To comply with EMC regulations, ensure that all empty slots are covered using the supplied cover plates. AXIS 240Q Video Server User's Manual The functionality of the AXIS 240Q Blade Video Server is the same as in the standalone version. For more information on how to use and configure the video server rack on your network, please refer to the AXIS 240Q Video Server User's Manual, available on the CD supplied with this product, or from the Axis Web site at www.axis.com
-
 1
1 -
 2
2 -
 3
3 -
 4
4 -
 5
5 -
 6
6 -
 7
7 -
 8
8
 |
 |
