Behringer DEEPMIND 12 Quick Start Guide - Page 7
Step 2: Controls
 |
View all Behringer DEEPMIND 12 manuals
Add to My Manuals
Save this manual to your list of manuals |
Page 7 highlights
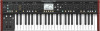
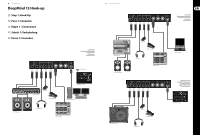
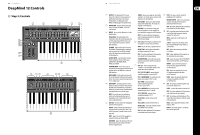
12 DeepMind 12 DeepMind 12 Controls (EN) Step 2: Controls (22) (21) (23) (24) (25) (26) (27) (28) (29) (30) 13 Quick Start Guide (12) ENVELOPE - these are the three envelopes Rear Panel (29) MIDI THRU - this 5-pin DIN jack is used to used to modulate other parameters. A [ATTACK]- controls the attack time of the envelope. (21) POWER INPUT - connect using the supplied power cable only. (22) POWER SWITCH - use this to turn the pass through MIDI data received at the MIDI INPUT. This will commonly be sent to another synthesizer or drum machine assigned to a different DEVICE ID, or MIDI Channel. D [DECAY] - controls the decay time of the envelope. synthesizer on and off. Only turn it on after all connections have been made. (30) USB PORT - this USB type B jack allows connection to a computer. The DeepMind 12 S [SUSTAIN] - controls the sustain level of (23) OUTPUT L / R - this is the main output of the will show up as a class-compliant USB MIDI the envelope. synthesizer. It should be connected to your device, capable of supporting MIDI in and R [RELEASE] - controls the release time of the envelope. audio interface or sound system. Remember to turn your monitors / loudspeakers on last when turning on your system and turn out. The DeepMind 12 does not require any additional drivers to work with Windows, Android, MacOS and iOS devices. VCA - selects the envelope used to control the voltage controlled amplifier. your monitors / loudspeakers off first when turning your system off. USB MIDI IN - accepts incoming MIDI data from an application. VCF - selects the envelope used to control the voltage controlled filter. MOD - selects the envelope used for user specific modulation. (24) PHONES - the headphones output of the synthesizer follows the main output. Connect your headphones here. Ensure the volume control is at minimum when putting on headphones or when turning the synthesizer USB MIDI OUT - sends MIDI data to an application. CURVES - changes the ADSR controls to on or off. affect the associated curves for each stage of the envelope. (25) SUSTAIN - this ¼" TS jack allows you to connect a sustain pedal, such as a normally- (13) VOICES - these LEDs show which voices are open switch. active as keys are played. The operation of this pedal can be (14) OCTAVE - these LEDs show the octave shift applied to the keyboard. customized using the GLOBAL / PEDAL SETTINGS menu. (15) PORTAMENTO - changes the slide time between played notes. (26) PEDAL/CV - this ¼" TRS jack allows you to connect an expression pedal. The operation of this pedal can be customized using the (16) VOLUME - controls the output level of GLOBAL / PEDAL SETTINGS menu. the synthesizer. (27) MIDI IN - this 5-pin DIN jack receives (17) OCTAVE UP/DOWN - raise or lower the MIDI data from an external source. This keyboard's pitch range in steps of an octave. will commonly be an external hardware (18) PITCH BEND WHEEL - this spring loaded wheel allows you to lower / raise the sequencer, a computer equipped with a MIDI interface, etc. pitch expressively. (28) MIDI OUT - this 5-pin DIN jack sends (19) MOD WHEEL - used for expressive modulation of parameters. MIDI data to an external source. This will commonly be an external hardware sequencer, a computer equipped with a MIDI (20) KEYS - 49 semi-weighted full-size keys interface, etc. featuring expressive velocity and after-touch.
-
 1
1 -
 2
2 -
 3
3 -
 4
4 -
 5
5 -
 6
6 -
 7
7 -
 8
8 -
 9
9 -
 10
10 -
 11
11 -
 12
12 -
13
-
14
-
15
-
16
-
17
 |
 |
