Behringer DIGITAL MIXER X32 User Manual - Page 5
Operational Overview, View buttons rule, Customizing the X32 through the Utilities
 |
View all Behringer DIGITAL MIXER X32 manuals
Add to My Manuals
Save this manual to your list of manuals |
Page 5 highlights
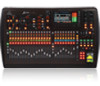
5 X32 DIGITAL MIXER Preliminary User Manual 1. Operational Overview (1) VIEW VIEW VIEW VIEW VIEW VIEW VIEW (3) -6 10 10 10 5 5 5 0 0 0 -5 -5 -5 -10 -10 -10 -20 -20 -20 - 30 - 30 - 30 - 40 - 40 - 40 - 50 - 50 - 50 - 60 - 60 - 60 - 00 - 00 - 00 VIEW VIEW VIEW VIEW (2) (4) (5) Mixer Operational Overview This chapter will give you an overview of the basic operations of the mixer, allowing you to get up and running quickly. While reading through the information, we encourage you to experiment with the console's different screens and controls. The console's user interface was designed to be extremely to navigate through and learn. More specific details about various functions can be referenced later in the manual. General user interface operation The X32 user interface is divided into five major sections: (1) Channel Strip (2) Input Channels (3) Display and Monitoring (4) Group/Bus/Main Channels (5) Scenes/Assign/Mute Groups View buttons rule Throughout the top panel of the console, you will find small buttons labeled View. Press these buttons to immediately switch the console's large color display (known as the Main Display) to show information related to the section whose View button you have just pressed. For example, if you are editing the equalizer and feel like seeing a large display of the EQ frequency response curve or corresponding EQ parameter value, simply press the adjacent View button in the EQ section. If you need to check where the talkback signal is being routed, simply press the View button next to the Talk button and the main display will show the details. With the View button approach of the X32 console, there is almost never a need to drill down through multiple menu pages, since the View buttons will always take you directly to the relevant screen. Tip: The Setup/Global tab on the main display allows preferences for the behavior of View and Select buttons to be adjusted. Customizing the X32 through the Utilities page Press the Utility button, located to the right of the main display, to bring up useful functions in a "context-sensitive" manner. For example: • When you are adjusting the equalizer of a console channel, pressing the Utility button will offer copying, pasting, loading or saving of equalizer settings • Pressing the Utility button while editing a channel's Preamp/Configuration screen will present a naming screen where you can customize the channel's appearance on both the main display as well as the small channel display • On the Routing pages, pressing the Utility button will offer loading or saving different presets of routing scenarios • In the Scenes menu, pressing the Utility button offers copying, loading, saving or naming console scenes Sometimes there is more to say Dir 05 Dir 06 12 Key In Source Select Some of the individual pages on the main display contain more adjustable parameters than can be controlled by the 6 rotary push encoders located beneath it. In these cases there is a small page number indication, e.g. "1/2". Simply press the Layer Up/Down buttons to switch between layers.
-
 1
1 -
 2
2 -
 3
3 -
 4
4 -
 5
5 -
 6
6 -
 7
7 -
 8
8 -
 9
9 -
 10
10 -
 11
11 -
12
-
13
-
14
-
15
-
16
-
17
-
18
-
19
-
20
-
21
-
22
-
23
-
24
-
25
-
26
-
27
-
28
-
29
-
30
-
31
-
32
-
33
-
34
-
35
-
36
-
37
-
38
-
39
-
40
-
41
-
42
-
43
-
44
-
45
-
46
-
47
-
48
-
49
-
50
-
51
-
52
-
53
-
54
-
55
-
56
-
57
-
58
-
59
-
60
-
61
-
62
-
63
-
64
-
65
-
66
-
67
-
68
-
69
-
70
-
71
-
72
-
73
-
74
-
75
 |
 |
