Behringer DIGITAL RACK MIXER X32 RACK User Manual - Page 29
Using Mute Groups, 5.9 Mix Buses, Sub Groups and DCA Groups, 5.10 User Assignable control
 |
View all Behringer DIGITAL RACK MIXER X32 RACK manuals
Add to My Manuals
Save this manual to your list of manuals |
Page 29 highlights
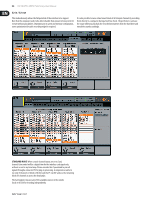
29 X32 DIGITAL MIXER Preliminary User Manual 5.8 Using Mute Groups The X32 has 6 separate "mute groups". Individual channels can be assigned to these mute groups, allowing you to mute multiple channels with a single button push. as desired in the FOH mix by adjusting DCA fader 1. However, if you then notice that background vocalist #3 is a little too soft in the "blend" of background vocals, you can adjust the level fader on their specific channel. To create a DCA group on the X32 console: This is particularly useful in theater contexts, where groups of microphones (such as the ones belonging to a group of background performers) may need to be muted and unmuted often. By assigning them to a mute group, you can quickly mute/unmute a large group of channels, which is much faster than muting/unmuting each channel one by one. 1. Press the MUTE GRP button. 2. While holding the desired Group button (located on top panel's lower right-hand corner), press the SELECT keys for any channels you wish to assign to that mute group. 3. When you are done assigning channels to the mute group, press the MUTE GRP button next to the display again. The channel SELECT buttons will now work normally again. 4. Press the corresponding mute group button, on the console top panel to mute that specific mute group and all channels belonging to it. 1. Press the GROUP DCA 1-8 button on the output fader layer. 2. Hold the respective DCA Group Select button on the right-hand side of the console. 3. While still holding down the DCA Group Select button, press the SELECT buttons for all the input channels, aux channels, fx return channels, and bus masters that you wish to assign to said DCA Group. Those channels are now assigned to the DCA group. 4. You can also press the DCA Group Select button in order to check which channels are already assigned to it; the assigned channel SELECT buttons will light up. 5. To adjust the level of a DCA group, simply adjust its respective fader. DCA groups can also have custom names, colors, and icons assigned to them to help you remember what groups of signals are assigned to each of the 8 DCA groups. 5.9 Mix Buses, Sub Groups and DCA Groups 1. Press the SETUP button, then page right to the DCA GROUPS page. On a live sound console such as the X32, channels can be combined into a single 2. Adjust the first encoder to select the DCA group you wish to customize, output channel in two ways. then press the encoder to edit. A "Bus" is a combined collection of channel signals where each channel feeding the bus can be done so with a variable level. One typical use of a bus would be an effects loop (where for example, different channels feeding the bus and the reverb effect associated with it, do so at different levels, so that a snare drum has a small amount of reverb applied while a lead vocal has a large amount of reverb). Another use of a bus would be to feed a stage monitor. By feeding the monitor mix with a bus, different channels can feed the monitor bus at differing levels, allowing creation of a custom monitor mix that is "just right" for the talent on stage. A "Group" is similar to a Bus, except that all channels feeding the group do so at a "unity gain" level, with their respective levels the same as their levels feeding the main mix bus. Thus, a group is best used to control the levels of a group of signals using a single fader, such as controlling the level of an entire group of drum microphones. To quickly divide up which of the 16 mix buses are configured as regular buses, and which are configured as groups, press the SETUP button and page right to the CONFIG page. Adjust the fifth encoder to select between different combinations of buses and groups for the 16 mix outputs of the console. This setting can later be changed individually for each of the 16 mix buses either on the SETUP page of the corresponding mix bus or individually per channel on the SEND page of the selected channel. You can feed the signal of any mix bus either directly to the main bus or back to any input channel if you want to apply loop type effects or send to a monitor mix. All mix buses are available as SOURCE on a channel's CONFIG page. Lastly, the X32 offers a "DCA Group". This is similar to a normal group, except that the signals of the underlying channels are not actually combined into a single audio path. Instead, channels are assigned to a DCA group (short for "Digitally Controlled Amplifier" ) and when a single fader representing the DCA group is moved, it has the effect of adjusting the level of all the underlying channels assigned to that DCA group. DCA groups are useful in situations where you have a collection of similar signals, and you want to be able to quickly adjust their overall level, but also easily adjust the individual levels of the individual channels assigned to the DCA group. For example, say you have a concert that employs 4 separate background vocalists. By assigning them all to DCA group 1, you can adjust their overall level 3. On the editing pop-up window that appears, use the various encoders to select a color, icon, and preset or custom name for the selected DCA. 4. Press the sixth encoder to exit the editing screen. By contrast, conventional "groups" are useful when you have a group of signals that you wish to combine into a single signal, perhaps to send that combined signal to a single effect processor. For example, a common method for making drums sound punchy and aggressive in a rock and roll mix would be to combine all of the drum channels to a single stereo group, then process that group signal through a compressor, and then finally bring the mono or stereo compressed drum group back into the mix. This approach would not be possible with a DCA group, because the DCA is not actually combining the audio signals, it is merely linking the levels of all of the underlying channels digitally. 5.10 User Assignable control section The X32's assignable controls section lets you take the adjustments you make most often, and assign them to a group of dedicated controls that are assigned to just those functions, and nothing else. The assignable controls offer 8 buttons and 4 knobs, with dedicated LCD screens to remind you of the currently assigned function. For example, you could program one of the knobs to control the aux send on the vocal channel feeding an internal reverb effect. Then, if you ever want to make the vocalist sound more "wet" or "dry" during different songs in a set, you can simply reach for that knob and it will always provide a quick and convenient place to make that adjustment. Additionally, the assignable controls are divided into "A", "B", and "C" groups, so you can actually program in 3 different sets of controls, offering a total of 36 different functions. Setting up the assignable controls is easy: 1. Press the "view" button in the assignable controls section. The main screen will switch to a view that lets you make assignments for the custom controls. 2. The main screen will show assignments for all 3 sets of custom controls (A, B, and C) on one page. Rotate any of the first five encoders to move the orange "focus" box to the specific set of custom controls you wish to assign.
-
 1
1 -
2
-
3
-
4
-
5
-
6
-
7
-
8
-
9
-
10
-
11
-
12
-
13
-
14
-
15
-
16
-
17
-
18
-
19
-
20
-
21
-
22
-
23
-
 24
24 -
 25
25 -
 26
26 -
 27
27 -
 28
28 -
 29
29 -
 30
30 -
 31
31 -
 32
32 -
 33
33 -
 34
34 -
35
-
36
-
37
-
38
-
39
-
40
-
41
-
42
-
43
-
44
-
45
-
46
-
47
-
48
-
49
-
50
-
51
-
52
-
53
-
54
-
55
-
56
-
57
-
58
-
59
-
60
-
61
-
62
-
63
-
64
-
65
-
66
-
67
-
68
-
69
-
70
 |
 |
