Behringer FLOW 8 Quick Start Guide - Page 7
Step 2: Controls - app
 |
View all Behringer FLOW 8 manuals
Add to My Manuals
Save this manual to your list of manuals |
Page 7 highlights
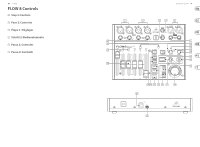
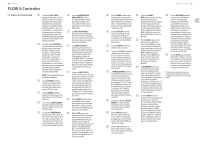
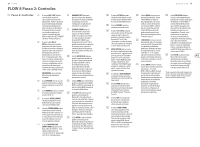
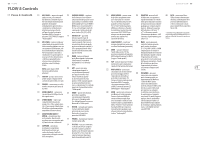
12 FLOW 8 FLOW 8 Controls (EN) Step 2: Controls (1) MIC 1/MIC 2 inputs accept audio signals over cables using balanced XLR connectors. Both XLR jacks feature individuallyselectable phantom power for condenser mics. Phantom power can be activated in the control app or via the MAIN button and SELECT/ADJUST push encoder (see "Getting Started"). (9) CHANNEL FADERS set mix levels for their respective channels. These faders can also be used to control the send levels to the MON 1/MON 2 output jacks or the FX 1/FX 2 internal busses when selected in the controlapp or by pressing the menu layer's related hardware button (see [16], [21] and [22]). (2) MIC 3/MIC 4 combo jacks accept audio signals from line-level sources or dynamic microphones over cables with balanced XLR, balanced ¼" TRS or unbalanced ¼" TS connectors. To run condenser microphones with these inputs, you will need an external preamp or phantom power supply that provides +48 V of power, such as the Behringer PS400. NOTE: These inputs do NOT offer phantom power! (10) OFFSET/CLIP LEDs indicate when the input gain is clipping the channel headroom or when the hardware faders are in a different position than the fader level shown in the control app (the LEDs will switch off when the hardware faders are returned to the level shown in the control app). (11) MENU button push opens Menu Mode when the MAIN, MON 1 or MON 2 menu layer is selected. Pressing the MENU button again will exit from Menu Mode. (3) FOOTSW jack connects to an (12) APP LED starts blinking when external single or dual Bluetooth* pairing is underway control footswitch using a ¼" for the control app. When pairing TRS connector. is successful, the LED lights (4) PHONES jack connects to headphones using a ¼" TRS stereo plug. consistently. When the Bluetooth connection fails or is deactivated, the LED will go off. See the Bluetooth instructions in (5) MAIN L/MAIN R connections send "Getting Started" for details. out the final stereo mix over cables (13) AUDIO LED lights up to indicate using balanced XLR connectors. when Bluetooth pairing is active (6) STEREO/MONO inputs can accept either stereo line-level signals (5/6 and 7/8 stereo pairs), or a for audio streaming. See the Bluetooth instructions in "Getting Started" for details. mono signal (5L and 7L for mono line-level sources, 6R and 8R for mono Hi-Z signals from guitars and basses.) (14) BT/USB knob sets volume for digital audio routed into the mixer via Bluetooth or the rear USB AUDIO connector. (7) MONITOR SEND (15) PHONES knob controls the (MON 1/MON 2) jacks provide two headphone volume. monitor outputs. These outputs accept cables with balanced (16) FX 1/FX 2 buttons switches ¼" TRS or unbalanced between the two FX engines for ¼" TS connectors. patch selection and parameter (8) HOLDING POSTS allow you to place your smartphone directly onto the mixer for easy viewing of levels and settings on the smartphone control app. adjustment. When the FX 1 or FX 2 menu buttons are selected, the channel faders are then used to set Send levels to the FX engines. (17) MENU SCREEN displays the names (24) MAIN knob controls the master of the currently-active effects for volume for the currently selected the two FX engines, and allows buss - FX 1, FX 2, MON 1, MON 2 or access to the FX preset list when MAIN. The final volume setting is the FX 1 or FX 2 button is pressed. indicated by the LED ring around Press the MENU button to open the knob. When adjusting the and close Menu Mode. Rotate the master volume setting of the SELECT/ADJUST push encoder to currently-selected bus from the navigate sub-menus and smartphone app, the LED ring then press to select specific will change to show the volume menu items. setting selected for that bus in (18) SELECT/ADJUST push encoder is the app. used to navigate menus (turn) and (25) USB AUDIO jack enables to enter/confirm (press). connection to a computer for (19) MUTE button switches off all audio from the FX section. A long press of the MUTE button activates the ALL MUTE function (see "Getting Started"). audio streaming, firmware updates and MIDI control. This USB connection also allows FLOW 8 to be used as multi-channel audio interface for recording to computer. (20) TAP button allows you to tap in a tempo for quick adjustment of time-based effects. (21) MON 1/MON 2 buttons select When used as a recording interface, 10 channels are transmitted to the computer (8 analog inputs, plus the main L/R bus mix tapped pre-fader), either of the monitor mixes and 2 stereo playback channels, for direct monitoring and level controllable via the BT/ USB setting in place of the main mix. channel, are streamed back to the To return to the main mix, FLOW 8 mixer. press the MAIN button. Press MON 1 and MON 2 simultaneously to active the EZ GAIN function (see "Getting Started"). (22) MAIN button selects the main (26) DC IN jack uses a Micro-USB connection to provide power to the unit. Power should come from either the included external power supply or a USB power bank with a Micro-USB connection. mix for the final output. Press the MAIN button to return to the main *The Bluetooth word mark and logos are mix after selecting and checking registered trademarks owned by Bluetooth SIG, monitor mixes with the MON 1 and Inc. and any use of such marks is under license. MON 2 buttons. Press and hold the MAIN button for manual gain setting and to activate phantom power (see "Getting Started"). (23) VU METER shows levels for the main mix, monitor mixes or FX send signals. In SOLO mode, this meter allows more detailed gain setting on individual input channels. The red LEDs "1" and "2" at the top of the meter will light up when +48 V phantom power is activated for Channels 1 and 2 respectively. Quick Start Guide 13
-
 1
1 -
 2
2 -
 3
3 -
 4
4 -
 5
5 -
 6
6 -
 7
7 -
 8
8 -
 9
9 -
 10
10 -
 11
11 -
 12
12 -
13
-
14
-
15
-
16
-
17
-
18
-
19
-
20
-
21
-
22
-
23
 |
 |