Behringer UB1222FX-PRO User Manual - Page 10
Caution
 |
View all Behringer UB1222FX-PRO manuals
Add to My Manuals
Save this manual to your list of manuals |
Page 10 highlights
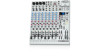
EURORACK UB1222FX-PRO Fig. 2.10: 2-track connectors CD/TAPE INPUT The CD/TAPE INPUT RCA connectors are provided for connecting a 2-track machine (e.g. DAT recorder) or also a CD player. They can also be used as stereo line input. Alternatively, the output signal of a second EURORACK or BEHRINGER ULTRALINK PRO MX882 can also be connected. If you connect a hi-fi amplifier with a source selection switch to the CD/TAPE INPUT, you can easily switch between additional sources (e.g. cassette recorder, MD player, sound card etc.). Using the voice canceller function, you can process all signals being brought into your mixing console via these connectors. CD/TAPE OUTPUT These connectors are wired pre graphic EQ and pre XPQ surround function. They carry the main mix signal (unbalanced), effects mix included. Connect the CD/TAPE OUTPUT to the inputs of your recording device. If you wish to use your mixer solely for recording purposes, the main outputs are also an alternative. 2.3.5 Main mix, main out connectors and headphone connector Live PA systems: A stereo dynamics processor (optional), stereo equalizer (optional) and the stereo power amplifier for full-range loudspeakers with passive crossovers. If you wish to use multi-way loudspeaker systems without an integrated crossover, you have to use an active crossover and several power amplifiers. Often, limiters are already built into active crossovers (e.g. BEHRINGER SUPER-X PRO CX2310 and ULTRADRIVE PRO DCX2496). Active crossovers are implemented directly before the power amplifier, and they divide the frequency range into several segments that are first amplified in the amplifiers and then passed onto the corresponding loudspeakers. Recording: For mastering, using a stereo compressor such as the COMPOSER PRO-XL MDX2600 can be recommended. Use it to custom-tailor the dynamic characteristics of your signal to the dynamic range of the recording equipment you are using. The signal is in this case passed on from the compressor into the recorder. PHONES The PHONES control adjusts the volume of the headphones connected to the PHONES/CTRL connector. If you connect active monitors or an amplifier, use this connector to adjust the output signal level. CAUTION! + We would like to draw your attention to the fact that extreme volumes may damage your hearing and/ or your headphones or loudspeakers. Turn the MAIN MIX faders and the PHONES control in the main section fully down before you switch on the unit. Always be careful to set the appropriate volume. Fig. 2.13: PHONES/CTRL connector PHONES/CTRL connector You can connect headphones to this 1/4" TRS connector. The connector can also be used for feeding active monitor loudspeakers (or an amplifier) in your control room. For this purpose, the signal is taken directly before it is passed on to the main mix faders. 2.3.6 Level meter and level setting Fig. 2.11: Main mix fader MAIN MIX Use the high-precision quality faders to control the output level of the main mix. Fig. 2.12: Main out connectors MAIN OUT The MAIN outputs carry the MAIN MIX signal and are on balanced XLR connectors with a nominal level of +4 dBu. Depending on how you wish to use your mixer and which gear you own, you can connect the following equipment: Fig. 2.14: Level meter POWER The blue POWER LED indicates that the device is switched on. +48 V The red “+48 V” LED lights up when the phantom power supply is switched on. The phantom power supply is necessary for condenser microphones and is activated using the corresponding switch on the rear of the device. 10 2. CONTROL ELEMENTS AND CONNECTORS
-
 1
1 -
2
-
3
-
4
-
 5
5 -
 6
6 -
 7
7 -
 8
8 -
 9
9 -
 10
10 -
 11
11 -
 12
12 -
 13
13 -
 14
14 -
 15
15
 |
 |
