Behringer ULTRALINK UL2000B Manual - Page 5
installation and operation, the user must be sufficiently grounded. Electrostatic charges
 |
View all Behringer ULTRALINK UL2000B manuals
Add to My Manuals
Save this manual to your list of manuals |
Page 5 highlights
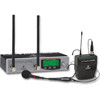
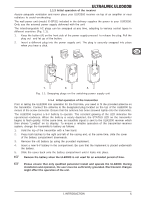
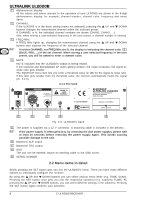
ULTRALINK UL2000B 1.1.3 Initial operation of the receiver Assure adequate ventilation and never place your ULR2000 receiver on top of an amplifier or near radiators to avoid overheating. The wall power unit (model: E-SPS1) included in the delivery supplies the power to your ULR2000. Only use the external power supply delivered with the unit! The interchangeable AC plugs can be swapped at any time, adapting to various socket types in different countries (Fig. 1.1). 1. Keep the button (A) on the front side of the power supply pressed to release the plug. Pull the plug out and let go of the button. 2. Insert a different plug into the power supply unit. The plug is securely snapped into place when you hear a click. Fig. 1.1: Swapping plugs on the switching power supply unit 1.1.4 Initial operation of the transmitter Prior to taking the ULB2000 into operation for the first time, you need to fit the provided antenna on the transmitter. Connect the antenna to the designated plug located on the top of the ULB2000 by means of the screw connector. Ensure that the antenna has been screwed tightly onto the transmitter. The ULB2000 requires a 9-V battery to operate. The constant glowing of the LED indicates the operational readiness. When the battery is nearly depleted, the STATUS LED on the transmitter begins to flash quickly. At the same time, an inaudible signal is sent to the ULR2000 receiver which then shows "LowBat" on its display. To ensure a reliable operation of the transmitter-receiver system, change the transmitter's battery as follows: 1. Hold the top of the transmitter with a free hand. 2. Press both latches to the right and left of the casing and, at the same time, slide the cover of the battery compartment downwards. 3. Remove the old battery by using the provided implement. 4. Insert a new 9-V battery in the compartment. Be sure that the implement is placed underneath the battery. 5. Slide the cover back onto the battery compartment until it locks into place. Remove the battery when the ULB2000 is not used for an extended period of time. Please ensure that only qualified personnel install and operate the ULB2000. During installation and operation, the user must be sufficiently grounded. Electrostatic charges might affect the operation of the unit. 1. INTRODUCTION 5
-
 1
1 -
 2
2 -
 3
3 -
 4
4 -
 5
5 -
 6
6 -
 7
7 -
 8
8 -
 9
9 -
 10
10 -
 11
11 -
12
-
13
-
14
-
15
-
16
-
17
-
18
-
19
-
20
-
21
-
22
-
23
-
24
-
25
-
26
 |
 |
