Behringer ULTRALINK UL2000B Manual - Page 8
Menu items in detail
 |
View all Behringer ULTRALINK UL2000B manuals
Add to My Manuals
Save this manual to your list of manuals |
Page 8 highlights
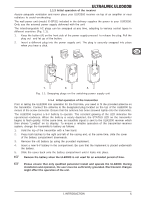
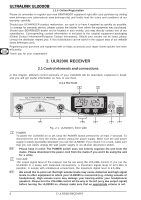
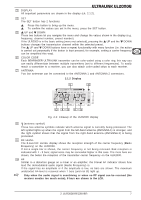
ULTRALINK UL2000B Alphanumeric display All the values and letters relevant to the operation of your ULR2000 are shown in the 6-digit alphanumeric display: for example, channel number, channel color, frequency and menu items. CHANNEL If the ULR2000 is in the basic setting (menu not selected), pressing the UP and DOWN buttons changes the transmission channel within the selected preset. If CHANNEL is lit, the individual channel numbers are shown (CHAN1, CHAN2, ...). Also, when storing a user-selected frequency in the user preset, a channel number is entered. FREQ MHz If FREQ MHz lights up, changing the transmission channel using the buttons also displays the frequency of the selected channel. UP and DOWN If neither CHANNEL nor FREQ MHz are lit, the display is indicating the channel color (BLUE, RED, ...) of the set channel. When storing a user-selected frequency in the user preset, you will be asked to enter a channel color. MUTE MUTE indicates that the ULR2000's output is being muted. If the received and demodulated AF starts getting weaker, the noise increases; the signal-tonoise ratio gets smaller. The SQUELCH menu item lets you enter a threshold value (in dB) for the signal-to-noise ratio. If this ratio gets smaller than the threshold value, the receiver automatically mutes the signal (ch. 2.2.3). 2.1.3 The back Fig. 2.3: ULR2000's back The power is supplied via a 12 V connector. A matching cable is included in the delivery. If the power supply is interrupted (e.g. by removing the wall power supply), please wait at least 10 seconds before restoring the power supply again. This avoids causing possible damage to the unit. Balanced XLR output. Balanced TRS output. GND The unit can be earthed. Attach an earthing cable to the GND screw. SERIAL NUMBER 2.2 Menu items in detail Briefly pressing the SET button gets you into the ULR2000's menu. There you have many different options to individually configure the receiver. By using the UP and DOWN buttons you can select various menu items (e.g. TUNE, SCAN). Pressing the SET button once gets you into the respective submenu (e.g. submenu TUNE). By pressing the UP and DOWN buttons, you can select different settings in the submenu. Pressing the SET button again confirms your selection. 8 2. ULR2000 RECEIVER
-
 1
1 -
2
-
 3
3 -
 4
4 -
 5
5 -
 6
6 -
 7
7 -
 8
8 -
 9
9 -
 10
10 -
 11
11 -
 12
12 -
 13
13 -
14
-
15
-
16
-
17
-
18
-
19
-
20
-
21
-
22
-
23
-
24
-
25
-
26
 |
 |
