Behringer V-TONE GMX212 Manual - Page 12
MIDI control
 |
View all Behringer V-TONE GMX212 manuals
Add to My Manuals
Save this manual to your list of manuals |
Page 12 highlights
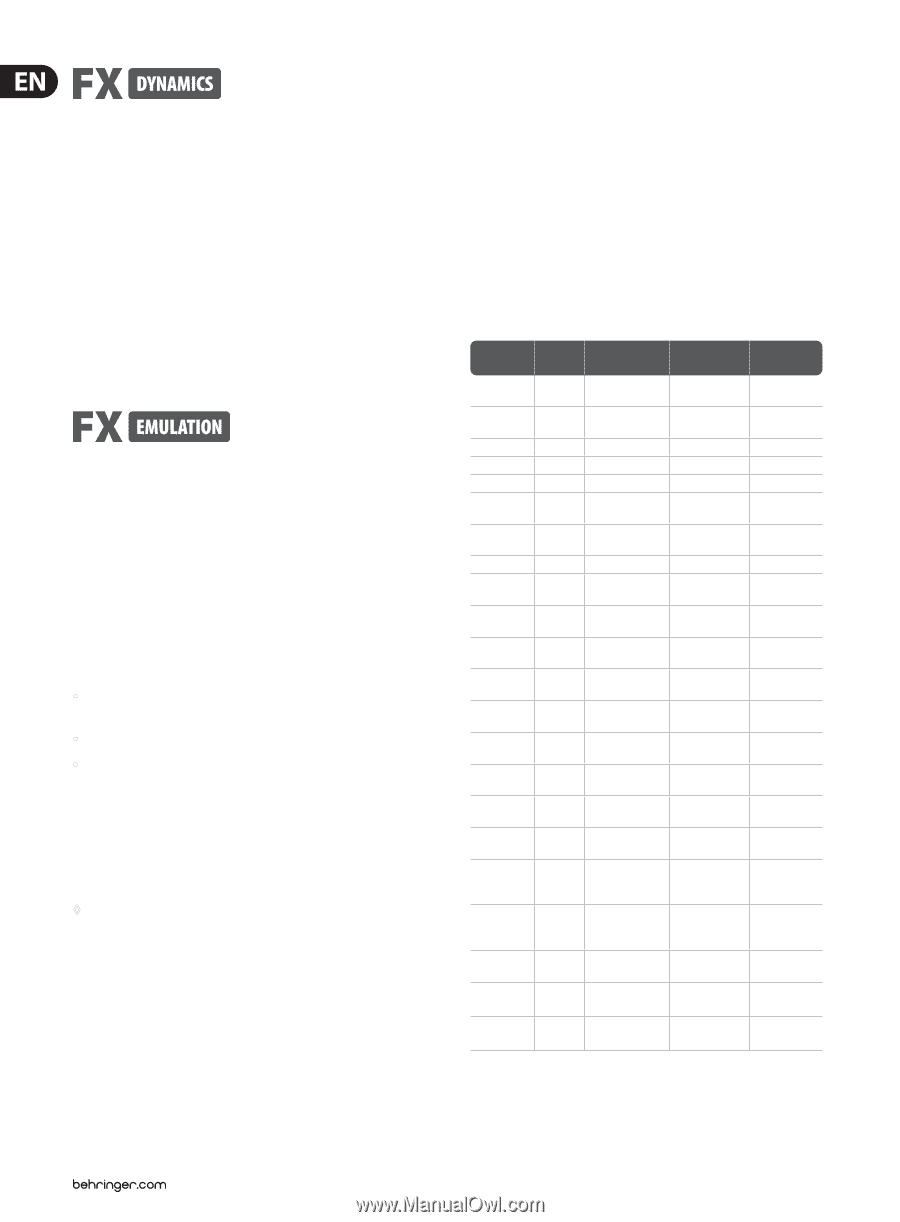
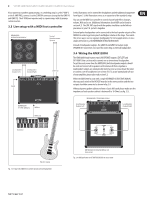
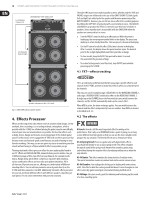
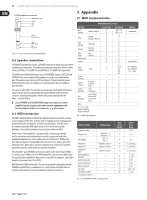
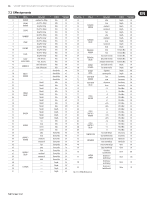
12 V-TONE GMX1200H/GMX212/GMX210/GMX112/GMX110 User Manual 90-91 Compressor: A signal's dynamic characteristics are often limited to assure its integration into the overall mix. This can be done by using a compressor or a limiter. A limiter confines the signal to the values above or below a previously determined threshold value rather abruptly, whereas the compressor does basically the same, but the threshold area is rather "softly" delineated, so program intervention is not so suddenly felt. Use the FX MIX control to determine the sensitivity for the compressor. This effect prolongs the sustain of your guitar, or you can also for example make the strumming on a funky-style guitar more audible (chicken scratch). 92-93 Expander: Background noise of all kinds (hissing, hum, etc.) limit the dynamic range of the desired signal. As long as the main signal's level is considerably higher than the noise floor, background noise is inaudible; the main signal basically masks the underlying noise signal. You can use the expander to effectively broaden the dynamic range of a signal. The signal is weakened when the amplitudes are smaller, whereby background noise is lowered. The FX MIX control determines the expander's threshold. 94-99 Guitar Combo: This effect simulates the sound characteristics of a small guitar combo, simulating not only two tube stages, but also the cabinet and the speaker. Use the FX MIX control to adjust the mix of direct and combo signals. 4.3 MIDI control Thanks to its built-in MIDI interface, you can integrate your V-TONE into any MIDI setup. The V-TONE is capable of receiving both program change and MIDI controller information. So, you can change programs via MIDI using a MIDI foot controller or a computer-based sequencing software, and you can also control individual effect parameters and edit your own effects. Our MIDI foot controller FCB1010 gives you precisely these options, and is a perfect match for all BEHRINGER guitar amps. This is how you activate the MIDI functions: • Connect the MIDI IN connector of your V-TONE to the MIDI OUT jack of a MIDI foot controller (see fig. 3.3). • Keep CHANNEL and IN/OUT keys simultaneously depressed for 2 seconds. • Use the PRESET control to select a MIDI channel (1 through 16, "ON" = Omni mode, "OF" = off). When the display no longer blinks, the selected MIDI channel is activated. Omni mode means that your V-TONE receives and processes relevant MIDI information on all channels. Of course, you should select the same channel both on your MIDI foot controller and the V-TONE (see your MIDI foot controller user's manual). The left decimal point on the display jitters when MIDI data is received on the V-TONE, giving you visual confirmation about the information currently being received. ◊ Once you activate MIDI, FX tracking is no longer active, i.e. there is no assignment between an effect number and a channel. This means that when you switch a channel, the previously set effect is not automatically loaded up. As this assignment feature would probably cause confusion when controlling the V-TONE via a MIDI foot controller, it makes sense only when it is controlled from the enclosed footswitch or directly from the V-TONE. To operate your V-TONE without MIDI remote control, please disable the MIDI function (display reads "OF"). You can control different functions of your V-TONE using MIDI. To this end, the V-TONE receives MIDI instructions (so-called messages). The messages that need to be sent to your V-TONE have to be created either on a MIDI foot controller or on a MIDI sequencer. Basically, these are Program Change Messages and Controller Messages: Program Changes: You can dial up presets using MIDI program changes. Since program changes start at 0 and go up to 127, program change 0 corresponds to preset 0, program change 1 to preset 1, and so on (compare table 7.1 in the appendix). After the switch is done, the preset is directly active, i.e. independent from a possibly set bypass. Effect parameters: Three parameters of the effects processor can be adjusted in real time. This way, you can create your own effects, modify existing effects to your specific needs (e.g. adapt the delay time to the tact of your song) or remotely control using a MIDI foot controller. Select a controller number for the footswitch on your MIDI foot controller. Use control numbers 12, 13 or 14. Using the footswitch on your MIDI foot controller, you can now modify the values of the three adjustable parameters in real time or directly enter their values. Which three parameters for the respective effect can be edited is shown in the following table: Effect Preset No. Parameter 3 CC 12 REVERB 0 - 16 - DELAY/ REVERB DELAY 17 - 20 21 - 29 Delay Time* Delay Time* PHASER 30 - 33 LFO Speed* CHORUS CHORUS/ REVERB 34 - 37 38 - 42 LFO Speed* Reverb Time CHORUS/ DELAY 43 - 47 Delay Time* FLANGER FLANGER/ REVERB 48 - 51 52 - 56 LFO Speed* Reverb Time FLANGER/ DELAY 57 - 61 Delay Time* TREMOLO/ REVERB 62, 63 LFO Speed* TREMOLO/ DELAY 64 - 66 LFO Speed* ROTARY SPEAKER 67, 68 LFO Speed* ROTARY DRIVE 69, 70 LFO Speed* AUTO WAH REVERB AUTO WAH DELAY PITCH SHIFTER PITCH SHIFTER/ REVERB 71, 72 73, 74 75 - 81 82 - 85 Reverb Mix Delay Mix - Reverb Time PITCH SHIFTER/ DELAY 86 - 89 Delay Time* COMPRESSOR 90, 91 Delay Time/ Rev Time² EXPANDER 92, 93 Rev Time/ Delay Time² GUITAR COMBO 94 - 99 Delay Time*/ Rev Time² *) Tap tempo: MIDI Control No. 64 2) depends on Variation Table 4.1: MIDI-controllable effect parameters Parameter 2 CC 13 Reverb Time Delay Mix Feedback Feedback Depth Reverb Mix Delay Mix Resonance Reverb Mix Delay Mix Reverb Mix Delay Mix Reverb Mix Delay Mix Parameter 1 CC14 Mix Reverb Mix Mix Depth Mix Chorus Mix Chorus Mix Depth Depth Depth Tremolo Mix Tremolo Mix Depth Depth Depth Sensitivity Depth Sensitivity - Pitch Mix Reverb Mix Pitch Mix Delay Mix Delay Mix/ Rev Mix² Rev Mix/ Delay Mix² Delay Mix/ Rev Mix² Pitch Mix Sensitivity Threshold Drive
-
 1
1 -
2
-
3
-
4
-
5
-
6
-
 7
7 -
 8
8 -
 9
9 -
 10
10 -
 11
11 -
 12
12 -
 13
13 -
 14
14 -
 15
15 -
 16
16 -
 17
17 -
18
-
19
-
20
-
21
-
22
-
23
 |
 |