Behringer V-TONE GMX212 Manual - Page 7
Rear panel - effect presets
 |
View all Behringer V-TONE GMX212 manuals
Add to My Manuals
Save this manual to your list of manuals |
Page 7 highlights
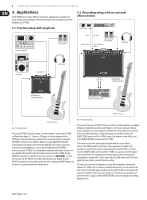
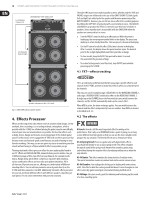
7 V-TONE GMX1200H/GMX212/GMX210/GMX112/GMX110 User Manual 2.2 Rear panel (21) Connect the stereo jack connector of the provided footswitch to the FOOTSWITCH connector. The footswitch has several functions: it lets you switch between two channels, and it also lets you activate/deactivate an effect. Additionally, the tuner can also be activated using the footswitch. To do that, keep the CHANNEL key pressed for about 2 seconds. (22) MIDI IN. This connector lets you remotely control your V-TONE via MIDI. You can activate/deactivate effects or switch between channels. You can use effect bypass via program changes and parameter edits as well as edit the presets via controllers (also see sections 6.3 and 7.1). (23) You can connect two external loudspeakers (L/R) to the LOUDSPEAKER connectors (GMX212 and GMX1200H). The outputs deliver 60 W into 8 W per channel. For optimum performance, please only connect loudspeakers with a minimum impedance of 8 W each (see also section 6.2). When these connectors are used the internal loudspeakers are automatically disconnected. ◊ The GMX210 features no external loudspeaker connectors. The loudspeaker connector on the GMX110 and GMX112 is described under (32). (24) The PHONES connector lets you monitor the signal from your V-TONE with standard headphones. The BEHRINGER HP series is well suited for this, for example. When the PHONES connector is used, the internal loudspeakers and speaker outputs are disconnected. (25) Those signals that are connected to the SLAVE IN connectors are directly routed to the V-TONE's power amp. This way, you can connect an external guitar preamp or modeling amp (e. g. V-AMP 2 or V-AMP PRO) without using the internal preamp on your V-TONE. ◊ The GMX110 and GMX112 feature no SLAVE IN connectors. (26) You can take the stereo signal of your V-TONE at the TAPE outputs (RCA) and record it, for example. (27) The TAPE inputs (RCA) let you feed an additional stereo signal into your V-TONE. You can play along to the beat of a drum computer or play to music from a CD or MD player. (28) You can take the stereo signal of your V-TONE at the LINE outputs to record it or route it to a P.A. system. This output is independent from the MASTER control and does not render the AUX signal. Additionally, its frequency response is corrected (speaker simulation). ◊ The GMX110 and GMX112 feature no LINE outputs. (29) Use the AUX IN control to adjust the volume of the signal that is fed in via the AUX IN connectors (e. g. drum computer, playback). ◊ On the GMX110 and GMX112, this control is called TAPE INPUT. It regulates the volume of the signal fed in at the TAPE IN connectors. (30) The AUX IN lets you feed an additional stereo signal into the amp. This way, you can play to a backing track that supports you on-stage but should not be audible via the LINE outputs connecting the GMX210/GMX212 to the P.A. system. Additionally, you can use AUX IN together with the INSERT SEND as a parallel insert loop. To do that, connect the INSERT SEND to the input of your effects device; connect the AUX IN (TAPE IN on the GMX110 and GMX112) to the output of your effects unit (the INSERT RETURN connector should not be in use!). This way, the signal flow in your V-TONE is not interrupted. With the AUX IN control, you can determine the extent to which the external effects unit alters the original signal. Keep in mind that the effects unit should be set up to 100% effects signal (100% "wet"). (31) Your V-TONE features a serial insert loop that can be used to connect external effects (e. g. a wah-wah pedal). Connect the SEND connector on the V-TONE to the input of your effects unit. The SEND connector is tapped into directly before (i.e. pre) the digital signal processor (DSP) of your V-TONE. Connect the output of your external effects unit to the RETURN connector of your V-TONE. ◊ You can use the INSERT SEND as a parallel output without the effects. This is useful, for example, when you want to record a dry guitar signal. As long as the RETURN connector has nothing plugged into it, the signal will not be interrupted internally. (32) Use the SPEAKER OUT connector to connect one additional loudspeaker to your GMX110/GMX112. This loudspeaker should have an impedance of 4 Ω. When this connector is used, the internal loudspeaker is automatically muted. Additional information about connecting an external loudspeaker can be found in section 6.2. (33) FUSE RETAINER/VOLTAGE SELECTOR. Please make sure that the voltage indicated by the voltage selector matches the local voltage before you connect the unit to the main power supply. Always replace blown fuses with fuses of the same type and rating. Some units feature a fuse retainer in which a selection between 230 V and 120 V is possible. Please be aware: When using your unit outside of Europe with 120 V, a fuse with a higher rating is required. (34) Power is supplied via an IEC connector. The matching cable is provided with the unit. (35) SERIAL NUMBER.
-
 1
1 -
 2
2 -
 3
3 -
 4
4 -
 5
5 -
 6
6 -
 7
7 -
 8
8 -
 9
9 -
 10
10 -
 11
11 -
 12
12 -
13
-
14
-
15
-
16
-
17
-
18
-
19
-
20
-
21
-
22
-
23
 |
 |
