Behringer V-TONE GMX212 Manual - Page 13
Tuner, Installation - midi
 |
View all Behringer V-TONE GMX212 manuals
Add to My Manuals
Save this manual to your list of manuals |
Page 13 highlights
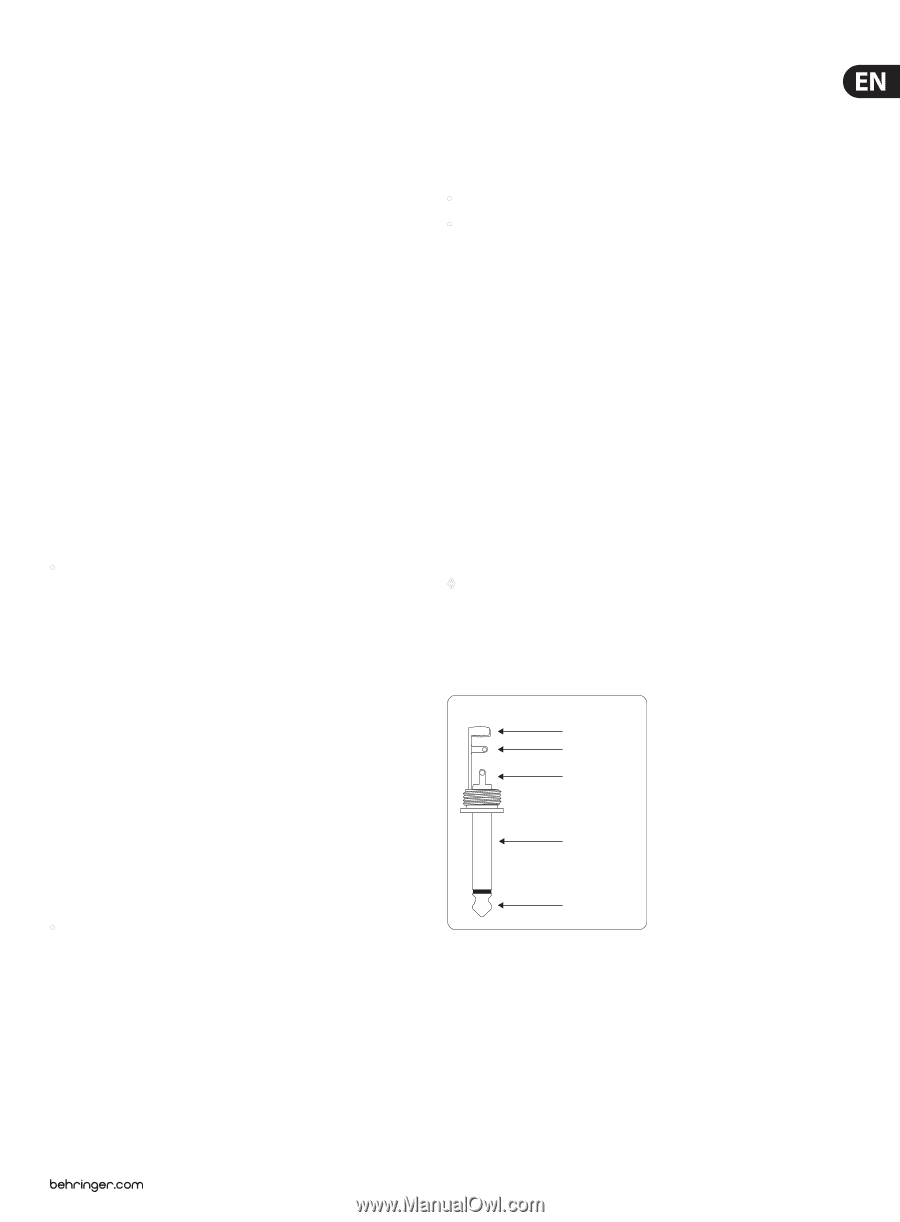
13 V-TONE GMX1200H/GMX212/GMX210/GMX112/GMX110 User Manual Channel switching: Changing modeling CHANNELS is done via controller #10. If you send value 0 via this controller, then channel 1 is active. Sending value 1 activates channel change to channel 2. Program change instructions can also be used to change channels. Program change #123 activates channels 1 and program change #124 activates channel 2 of your V-TONE. In addition to switching channels, you can also deactivate the effect. To this end, send value 0 via controller #11. Value 1 activates the effect again. Sending program change #127 activates the tuner. As soon as another program change number is sent, the tuner is automatically deactivated. You determine the input volume of the effect module by using MIDI controller #7. This lets you adjust the volume of your V-TONE to your own requirements. Since this controller does not control master volume, you should first adjust the maximum volume you need by using the master volume control, and then use MIDI controller #7 to lower the volume. This function is also called "volume controller". The operating range of the Wah effect is adjusted using MIDI controller #27. Furthermore, if you're using LFO-controlled modulation effects, you can deactivate LFO and implement modulation via MIDI controller #27. To activate this MIDI controller, you should first set up the LFO velocity either directly on your V-TONE or set the respective MIDI controller to value 0. Of course, you can use a MIDI sequencer or a computer-based MIDI editor for MIDI remote control, particularly in the home recording environment. 5. Tuner • The integrated tuner is activated by pressing the CHANNEL key for about 2 seconds (directly on the amp or on the footswitch). 5.1 Tuning your guitar The chromatic tuner automatically recognizes the frequencies of guitar notes. For A string, this means a frequency of 110 Hz. When you connect your guitar to the V-TONE and strum a string, the tuner tries to recognize the tone and shows it in the display. Because the tuner functions chromatically, it can also recognize semitones. These are shown in the display with a "b" accompanying the value. However, it may be the case that a played note (shown in the display as for example "a") slightly deviates from the ideal tone. This will be indicated by lighting up at least one of the red tuner LEDs (HIGH/LOW) near the FX display. The faster the LED blinks, the harsher the deviation of the played tone from the note shown in the display. If the middle LED (green) lights up, the tone you played is completely in tune with the tone indicated in the display. When the tuner is active, the loudspeaker outputs are typically muted. However, sometimes it is preferable not to mute the signal in order to let you have acoustic control of what you are doing while you are tuning your guitar. For this reason, the V-TONE has an integrated tuner level function. • You can adjust tuner volume from 0 to 99 by using the FX control. At "0" the guitar signal is completely muted. After a successfully implemented adjustment, the display auto-matically goes back to tuner mode. Nowadays, orchestras set the "a" with 444 Hz, and the Berlin Philharmonic Orchestra wishes to stay ahead: their "chamber tone a" lies at a full 447 Hz. The reference tone "a" of the V-TONE is programmed at 440 Hz. Let's say, you want to work with a big orchestra that works with the chamber tone "a" set to 444 Hz. To activate the function that changes the chamber tone, do the following: • Activate the tuner by keeping the CHANNEL key pressed for a few seconds. • By turning the PRESET control, you can adjust the "a" reference tone up or down in 1 Hz increments for a maximum of 15 Hz. The last two digits of the frequency value are always shown in the display, since the first digit is always a 4. For example, when you start with the 440 Hz basic tone, and then press the right arrow key four times, the display shows 44, which corresponds to a frequency of 444 Hz. After about 3 seconds, the display goes back to tuner mode. Your changes are automatically stored. Ideal tones for the remaining strings are automatically set up using the newly adjusted frequency as a reference. A quick hit on the CHANNEL key lets you leave tuner mode and go back to amp mode. 6. Installation 6.1 Audio connections With the exception of the headphone output and the AUX input (stereo jacks), audio inputs and outputs of your BEHRINGER V-TONE are provided in the form of mono jack connectors. Tape inputs and outputs use RCA connectors. ◊ Please keep in mind that your V-TONE should be installed and operated only by those who possess sufficient technical knowledge about its installation and operation. Everyone dealing with your V-TONE should be sufficiently grounded both during the installation as well as during actual usage. Failure to do so may cause undesirable or faulty operation due to electromagnetic discharges, etc. Unbalanced ¼" TS connector strain relief clamp sleeve tip sleeve (ground/shield) tip (signal) Fig. 6.1: 1/4" TS connector 5.2 Setting up the "a" reference tone To put complete freedom at your disposal when tuning your instrument, you have the option to change the preset of the reference tone "a". Here is a quick intro to the subject. The so-called "chamber tone a" has been continually revised upwards ever since it was first measured: tuning forks of Bach, Handel or Mozart were at 415, 420 or 421 Hz (vibrations pro second).
-
 1
1 -
2
-
3
-
4
-
5
-
6
-
7
-
 8
8 -
 9
9 -
 10
10 -
 11
11 -
 12
12 -
 13
13 -
 14
14 -
 15
15 -
 16
16 -
 17
17 -
 18
18 -
19
-
20
-
21
-
22
-
23
 |
 |