Behringer X-LIVE Quick Start Guide - Page 6
USB Operation - driver
 |
View all Behringer X-LIVE manuals
Add to My Manuals
Save this manual to your list of manuals |
Page 6 highlights
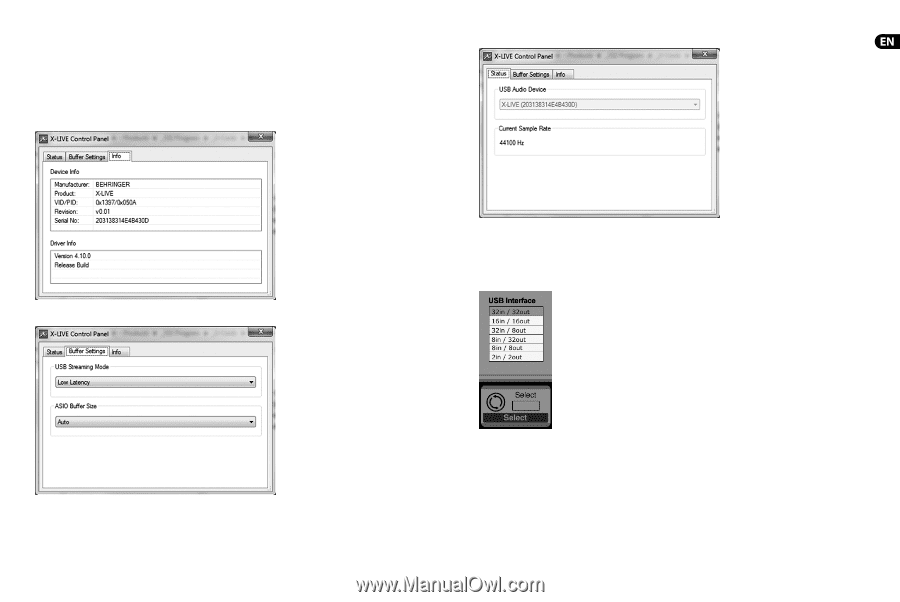
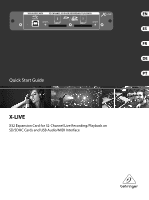
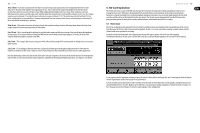
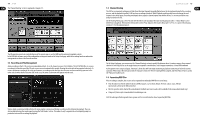
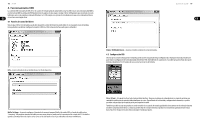
10 X-LIVE 4. USB Operation The USB connection on the X-LIVE card provides 32 channels of bi-direction audio I/O via USB 2.0, as well as MIDI I/O and remote DAW control via HUI/MackieControl emulation. Make sure to download and install the free ASIO driver from behringer.com if you are using a Windows PC. The X-LIVE is CoreAudio compliant and therefore does not need a driver for use on Mac computers. 4.1 Driver Control Panels Once the driver is installed, you can open the control panel by double-clicking on the small tray icon. These screens will allow configuring the X-LIVE card in the X32 as an audio interface for your computer. Quick Start Guide 11 Info - displays the driver version number and device IDs. Status / USB Audio Device - displays the card name and serial number. 4.2 USB Configuration After the console has booted up, you can access the Setup screen and navigate to the Card tab to select the USB interface input/output configuration. Depending on your application, you may want to select an option other than the maximum 32 x 32 channel count to preserve system resources. Buffer Settings - allows the stream and ASIO sound buffers to be set. Use small buffers for short latency when monitoring through the PC. Use large buffers and longer latency for preventing audio glitches on old, low-performance PCs. 32 in / 32 out - This mode allows the full potential of the interface to be tapped. Note that the computer needs to be able to handle that amount of concurrent I/O stream without any glitches. Depending on its speed and memory configuration, some optimization for audio recording might be required. It is also possible to run a virtual sound check of all 32 input channels by recording them directly to a computer during a brief line check. The performers can leave the stage while you play back the recorded instruments from the hard drive and tweak the sound accordingly.
-
 1
1 -
 2
2 -
 3
3 -
 4
4 -
 5
5 -
 6
6 -
 7
7 -
 8
8 -
 9
9 -
 10
10 -
 11
11 -
 12
12 -
13
-
14
-
15
-
16
-
17
-
18
-
19
-
20
-
21
-
22
-
23
-
24
-
25
-
26
-
27
-
28
-
29
 |
 |