Behringer X-LIVE Quick Start Guide - Page 7
SD Card Operation
 |
View all Behringer X-LIVE manuals
Add to My Manuals
Save this manual to your list of manuals |
Page 7 highlights
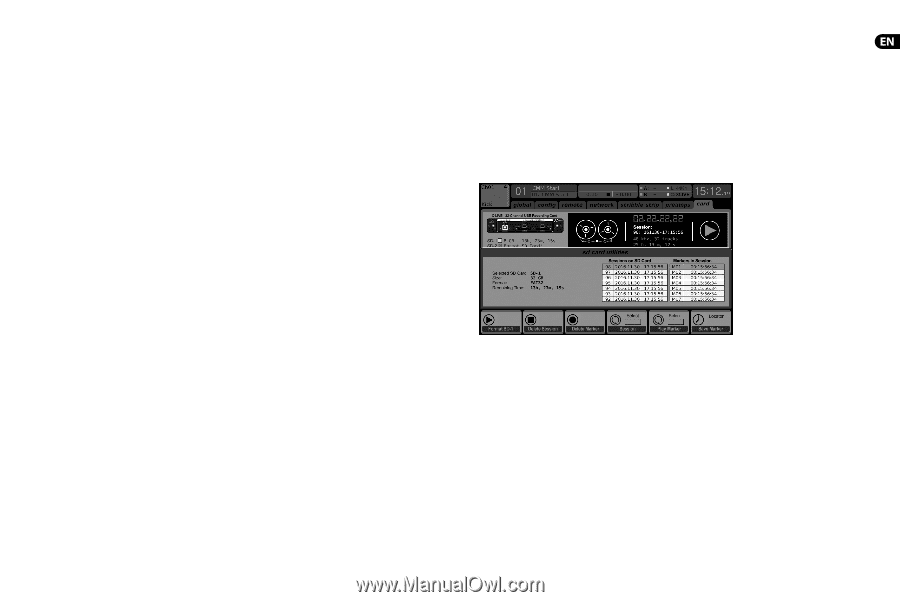
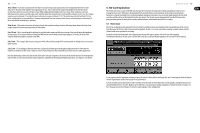
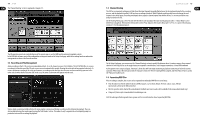
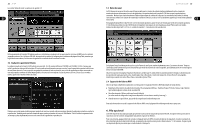
12 X-LIVE 16 in / 16 out - If you don't actually need more than 16 concurrent input and output tracks to be exchanged between the console and your PC, then this mode might be more appropriate for you. First, it will slow the required bandwidth on the interface down. Second, there will be no excessive I/O tracks in your DAW configuration that might clutter your setup. Third, it allows you to run a fully-featured zero-latency overdub setup, which would be impossible if signals were run through the computer. In this case, the 16 input signals are put on channels 1-16, while the tape (card) returns are put on channels 17-32. The monitoring is directly fed from Ch1-16 as usual, including all processing and effects. It remains independent from any computer audio latency, even though you can hear back all the recorded tracks without any re-patching. 32 in / 8 out - This mode is tailored to suit a typical studio and overdub recording situation, with many input channels but only a few output channels for monitoring of previously recorded takes. 8 in / 32 out - This is a useful mode for utilizing the excellent audio engine and effects processing of the console during final mixdown of your project. All 32 tracks would be fed from your DAW into the console where all the magic happens. Then only 2-8 tracks of the complete mixdown would be sent back to the DAW. 8 in / 8 out - This setting is light on processing power while still providing enough I/O for tracking drums or multiple mics on an acoustic guitar or piano. 2 in / 2 out - For recording just the main stereo mix, or playing back from typical media player applications where often only two channels are needed. Use this mode in order to remove all unused channels that would otherwise clutter your PCs audio applications. Note that the Routing / Home and Card Out tabs allow audio from your computer to be sent to the desired destination. The Routing/home tab now offers to select two alternative input assignments, separately for Recording and Playback operation. See chapter 5.3 for details. Quick Start Guide 13 5. SD Card Operation The X-LIVE card features a pair of SD/SDHC slots that provide 32 channels of multitrack recording and playback. Simple session management and up to 100 markers allow playback from any desired point, easily cueing up certain songs or backing tracks. Automatic or manual switching from recording to playback routing presets makes it easy to monitor input channels directly while recording, and then listen to the playback from the card returns. The SD cards operate independently from the USB connection, giving you many options for how you incorporate outboard plugins, multichannel input and live recording. 5.1 Overview Most of the configuration and operation for the SD card slots and USB connection are handled on the Setup/Card page of the console. From this page, the SD slot or USB can be selected for playback, SD slot 1 or 2 can be selected for recording or marker editing, and the channel count can be specified for recording. A properly installed and formatted card will appear near the top with a green square, with its file size and remaining recording time indicated. SD cards up to 2 GB and SDHC cards up to 32 GB are officially supported, for use with FAT32 formatting. It is best practice before important recordings to press the console's Utility button and format the card. Formatting will delete all data to remove fragmentation and to ensure proper write performance. A list of recorded sessions and markers for the currently-selected session are listed below the recorder graphics. Transport functions are controlled with the first 3 encoders. Markers can be added to a session during recording or playback to indicate the start of a song or set. Press the page down to the 2nd layer of controls to make changes to the configuration.
-
 1
1 -
 2
2 -
 3
3 -
 4
4 -
 5
5 -
 6
6 -
 7
7 -
 8
8 -
 9
9 -
 10
10 -
 11
11 -
 12
12 -
13
-
14
-
15
-
16
-
17
-
18
-
19
-
20
-
21
-
22
-
23
-
24
-
25
-
26
-
27
-
28
-
29
 |
 |