Behringer X-LIVE Quick Start Guide - Page 8
Recording and File Management, 3 Channel Routing, 4 Separating WAV Files - sd card
 |
View all Behringer X-LIVE manuals
Add to My Manuals
Save this manual to your list of manuals |
Page 8 highlights
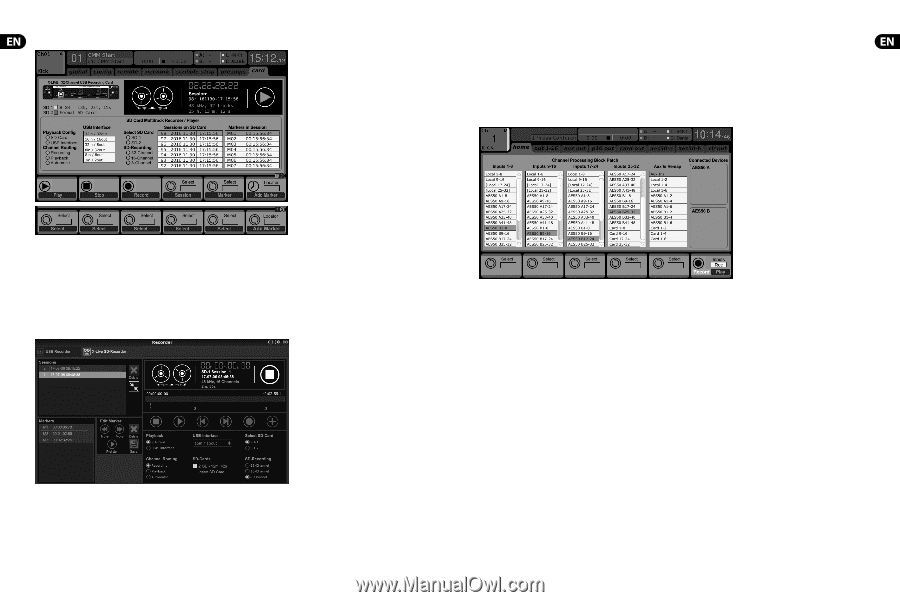
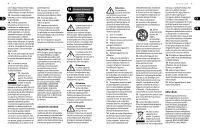
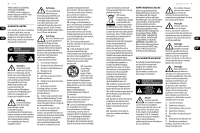
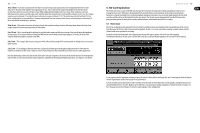
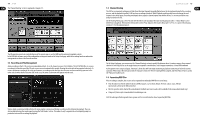
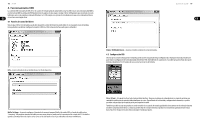
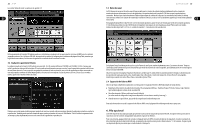
14 X-LIVE The 'Channel Routing' section is explained in chapter 5.3. Quick Start Guide 15 5.3 Channel Routing The X32 has a convenient routing preset that allows the input channels to quickly flip between the desired monitoring for the recording process, and the playback from the X-LIVE card once recording is finished. While Playback would typically be used to assign the card outputs to the mixer inputs, Recording would patch those signals to channel inputs that shall be on mix, i.e. not necessarily the ones being recorded on X-LIVE. On the Routing/Home page, select 'Record' with the 6th encoder and adjust the input routing using encoders 1-5 (most likely Local or AES50 from a stagebox). Then turn the 6th encoder to select 'Play' and press the encoder. Now Card 1-8, 9-16, etc. can be selected using encoders 1-5 for the playback preset. The SD operation can also be controlled by any of the remote apps, as well as MIDI and the onboard assignable controls. In the X32-Edit software, most of the configuration settings are made on the Setup/Card page, while the recording functions and marker management are done in the Recorder window. 5.2 Recording and File Management Audio recording on the X-LIVE card can accommodate either 8, 16, or 32-channel sessions of 44.1/48 kHz / 32-bit PCM WAV files. As soon as recording is initiated to one of the SD cards, a new session is automatically created, allowing the entire take to be organized cohesively. To ensure continuous recording of the entire performance, a recording session that has started on one card can seamlessly span over to the other card slot when the first becomes full. In this case, the same session name will appear on both cards. Since a single session may include a full set of songs, markers can be placed during recording or while listening to playback. They can also be adjusted using the remote apps by using the 'Edit Marker' section. This makes it easy to organize the set and quickly jump to a particular section of the recording for playback. On the Setup/Card page, you can now use the 'Channel Routing' section to quickly flip between these 2 routing scenarios. Keep in mind that the Record/Play presets can be toggled using an assignable control button, scene/snippet automation, or even MIDI command. A third option on the Setup/Card page, 'Automatic', allows the shift from input monitoring to playback monitoring to follow the current operation. When Stop or Record is pressed in the transport control, the 'Record' routing will be assigned, and when Play or Pause is active, the 'Play' preset will be used. 5.4 Separating WAV Files After recording is complete, the session can be separated into individual WAV files in several ways: • Play the audio from the SD card directly into a DAW program, e.g. Tracktion, Reaper, ProTools, Cubase, Logic, Ableton (just to name a few) via the USB connection • Directly open the multi-channel file using Audacity (brilliant open source audio editor available from www.audacityteam.org/) • Using our Python scripts, downloadable from behringer.com Visit the wiki page at behringerwiki.music-group.com for more information about separating WAV files.
-
 1
1 -
2
-
 3
3 -
 4
4 -
 5
5 -
 6
6 -
 7
7 -
 8
8 -
 9
9 -
 10
10 -
 11
11 -
 12
12 -
 13
13 -
14
-
15
-
16
-
17
-
18
-
19
-
20
-
21
-
22
-
23
-
24
-
25
-
26
-
27
-
28
-
29
 |
 |