Behringer X-TOUCH EXTENDER Quick Start Guide - Page 14

Using the X-TOUCH, with RTP MIDI - setup

Page 14 highlights

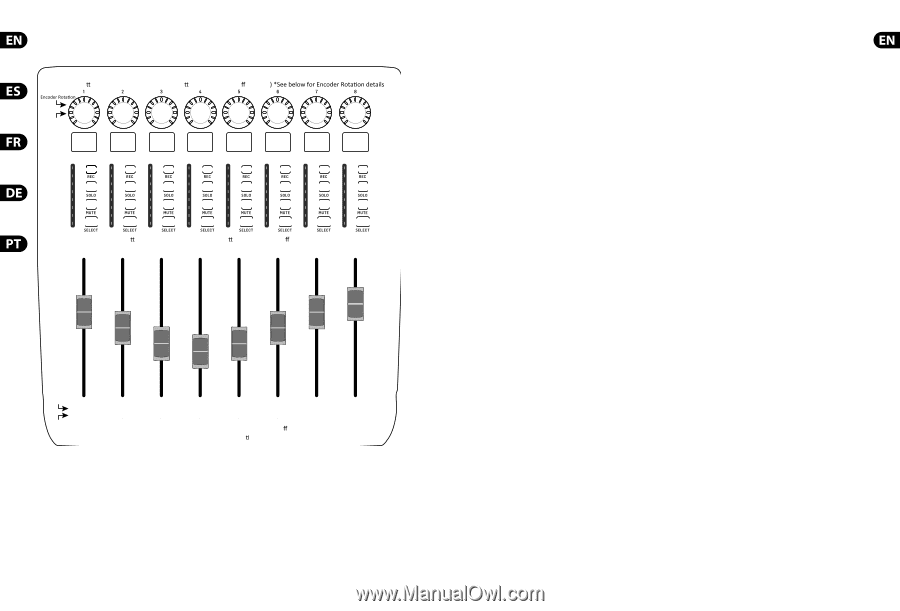
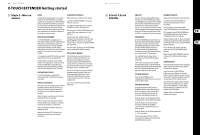
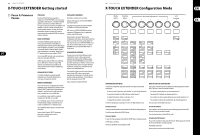
26 X-TOUCH EXTENDER X-TOUCH EXTENDER MIDI Send Encoder Bu on Press: Note On (Value 127), Bu on release: Note Oī (Value 0 Encoder Press CC 80 Note 0 (C-1) CC 81 Note 1 (C#-1) CC 82 Note 2 (D-1) CC 83 Note 3 (D#-1) CC 84 Note 4 (E-1) CC 85 Note 5 (F-1) CC 86 Note 6 (F#-1) CC 87 Note 7 (G-1) Note 8 (G#-1) Note 9 (A-1) Note 10 (A#-1) Note 11 (B-1) Note 12 (C0) Note 13 (C#0) Note 14 (D0) Note 15 (D#0) Note 16 (E0) Note 17 (F0) Note 18 (F#0) Note 19 (G0) Note 20 (G#0) Note 21 (A0) Note 22 (A#0) Note 23 (B0) Note 24 (C1) Note 25 (C#1) Note 26 (D1) Note 27 (D#1) Note 28 (E1) Note 29 (F1) Note 30 (F#1) Note 31 (G1) Note 32 (G#1) Note 33 (A1) Note 34 (A#1) Note 35 (B1) Note 36 (C2) Note 37 (C#2) Note 38 (D2) Note 39 (D#2) Bu on Press: Note On (Value 127), Bu on release: Note Oī (Value 0) Fader Touch Note 110 (D8) CC 70 Fader Move Note 111 (D#8) CC 71 Note 112 (E8) CC 72 Note 113 (F8) CC 73 Note 114 (F#8) CC 74 Note 115 (G8) CC 75 Note 116 (G#8) CC 76 Fader Touch: Note On (Value 127), Fader release: Note Oī (Value 0) Fader Move: Fader Values (min to max posi on): 0...127 Note 117 (A8) CC 77 * In CTRL Mode:Encoder Rotation Values (left to right end): 0...127 * In CTRL REL Mode:Encoder Rotation Left turn (decrement) = value 1 / Right turn (increment) = value 65 Apart from the difference to the Encoder Rotation function, CTRL mode and CTRL REL mode are identical * En el modo CTRL: Valores de giro de mandos giratorios (izquierda a tope derecho): 0...127 * En el modo CTRL REL: Giro de mando giratorio Giro hacia la izquierda (disminución) = valor 1 / Giro hacia la derecha (aumento) = valor 65 Aparte de la diferencia de la función de giro de los mandos giratorios, los modos CTRL y CTRL REL son idénticos. * En mode CTRL : Valeurs de la rotation des encodeurs (de gauche à droite) : 0...127 * En mode CTRL REL : Rotation de l'encodeur Rotation vers la gauche (décrémentation) = valeur 1 / Rotation vers la droite (incrémentation) = valeur 65 À l'exception de la différence de valeur pour la rotation des encodeurs, les modes CTRL et CTRL REL sont identiques. * Im CTRL-Modus: Werte bei Reglerdrehung (links nach rechts bis Ende): 0...127 * Im CTRL REL-Modus: Reglerdrehung Linksdrehung (Verringerung) = Wert 1 / Rechtsdrehung (Erhöhung) = Wert 65 Abgesehen von der unterschiedlichen Reglerdrehungs-Funktion sind der CTRL- und der CTRL REL-Modus identisch. * Em CTRL: Valores Rotatórios do Codificador (esquerda para direita): 0...127 * Em Modo CTRL REL: Rotação do Codificador Virando à esquerda (diminuição) = valor 1 / Virando à direita (aumento) = valor 65 Além da diferença da função Encoder Rotation, o modo CTRL e o modo CTRL REL são idênticos. Quick Start Guide 27 Using the X-TOUCH EXTENDER with RTP MIDI The X-TOUCH EXTENDER can be used as an RTP MIDI device over a Network connection. This is useful in systems where long USB cables would otherwise be required. The following instructions show the general preparation of the X-TOUCH EXTENDER for RTP MIDI operation, and then further details for use with an OS X* network, and a Windows* network. Preparing the X-TOUCH EXTENDER for RTP MIDI operation 1. On the X-TOUCH EXTENDER, press and hold the SELECT button of CH1 during power up, to enter the Settings menu. Observe the text in the scribble-strip displays. 2. Turn the 2nd encoder to select NETWORK. 3. The 3rd encoder allows you to select either MODE or DHCP: • MODE selects between using the X-TOUCH EXTENDER as an RTP SLAVE or an RTP MASTER. In SLAVE mode, you need to enter the IP address of the X-TOUCH EXTENDER into your computer's RTP MIDI settings. In MASTER mode you can enter the IP address of the computer by turning the 3rd encoder one tick to the right, and use encoders 4-7 to enter the sets of 3-digits that make up the address. You may use Port 5004 in both cases, as this is the standard port for RTP MIDI. • DHCP can be set to ON or OFF. When DHCP is set to ON, the X-TOUCH EXTENDER will get its IP address automatically within the connected network from the DHCP server. When DHCP is set to OFF, the IP, Subnet mask, and Gateway have to be entered manually by turning the 3rd encoder to the right and accessing the following pages: my IP, my Mask, and my Gway. You can enter the IP addresses using encoders 4-7. 4. Exit the X-TOUCH EXTENDER setup by pressing the SELECT button of CH1 again. You will see the following in the display: IP: 000.000.000.000 Wait... 5. The IP will first switch to an internal IP before it shows the actual IP (for example IP: 010.100.001.029) within the network when DHCP is used. When the X-TOUCH EXTENDER is connected to the computer via the network, the Wait message will disappear. Using X-TOUCH EXTENDER as an RTP MIDI device within OS X For OS X systems, no external driver is required for RTP MIDI operation. Slave 1. Make sure your computer and the X-TOUCH EXTENDER are within the same network. 2. Open AUDIO/MIDI-Settings on the computer. 3. Open MIDI Studio / MIDI Devices window. 4. Double-click on "Network." 5. Click on "+" underneath the DIRECTORY field to add a device. Insert Name, the IP of your X-TOUCH EXTENDER and the port (5004). 6. Create a Session by pressing "+" underneath the "My Sessions" field and activate the session created. 7. Activate the X-TOUCH EXTENDER and click "Connect." 8. The X-TOUCH EXTENDER is now available as an RTP MIDI controller. Open the preferences of your DAW and add it as control surface. Within most DAWs, it will be detected automatically. Master 1. Make sure your computer and the X-TOUCH EXTENDER are within the same network. 2. Open AUDIO/MIDI-Settings on the computer. 3. Open MIDI Studio / MIDI Devices window. 4. Double-click on "Network." 5. Create a Session by pressing "+" underneath the "My Sessions" field and activate the session created. 6. For "Who may connect to me:" choose "Anyone." X-TOUCH EXTENDER should appear as a participant of the session. 7. The X-TOUCH EXTENDER is now available as an RTP MIDI controller. Open the preferences of your DAW and add it as control surface. Within most DAWs, it will be detected automatically. Using X-TOUCH EXTENDER as an RTP MIDI device with Windows Windows systems require the use of a third-party external driver for RTP MIDI. For example, do an internet search for "rtpMIDI" then download and install it on your computer. Slave 1. Make sure your computer and the X-TOUCH EXTENDER are within the same network. 2. Open the rtpMIDI driver. 3. Click on "+" underneath the DIRECTORY field to add a device. Insert Name, the IP including port address (e.g. 10.100.1.29:5004) of your X-TOUCH EXTENDER. 4. Create a Session by pressing "+" underneath the "My Sessions" field and activate the session created. 5. Activate the X-TOUCH EXTENDER and click "Connect." 6. The X-TOUCH EXTENDER is now available as an RTP MIDI controller. Open the preferences of your DAW and add it as control surface. Master 1. Make sure your computer and the X-TOUCH EXTENDER are within the same network. 2. Open the rtpMIDI driver. 3. Create a Session by pressing "+" underneath the "My Sessions" field and activate the session created. 4. For "Who may connect to me:" choose "Anyone." X-TOUCH EXTENDER should appear as a participant of the session. 5. The X-TOUCH EXTENDER is now available as an RTP MIDI controller. Open the preferences of your DAW and add it as control surface. *OS X is a trademark of Apple Inc. *Windows is either a registered trademark or trademark of Microsoft Corporation in the United States and/or other countries.

  • 1
  • 2
  • 3
  • 4
  • 5
  • 6
  • 7
  • 8
  • 9
  • 10
  • 11
  • 12
  • 13
  • 14
  • 15
  • 16
  • 17

26
X-TOUCH EXTENDER
Quick Start Guide
27
* I
n
C
T
RL
Mode:
E
ncoder
Rotation
Va
l
ues
(
l
eft
to
right
end):
0...12
7
* I
n
C
T
RL
R
E
L
Mode:
E
ncoder
Rotation
Left
turn
(decrement)
=
va
l
ue
1
/
Right
turn
(increment)
=
va
l
ue
65
Apart
from
the
diff
erence
to
the
E
ncoder
Rotation
function,
C
T
RL
mode
and
C
T
RL
R
E
L
mode
are
identica
l
* E
n
e
l
modo
C
T
RL:
Va
l
ores
de
giro
de
mandos
giratorios
(izquierda
a
tope
derecho):
0...12
7
* E
n
e
l
modo
C
T
RL
R
E
L:
Giro
de
mando
giratorio
Giro
hacia
l
a
izquierda
(disminución)
=
va
l
or
1
/
Giro
hacia
l
a
derecha
(aumento)
=
va
l
or
65
Aparte
de
l
a
diferencia
de
l
a
función
de
giro
de
l
os
mandos
giratorios,
l
os
modos
C
T
RL
y
C
T
RL
R
E
L
son
idénticos.
* E
n
mode
C
T
RL
:
Va
l
eurs
de
l
a
rotation
des
encodeurs
(de
gauche
à
droite)
:
0...12
7
* E
n
mode
C
T
RL
R
E
L
:
Rotation
de
l
’encodeur
Rotation
vers
l
a
gauche
(décrémentation)
=
va
l
eur
1
/
Rotation
vers
l
a
droite
(incrémentation)
=
va
l
eur
65
À l
’exception
de
l
a
diff
érence
de
va
l
eur
pour
l
a
rotation
des
encodeurs,
l
es
modes
C
T
RL
et
C
T
RL
R
E
L
sont
identiques.
* I
m
C
T
RL-Modus:
Werte
bei
Reg
l
erdrehung
(
l
inks
nach
rechts
bis
E
nde):
0...12
7
* I
m
C
T
RL
R
E
L-Modus:
Reg
l
erdrehung
Linksdrehung
(Verringerung)
=
Wert
1
/
Rechtsdrehung
(
E
rhöhung)
=
Wert
65
Abgesehen
von
der
unterschied
l
ichen
Reg
l
erdrehungs-
F
unktion
sind
der
C
T
RL-
und
der
C
T
RL
R
E
L-Modus
identisch.
* E
m
C
T
RL:
Va
l
ores
Rotatórios
do
Codifi
cador
(esquerda
para
direita):
0...12
7
* E
m
Modo
C
T
RL
R
E
L:
Rotação
do
Codifi
cador
Virando
à
esquerda
(diminuição)
=
va
l
or
1
/
Virando
à
direita
(aumento)
=
va
l
or
65
A
l
ém
da
diferença
da
função
E
ncoder
Rotation,
o
modo
C
T
RL
e
o
modo
C
T
RL
R
E
L
são
idênticos.
X-TOUCH EXTENDER MIDI Send
CC 80
CC 81
CC 82
CC 83
CC 84
CC 85
CC 86
CC 87
Note 0
(C-1)
Note 1
(C#-1)
Note 2
(D-1)
Note 3
(D#-1)
Note 4
(E-1)
Note 5
(F-1)
Note 6
(F#-1)
Note 7
(G-1)
Note 8 (G#-1)
Note 9 (A-1)
Note 10 (A#-1)
Note 11 (B-1)
Note 12 (C0)
Note 13 (C#0)
Note 14 (D0)
Note 15 (D#0)
Bu
on Press: Note On (Value 127), Bu
on release: Note O
(Value 0)
Encoder Bu
on Press: Note On (Value 127), Bu
on release: Note O
(Value 0
Note 16 (E0)
Note 17 (F0)
Note 18 (F#0)
Note 19 (G0)
Note 20 (G#0)
Note 21 (A0)
Note 22 (A#0)
Note 23 (B0)
Note 24 (C1)
Note 25 (C#1)
Note 26 (D1)
Note 27 (D#1)
Note 28 (E1)
Note 29 (F1)
Note 30 (F#1)
Note 31 (G1)
Note 32 (G#1)
Note 33 (A1)
Note 34 (A#1)
Note 35 (B1)
Note 36 (C2)
Note 37 (C#2)
Note 38 (D2)
Note 39 (D#2)
Note 110 (D8)
Note 111 (D#8)
Note 112 (E8)
Note 113 (F8)
Note 114 (F#8)
Note 115 (G8)
Note 116 (G#8)
Note 117 (A8)
CC 70
Fader Touch
Fader Move
CC 71
CC 72
CC 73
CC 74
CC 75
CC 76
CC 77
Fader Touch: Note On (Value 127), Fader release: Note O
(Value 0)
Fader Values (min to max posi
on): 0...127
Encoder Press
Fader Move:
Using the X-TOUCH
EXTENDER
with RTP MIDI
T
he
X
-
T
OUC
H EXTE
ND
E
R
can
be
used
as
an
R
T
P
M
I
D
I
device
over
a
Network
connection.
T
his
is
usefu
l
in
systems
where
l
ong
USB
cab
l
es
wou
l
d
otherwise
be
required.
T
he
fo
ll
owing
instructions
show
the
genera
l
preparation
of
the
X
-
T
OUC
H EXTE
ND
E
R
for
R
T
P
M
I
D
I
operation,
and
then
further
detai
l
s
for
use
with
an
OS
X*
network,
and
a
Windows
*
network.
Preparing the X-TOUCH EXTENDER for RTP
MIDI operation
1.
On
the
X
-
T
OUC
H EXTE
ND
E
R,
press
and
ho
l
d
the
S
E
L
E
C
T
button
of
C
H
1
during
power
up,
to
enter
the
Settings
menu.
Observe
the
text
in
the
scribb
l
e-strip
disp
l
ays.
2.
T
urn
the
2nd
encoder
to
se
l
ect
N
ET
WORK.
3.
T
he
3rd
encoder
a
ll
ows
you
to
se
l
ect
either
MOD
E
or
D
H
CP:
MOD
E
se
l
ects
between
using
the
X
-
T
OUC
H EXTE
ND
E
R
as
an
R
T
P
SLAV
E
or
an
R
T
P
MAS
TE
R.
I
n
SLAV
E
mode,
you
need
to
enter
the
I
P
address
of
the
X
-
T
OUC
H EXTE
ND
E
R
into
your
computer’s
R
T
P
M
I
D
I
settings.
I
n
MAS
TE
R
mode
you
can
enter
the
I
P
address
of
the
computer
by
turning
the
3rd
encoder
one
tick
to
the
right,
and
use
encoders
4
-
7
to
enter
the
sets
of
3-digits
that
make
up
the
address.
You
may
use
Port
500
4
in
both
cases,
as
this
is
the
standard
port
for
R
T
P
M
I
D
I
.
D
H
CP
can
be
set
to
ON
or
O
FF
.
When
D
H
CP
is
set
to
ON,
the
X
-
T
OUC
H EXTE
ND
E
R
wi
ll
get
its
I
P
address
automatica
ll
y
within
the
connected
network
from
the
D
H
CP
server.
When
D
H
CP
is
set
to
O
FF
,
the
I
P,
Subnet
mask,
and
Gateway
have
to
be
entered
manua
ll
y
by
turning
the
3rd
encoder
to
the
right
and
accessing
the
fo
ll
owing
pages:
my
I
P,
my
Mask,
and
my
Gway.
You
can
enter
the
I
P
addresses
using
encoders
4
-
7
.
4
.
E
xit
the
X
-
T
OUC
H EXTE
ND
E
R
setup
by
pressing
the
S
E
L
E
C
T
button
of
C
H
1
again.
You
wi
ll
see
the
fo
ll
owing
in
the
disp
l
ay:
IP: 000.000.000.000
Wait…
5.
T
he
I
P
wi
ll
rst
switch
to
an
interna
l I
P
 
before
it
shows
the
actua
l I
P
(for
examp
l
e
I
P:
010.100.001.029)
within
the
network
when
D
H
CP
is
used.
When
the
X
-
T
OUC
H EXTE
ND
E
R
is
connected
to
the
computer
via
the
network,
the
Wait
message
wi
ll
disappear.
Using X-TOUCH EXTENDER as an RTP MIDI
device within OS X
F
or
OS
X
systems,
no
externa
l
driver
is
required
for
R
T
P
M
I
D
I
operation.
Slave
1.
Make
sure
your
computer
and
the
X
-
T
OUC
H EXTE
ND
E
R
are
within
the
same
network.
2.
Open
AUD
I
O/M
I
D
I
-Settings
on
the
computer.
3.
Open
M
I
D
I
Studio
/
M
I
D
I
Devices
window.
4
.
Doub
l
e-c
l
ick
on
Network.
5.
C
l
ick
on
“+”
underneath
the
D
I
R
E
C
T
ORY
e
l
d
to
add
a
device.
I
nsert
Name,
the
I
P
of
your
X
-
T
OUC
H EXTE
ND
E
R
and
the
port
(500
4
).
6.
Create
a
Session
by
pressing
“+”
underneath
the
My
Sessions
e
l
d
and
activate
the
session
created.
7
.
Activate
the
X
-
T
OUC
H EXTE
ND
E
R
and
c
l
ick
Connect.
8
.
T
he
X
-
T
OUC
H EXTE
ND
E
R
is
now
avai
l
ab
l
e
as
an
R
T
P
M
I
D
I
contro
ll
er.
Open
the
preferences
of
your
DAW
and
add
it
as
contro
l
surface.
Within
most
DAWs,
it
wi
ll
be
detected
automatica
ll
y.
Master
1.
Make
sure
your
computer
and
the
X
-
T
OUC
H
EXTE
ND
E
R
are
within
the
same
network.
2.
Open
AUD
I
O/M
I
D
I
-Settings
on
the
computer.
3.
Open
M
I
D
I
Studio
/
M
I
D
I
Devices
window.
4
.
Doub
l
e-c
l
ick
on
Network.
5.
Create
a
Session
by
pressing
“+”
underneath
the
My
Sessions
e
l
d
and
activate
the
session
created.
6.
F
or
Who
may
connect
to
me:
choose
Anyone.
” X
-
T
OUC
H EXTE
ND
E
R
shou
l
d
appear
as
a
participant
of
the
session.
7
.
T
he
X
-
T
OUC
H EXTE
ND
E
R
is
now
avai
l
ab
l
e
as
an
R
T
P
M
I
D
I
contro
ll
er.
Open
the
preferences
of
your
DAW
and
add
it
as
contro
l
surface.
Within
most
DAWs,
it
wi
ll
be
detected
automatica
ll
y.
Using X-TOUCH EXTENDER as an RTP MIDI
device with Windows
Windows
systems
require
the
use
of
a
third-party
externa
l
driver
for
R
T
P
M
I
D
I
.
F
or
examp
l
e,
do
an
internet
search
for
rtpM
I
D
I”
then
down
l
oad
and
insta
ll
it
on
your
computer.
Slave
1.
Make
sure
your
computer
and
the
X
-
T
OUC
H EXTE
ND
E
R
are
within
the
same
network.
2.
Open
the
rtpM
I
D
I
driver.
3.
C
l
ick
on
“+”
underneath
the
D
I
R
E
C
T
ORY
e
l
d
to
add
a
device.
I
nsert
Name,
the
I
P
inc
l
uding
port
address
(e.g.
10.100.1.29:500
4
)
of
your
X
-
T
OUC
H EXTE
ND
E
R.
4
.
Create
a
Session
by
pressing
“+”
underneath
the
My
Sessions
e
l
d
and
activate
the
session
created.
5.
Activate
the
X
-
T
OUC
H EXTE
ND
E
R
and
c
l
ick
Connect.
6.
T
he
X
-
T
OUC
H EXTE
ND
E
R
is
now
avai
l
ab
l
e
as
an
R
T
P
M
I
D
I
contro
ll
er.
Open
the
preferences
of
your
DAW
and
add
it
as
contro
l
surface.
Master
1.
Make
sure
your
computer
and
the
X
-
T
OUC
H EXTE
ND
E
R
are
within
the
same
network.
2.
Open
the
rtpM
I
D
I
driver.
3.
Create
a
Session
by
pressing
“+”
underneath
the
My
Sessions
e
l
d
and
activate
the
session
created.
4
.
F
or
Who
may
connect
to
me:
choose
Anyone.
” X
-
T
OUC
H EXTE
ND
E
R
shou
l
d
appear
as
a
participant
of
the
session.
5.
T
he
X
-
T
OUC
H EXTE
ND
E
R
is
now
avai
l
ab
l
e
as
an
R
T
P
M
I
D
I
contro
ll
er.
Open
the
preferences
of
your
DAW
and
add
it
as
contro
l
surface.
*OS X is a trademark of Apple Inc.
*Windows is either a registered trademark or trademark of Microsoft Corporation in the United States and/or other countries.