Behringer X-TOUCH EXTENDER Quick Start Guide - Page 7
X-TOUCH EXTENDER Controls - used
 |
View all Behringer X-TOUCH EXTENDER manuals
Add to My Manuals
Save this manual to your list of manuals |
Page 7 highlights
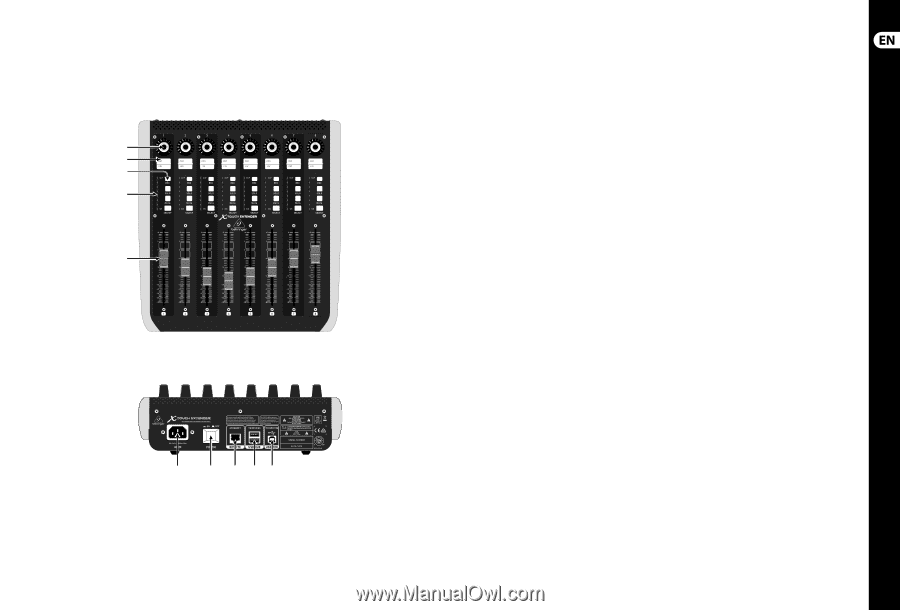
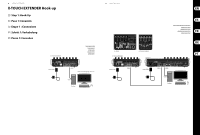
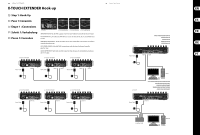
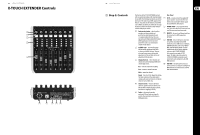
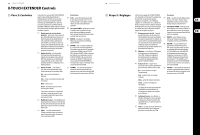
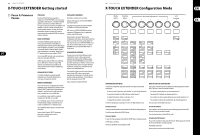
12 X-TOUCH EXTENDER X-TOUCH EXTENDER Controls (1) (2) (3) (4) (5) (6) (7) (8) (9) (10) 13 Quick Start Guide (EN) Step 2: Controls The function of the X-TOUCH EXTENDER controls will vary widely depending on the implementation of your DAW. The following descriptions are for the ideal case in MC mode, if your DAW supports these features. If you look into the features of your DAW, such as MIDI Learn mode, you will be able to assign the physical controls to operate a wide variety of software and plug-in controls. (1) Push encoder knobs - these 8 endless encoders each have a detent and push function (not illuminated), and a 13-segment amber LED ring. These are typically used in Digital Audio Workstation (DAW) applications for fine control of parameters such as aux send and pan control of each channel. (2) Scribble strips - these 8 LCD displays indicate various parameters and labels as shown in the DAW software. They are also used to view various settings and adjustments of the unit that can then be adjusted with the encoders. (3) Channel buttons - these 4 buttons per channel are used for individual DAW mixer channel applications: Rec - arms the channel for recording. Solo - isolates a channel in the mix. Rear Panel (6) AC IN - securely connect the supplied AC power cord here. Connect the other end of the cord to your local AC mains supply. Do not defeat the safety ground. (7) POWER switch - press in to turn on the unit, press out to turn it off. Do not turn it on until all connections have been made. (8) REMOTE - this port is an Ethernet interface for connection to a DAW supporting RTP MIDI. (9) USB HUB - these 2 USB type A connectors are used for connecting external USB hardware such as a USB mouse, a keyboard, USB MIDI controllers such as the X-TOUCH MINI, and USB MIDI keyboards. The Hub communicates directly to the computer and not to the X-TOUCH EXTENDER. Each connector can supply 5V USB power. The hub is only active when the X-TOUCH EXTENDER is powered on, and connected to a live computer via the USB MIDI connector. (10) USB MIDI - this USB type B connector is used to connect to a computer's USB port for MIDI data transfer (send/receive), and USB Hub communications. Mute - mutes the channel. Select - this selects the channel for editing. The mixer controls are then dedicated to setting up the selected channel, with details shown in each scribble strip. (4) Channel meters - these 8-LED meters show the signal level of each channel, and indicate when a signal (SIG LED) is present, and when it is clipping (CLIP LED). (5) Faders - these touch-sensitive motorized 100 mm faders are typically used for fine control of level functions in DAW applications.
-
 1
1 -
 2
2 -
 3
3 -
 4
4 -
 5
5 -
 6
6 -
 7
7 -
 8
8 -
 9
9 -
 10
10 -
 11
11 -
 12
12 -
13
-
14
-
15
-
16
-
17
 |
 |