Beko HIC64402T User Manual - Page 12
Control, Elements, Displays - flashing h
 |
View all Beko HIC64402T manuals
Add to My Manuals
Save this manual to your list of manuals |
Page 12 highlights
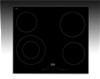
Control Elements and Displays operating the hob E Features II Main switch - ON/OFF Key Key lock Heat setting/Timer increase N/ Heat setting/Timer decrease ** Dual/triple zone-Selection Key O Activate/deactivate timer ** Activate/deactivate warming zone Note : • This appliance controls via the touch control unit. If your touch control unit has a timer, each operation is confirmed with an audio signal. • Always keep the control panels clean and dry. Moisture and dirt may impair function. la (*) If your hob is euipped with timer. ** OC If your hob is equipped with these functions ** in models with timer. • The graphics and figures are for illustration purposes only. The actual view or functions may differ. 11 Hotplate (cooking zone) Selection controls Hotplate display (heat setting 0 ...9) ▪ Dual/Triple zone in operation display ® ▪ via LED (Hotplate display) E * Timer display (4 LED assigned for 4 different hotplate) Turn on the hob Touch the "0" key in the control panel at least 1 second. The hotplate displays will light up. The hob is ready for use. You can now turn on (select) different hotplates within next 10 seconds. While operating the main switch "0" , it is not allowed to operate other controls. Note: When the hob is switched on for the first time or if the hob has been switched off at the mains whilst hot, the displays may flash 4 This is normal and will not effect the operation, of the hob. All hotplate displays flashes " and all related decimal points. The hob will be set automatically stand by mode if there is no operation within 10 seconds. If the main switch "0" is touched more than 2sec, the hob is turned off and is set into the stand-by mode again.
-
 1
1 -
2
-
3
-
4
-
5
-
6
-
 7
7 -
 8
8 -
 9
9 -
 10
10 -
 11
11 -
 12
12 -
 13
13 -
 14
14 -
 15
15 -
 16
16 -
 17
17 -
18
-
19
-
20
-
21
-
22
-
23
-
24
 |
 |
