Belkin F1DA116Q User Manual - Page 22
Step 3, Step 4
 |
View all Belkin F1DA116Q manuals
Add to My Manuals
Save this manual to your list of manuals |
Page 22 highlights
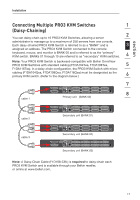
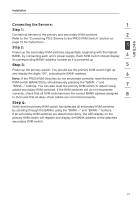
Installation Connecting the Primary and Secondary KVM Switches: Step 1 Using the Daisy-Chain Cable (F1D108-CBL), connect one end to the "Daisy-Chain In" port on the primary KVM switch (BANK 00). Step 2 Connect the other end of the Daisy-Chain Cable (F1D108-CBL) to the "Daisy-Chain Out" port of the first secondary KVM switch (BANK 01). Step 3 To add secondary units, connect one end of the Daisy-Chain Cable (F1D108-CBL) to the "Daisy-Chain In" port on the first secondary KVM switch and the other end to the "Daisy-Chain Out" port of the next secondary KVM switch(for example, BANK 02). Step 4 Repeat Step 3 for additional PRO3 KVM Switches you wish to daisy-chain together. Note: Your PRO3 KVM Switch is backward-compatible with Belkin OmniView PRO2 KVM Switches with standard cabling (F1DA104Tea, F1DA108Tea, F1DA116Tea). In a daisy-chain configuration, the PRO3 KVM Switch with microcabling (F1DA104Zea, F1DA108Zea, F1DA116Zea) must be designated as the primary KVM switch. 20
-
 1
1 -
2
-
3
-
4
-
5
-
6
-
7
-
8
-
9
-
10
-
11
-
12
-
13
-
14
-
15
-
16
-
 17
17 -
 18
18 -
 19
19 -
 20
20 -
 21
21 -
 22
22 -
 23
23 -
 24
24 -
 25
25 -
 26
26 -
 27
27 -
28
-
29
-
30
-
31
-
32
-
33
-
34
-
35
-
36
-
37
-
38
-
39
-
40
-
41
-
42
-
43
-
44
 |
 |
