Belkin F6C230-RKM-2U Belkin OmniGuard Rackmount UPS Hardware Manual - Page 11
Software Features & Installation
 |
View all Belkin F6C230-RKM-2U manuals
Add to My Manuals
Save this manual to your list of manuals |
Page 11 highlights
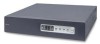
SOFTWARE FEATURES & INSTALLATION Communications Port Connection Setting Up OmniGuard Power Management Software and The Interface Cable Power Management software and interface cable kits can be used with the UPS. Use only approved interface cables with this UPS. Connect the interface cable to the 9-pin communication port on the rear panel of the UPS. Secure the connector to the UPS via the screws on the connector housing. Connect the other end of the cable to the device or computer that will be monitoring/controlling the UPS. Please check the setup instructions in the software manual located with the CD. Setting Up Windows Internal Power Management for UPS Service Note 1: Wake Up and Auto Power-On ATX PC When AC returns, if the user wants the UPS to power up the PC equipped with ATX power, our UPS has two methods in order to do this function: 1. Enable the wake-up by modem in the PC BIOS, and then connect the UPS and PC with RS232 cable. When AC returns, the UPS will send a signal to start up the PC by RS232 cable. 2. Enable the AC return restart in the PC BIOS (if your PC BIOS can support this function), and when the AC returns, then the PC will start up directly. If you don't need to have your PC auto power on after auto shutdown, you may just set up Windows internal power management for UPS service as follows: When there is a utility failure, the UPS will send the AC-fail and low-battery signals to the PC, and Windows will shut down and send back to the UPS a shutdown signal. The UPS will be off automatically after the PC is off. The UPS will be on automatically when utility is recovered. The PC will assume the power from your UPS. If you have set up your PC to wake-up or auto restart in BIOS as described in the foregoing note, your PC will be turned on automatically. SOFTWARE FEATURES & INSTALLATION 1. Open your Windows 2000 Control Panel by clicking on "Start", "Setting", "Control Panel". 2. Double-click on the Control Panel's "Administrative Tools" icon. 3. Double-click the "Services" icon. 20 21
-
 1
1 -
2
-
3
-
4
-
5
-
 6
6 -
 7
7 -
 8
8 -
 9
9 -
 10
10 -
 11
11 -
 12
12 -
 13
13 -
 14
14 -
 15
15 -
 16
16 -
17
 |
 |
