BenQ PL460 P Series Video Wall Guide - Page 5
Installing edge finishing kit (optional), Installation
 |
View all BenQ PL460 manuals
Add to My Manuals
Save this manual to your list of manuals |
Page 5 highlights
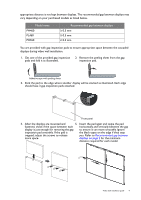
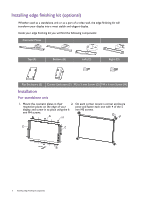
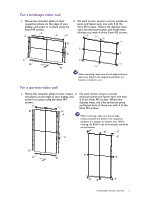
Installing edge finishing kit (optional) Whether used as a standalone unit or as a part of a video wall, the edge finishing kit will transform your display into a most stylish and elegant display. Inside your edge finishing kit you will find the following components: Cosmetic Plates Top (A) Bottom (B) Left (C) Right (D) Flat Enclosure (E) Corner Enclosure (F) M3 x 5 mm Screw (G) M4 x 6 mm Screw (H) Installation For standalone unit 1. Mount the cosmetic plates in their 2. On each corner, mount a corner enclosure respective places on the edge of your piece and fasten each one with 4 of the 5 display, and screw in to place using the 6 mm M3 screws. mm M4 screws. A H GF C D B 5 Installing edge finishing kit (optional)
-
 1
1 -
 2
2 -
 3
3 -
 4
4 -
 5
5 -
 6
6 -
 7
7
 |
 |

5
Installing edge finishing kit (optional)
Installing edge finishing kit (optional)
Whether used as a standalone unit or as a part of a video wall, the edge finishing kit will
transform your display into a most stylish and elegant display.
Inside your edge finishing kit you will find the following components:
Installation
For standalone unit
Cosmetic Plates
Top (A)
Bottom (B)
Left (C)
Right (D)
Flat Enclosure (E)
Corner Enclosure (F)
M3 x 5 mm Screw (G)
M4 x 6 mm Screw (H)
1.
Mount the cosmetic plates in their
respective places on the edge of your
display, and screw in to place using the 6
mm M4 screws.
2.
On each corner, mount a corner enclosure
piece and fasten each one with 4 of the 5
mm M3 screws.
A
H
D
B
C
G
F