BenQ PW9620 DLP Projector User Manual - Page 64
Control the projector through a network
 |
View all BenQ PW9620 DLP Projector manuals
Add to My Manuals
Save this manual to your list of manuals |
Page 64 highlights
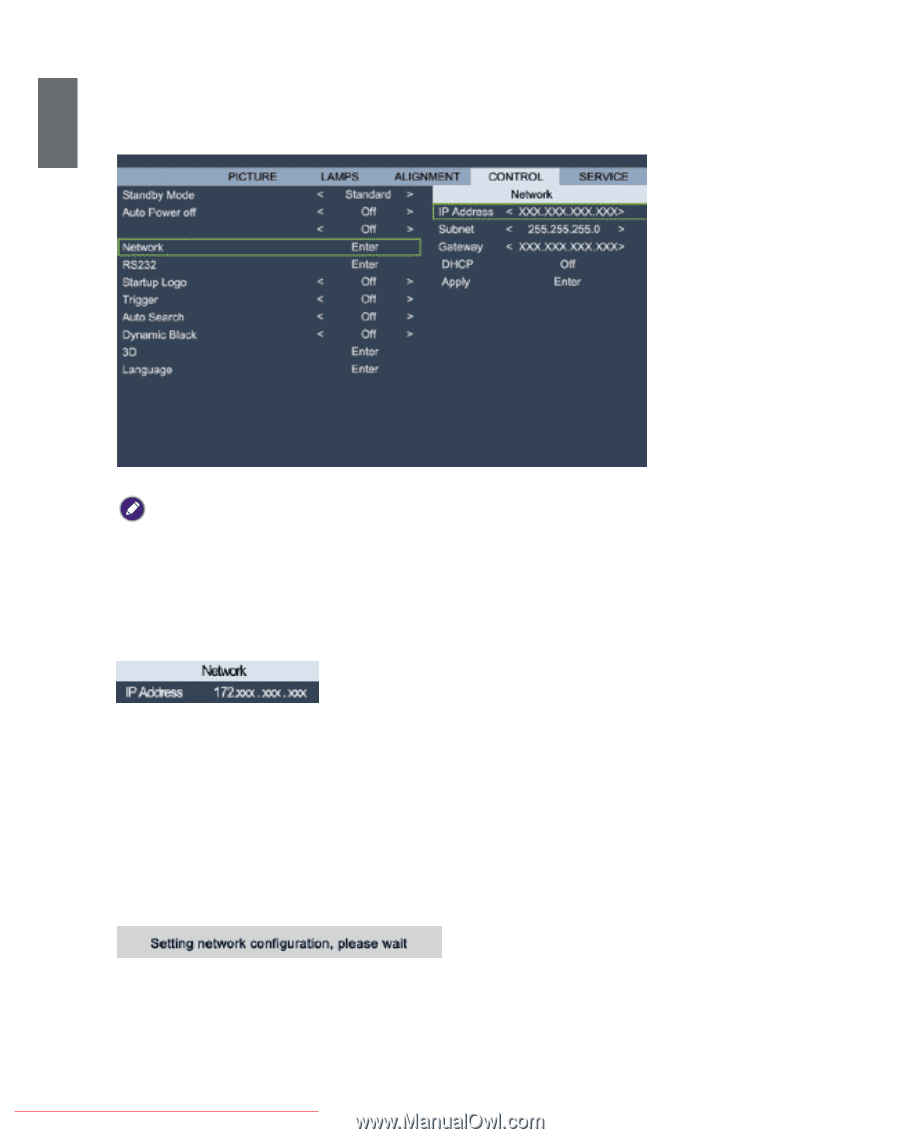
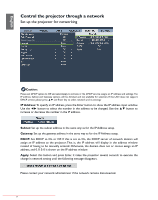
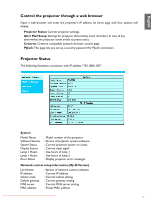
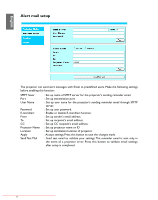
English Control the projector through a network Set up the projector for networking DISPLAY Direct Power On Caution: Please set DHCP option to Off and select Apply to activate it.The DHCP service assigns an IP address and settings.The IP address, Subnet and Gateway options will be dimmed and not available for selection. If the LAN does not support DHCP service, please press ▲▼ and Enter key to select network and its settings: IP Address: To specify an IP address, press the Enter button to show the IP address input window. Use the ◄► button to select the number in the address to be changed. Use the ▲▼ button to increase or decrease the number in the IP address. Subnet: Set up the subnet address in the same way as for the IP Address setup. Gateway: Set up the gateway address in the same way as for the IP Address setup. DHCP: Set DHCP to On or Off. If this is set to On, the DHCP server of network domain will assign an IP address to the projector. That is, the IP address will display in the address window instead of having to be manually entered. Otherwise, the domain does not or cannot assign an IP address, and 0. 0. 0. 0 is shown on the IP address window. Apply: Select this button and press Enter. It takes the projector several seconds to execute the change in network setting until the following message disappears. Please contact your network administrator if the network remains disconnected. Downloaded From projector-manual.com BenQ Manuals 64
-
 1
1 -
2
-
3
-
4
-
5
-
6
-
7
-
8
-
9
-
10
-
11
-
12
-
13
-
14
-
15
-
16
-
17
-
18
-
19
-
20
-
21
-
22
-
23
-
24
-
25
-
26
-
27
-
28
-
29
-
30
-
31
-
32
-
33
-
34
-
35
-
36
-
37
-
38
-
39
-
40
-
41
-
42
-
43
-
44
-
45
-
46
-
47
-
48
-
49
-
50
-
51
-
52
-
53
-
54
-
55
-
56
-
57
-
58
-
 59
59 -
 60
60 -
 61
61 -
 62
62 -
 63
63 -
 64
64 -
 65
65 -
 66
66 -
 67
67 -
 68
68 -
 69
69 -
70
-
71
-
72
-
73
 |
 |