Beretta U22 Neos Beretta U22 Neos User Manual - Page 31
Troubleshooting - 22lr
 |
View all Beretta U22 Neos manuals
Add to My Manuals
Save this manual to your list of manuals |
Page 31 highlights
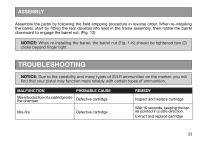
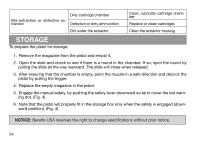
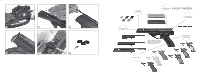
ASSEMBLY Assemble the pistol by following the field stripping procedure in reverse order. When re-installing the barrel, start by fitting the rear dovetail into seat in the frame assembly, then rotate the barrel downward to engage the barrel nut. (Fig. 12) NOTICE: When re-installing the barrel, the barrel nut (Fig. 1-K) should be tightened two (2) clicks beyond finger tight. TROUBLESHOOTING NOTICE: Due to the variability and many types of 22LR ammunition on the market, you will find that your pistol may function more reliably with certain types of ammunition. MALFUNCTION PROBABLE CAUSE Mis-introduction of a cartridge into the chamber Defective cartridge Mis-fire Defective cartridge REMEDY Inspect and replace cartridge Wait 10 seconds, keeping the barrel pointed in a safe direction. Extract and replace cartridge 33
-
 1
1 -
2
-
3
-
4
-
5
-
6
-
7
-
8
-
9
-
10
-
11
-
12
-
13
-
14
-
15
-
16
-
17
-
18
-
19
-
20
-
21
-
22
-
23
-
24
-
25
-
 26
26 -
 27
27 -
 28
28 -
 29
29 -
 30
30 -
 31
31 -
 32
32 -
 33
33 -
 34
34 -
 35
35 -
 36
36
 |
 |