Bernina 1011 Manual - Page 16
Inserting, needle, changing, presser
 |
View all Bernina 1011 manuals
Add to My Manuals
Save this manual to your list of manuals |
Page 16 highlights
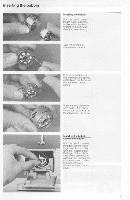
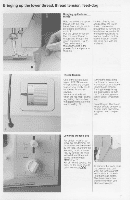
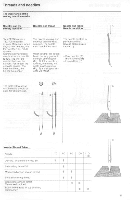
Inserting the needle, changing presser feet I I Inserting the needle • A small Drown screw- driver for slackening Tighten the needle -'amp nit ,;,:./cy, t;tci.rely. or tightening the nets! clamp W provided 41 l• sacessones box WARNING: Set the power switch to the (=I position. Check I flat the needle is in the 'awed Deer Don 'geese refer to the Safely Instructions. fo slacken the needle clamp: hall a turn for- wards. anti-clockwise 'Fig. n. To insert the needle: The Hat side of the needle shank should ahvays be to the rear. Insen the needle until it reaches the lop. If the needle does het reach the top, i.e is set too low, skipped stitches will result Changing presser Int or me presser feet and the., uses. see page 11 Inc success of a piece of sewing largely depends on the correct choice ci presser loot The presser feel are easy and practical 10 change Set the power switch to the I position Chock that the needle is "f• raised position Raise the presser loot (Fig 2). Raise the clamping lever with the index linger of the right hand, and using the middle linger and thumb, remove the presser fool (Fig. 3) To attach the presser toot The procedure is the same, but press the clamping lover downwards with the index finger IFig. S.
-
 1
1 -
2
-
3
-
4
-
5
-
6
-
7
-
8
-
9
-
10
-
 11
11 -
 12
12 -
 13
13 -
 14
14 -
 15
15 -
 16
16 -
 17
17 -
 18
18 -
 19
19 -
 20
20 -
 21
21 -
22
-
23
-
24
-
25
-
26
-
27
-
28
-
29
-
30
-
31
-
32
-
33
-
34
-
35
-
36
-
37
-
38
-
39
-
40
-
41
-
42
-
43
-
44
-
45
-
46
-
47
-
48
-
49
-
50
-
51
-
52
-
53
-
54
 |
 |
