Bernina 1011 Manual - Page 42
Darning
 |
View all Bernina 1011 manuals
Add to My Manuals
Save this manual to your list of manuals |
Page 42 highlights
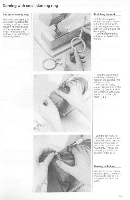
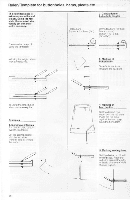
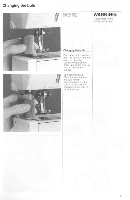
Darning Principles of darning The feed dog must be lowered for darning. as the work is moved to and frO by hand and not by the feed-dog It is important to guide evenly when darning - Use the sewing table and keep the elbowS supported, when possible by the work table. MOVe the machine suffipently far away from the edge to do this Recommendation :Whenever possible, use a darning or embroidery ring to keep the darning - lovethe ring Packwards and forwards winout pressure. otherwise rerky movements and thread breakage wilt result - Always work from left '0 right. moving up and dawn over the hole. Do not move the hoop from Bide tO side. - The ideal way to hold the ring 5 with the little fingers and thumbs to the Outside of the ring, held firmly to give a smooth movement Presser r.sr Thread Needle' StitchStitch width Slitchlength• Needle_position Feed-dog Colour indicator darning thread / Machine emb. 60 80-70 0 0 centre towered Important Darn in a curved rather than a pointed shape. Otherwise the fabric is liable to tear Beginners Often tend to prefer L and M movements. but care must be taken to ensure that hirs does not result in Circular movements. 15-66t5' TOW/V.4/)1 Darning technique There are various methods of darning. Here 5 a rnethOd that r$ easy 10 leawr „ r LL r r Iii The three steps Rang lower thread up. start at top left, work tram eft to right across hole. finish at top nght. then kiln through 90" 2 Again work from left to Main lauits right. but not too densely that a ridge forms at the re Turn work through Thread free, prnuy nreakS: - Fabric is r piiCtrit un- evenly 3 Fill in the darn, but only across Ilia .hole.. The stitches will be in the Stitching m. I.neeranriye, same direction so chair* a thread hes loose on top. - Fabric is gkoded quickly Small knots form on the underside: - Fabric is guided too slowly they blend with the 2nd row. When the darning techni- que has been mastered, work the rows of shwas in 'regular lengths so the darn blends into the la- enc. 34
-
 1
1 -
2
-
3
-
4
-
5
-
6
-
7
-
8
-
9
-
10
-
11
-
12
-
13
-
14
-
15
-
16
-
17
-
18
-
19
-
20
-
21
-
22
-
23
-
24
-
25
-
26
-
27
-
28
-
29
-
30
-
31
-
32
-
33
-
34
-
35
-
36
-
 37
37 -
 38
38 -
 39
39 -
 40
40 -
 41
41 -
 42
42 -
 43
43 -
 44
44 -
 45
45 -
 46
46 -
 47
47 -
48
-
49
-
50
-
51
-
52
-
53
-
54
 |
 |
