Biostar K8NHA GRAND K8NHA Grand BIOS setup guide - Page 30
Frequency Control
 |
View all Biostar K8NHA GRAND manuals
Add to My Manuals
Save this manual to your list of manuals |
Page 30 highlights
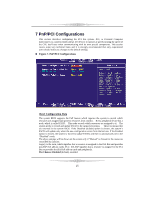
9 Frequency Control Figure 9. Frequency Control CPU Voltage This item allows you to select CPU Voltage Control. The Choices: Default (default), +1.7%, +3.4%, +5.1%. DDR Voltage This item allows you to select DDR Voltage Control. The Choices: Default (Default), 2.75V, 2.85V, 2.90V. If unfortunately, the system's frequency that you are selected is not functioning, there are two methods of booting-up the system. Method 1: Clear the CMOS data by setting the JCMOS1 ((2-3) closed)) as "ON" status. All the CMOS data will be loaded as defaults setting. Method 2: Press the key and Power button simultaneously, after that keep-on pressing the key until the power-on screen showed. This action will boot-up the system according to FSB of the processor. 29
-
 1
1 -
2
-
3
-
4
-
5
-
6
-
7
-
8
-
9
-
10
-
11
-
12
-
13
-
14
-
15
-
16
-
17
-
18
-
19
-
20
-
21
-
22
-
23
-
24
-
 25
25 -
 26
26 -
 27
27 -
 28
28 -
 29
29 -
 30
30
 |
 |
