Biostar P4TCA PRO P4TCA Pro user's manual - Page 10
Installing DDR Module, Serial Raid - raid driver
 |
View all Biostar P4TCA PRO manuals
Add to My Manuals
Save this manual to your list of manuals |
Page 10 highlights
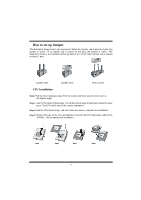
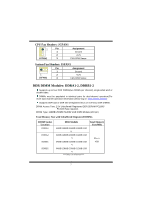
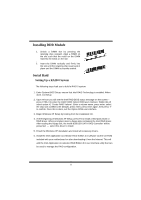
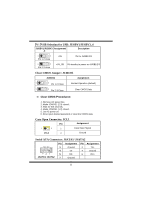
Installing DDR Module 1. Unlock a DIMM slot by pressing the retaining clips outward. Align a DIMM on the slot such that the notch on the DIMM matches the break on the slot. . 2. Insert the DIMM vertically and firmly into the slot until the retaining chip snap back in place and the DIMM is properly seated. Serial Raid Setting Up a RAID 0 System The following steps lead you to build a RAID 0 system: 1. Enter System BIOS Setup; ensure that Intel RAID Technology is enabled. When done, exit Setup. 2. Upon re-boot you will see the Intel RAID BIOS status message on the screen - press CTRL+I to enter the Intel® RAID Option ROM user interface. Within this UI select option #1 'Create RAID Volume'. Enter a volume name, press enter, select the strip size (128KB is the default), press enter, press enter again, then press 'Y' to confirm. Once this is done, exit the Option ROM user interface. 3. Begin Windows XP Setup by booting from the installation CD. 4. At the beginning of Windows XP Setup, press F6 to install a third-party SCSI or RAID driver. When prompted, insert a floppy disk containing the Intel RAID driver. After reading the floppy disk, the Intel® 82801ER SATA RAID Controller' will be presented - select this driver to install. 5. Finish the Windows XP installation and install all necessary drivers. 6. Install the Intel Application Accelerator RAID Edition 3.0 software via the CD-ROM included with your motherboard or after downloading it from the Internet. This will add the Intel Application Accelerator RAID Edition 3.0 user interface utility that can be used to manage the RAID configuration. 8
-
 1
1 -
2
-
3
-
4
-
 5
5 -
 6
6 -
 7
7 -
 8
8 -
 9
9 -
 10
10 -
 11
11 -
 12
12 -
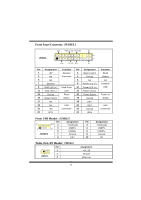 13
13 -
 14
14 -
 15
15 -
16
-
17
-
18
-
19
-
20
-
21
-
22
-
23
-
24
-
25
-
26
-
27
-
28
-
29
 |
 |