Bissell AeroSwift™ Compact Vacuum User's Guide - Page 11
Check Rotating Floor Brush - cleaner parts
 |
View all Bissell AeroSwift™ Compact Vacuum manuals
Add to My Manuals
Save this manual to your list of manuals |
Page 11 highlights
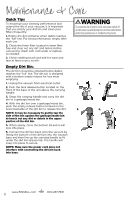
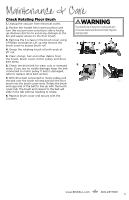
Maintenance & Care Check Rotating Floor Brush 1. Unplug the vacuum from electrical outlet. 2. Recline the handle into lowest position and turn the vacuum over so bottom side is facing up. Remove dirt bin to avoid any damage to the bin and easier access to the floor brush. 3. Remove the 3 screws in the brush cover using a Phillips screwdriver. Lift up and remove the brush cover to access brush roll. 4. Grasp the rotating brush at both ends at lift out. 5. Clear strings, hair and other debris from the brush, brush cover, motor pulley and drive belt areas. 6. Check the drive belt for wear, cuts or stressed areas. If you see no visible damage, keep the belt connected to motor pulley. If belt is damaged, refer to replace drive belt section. 7. With drive belt connected to motor pulley, pull the belt over the brush roll and position the floor brush into the brush cover ends. Rotate the brush end opposite of the belt to line up with the brush cover tab. The brush end closest to the belt will slide in the tab without needing to rotate. 8. Replace brush cover and secure with the 3 screws. WARNING To reduce the risk of injury from moving parts, turn off vacuum cleaner and disconnect Power Plug from electrical outlet. 3. 4. 5. 7. www.bissell.com 800.237.7691 11
-
 1
1 -
2
-
3
-
4
-
5
-
 6
6 -
 7
7 -
 8
8 -
 9
9 -
 10
10 -
 11
11 -
 12
12 -
 13
13 -
 14
14 -
 15
15 -
 16
16
 |
 |