Bissell AeroSwift™ Compact Vacuum User's Guide - Page 5
As²mbly
 |
View all Bissell AeroSwift™ Compact Vacuum manuals
Add to My Manuals
Save this manual to your list of manuals |
Page 5 highlights
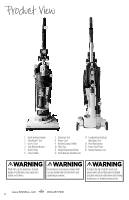
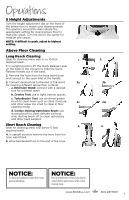
Assembly No tools required! Remove all protective plastic before assembly and operating. Attach Quick Release Handle to Base 1. Locate vacuum handle and remove the protective plastic overwrap. 1. NOTE: The plastic wrap will easily slide off the handle by removing the TurboBrush® Tool Clip. 2. With the Quick Release Lever in upright position - slide handle into base and push the lever down to lock handle into place. Attach TurboBrush® Tool to Handle Clip 1. Locate the TurboBrush® Tool in the box and remove the protective plastic wrap. 1. 2. Snap the TurboBrush® Tool Clip to the handle. 3. Line up the back of the TurboBrush® to the bottom of the clip - the top of the brush opening will rest over the bottom of the clip. 3. 4. With the lower tool in position, push the top of the tool handle into the upper clip to secure. Attach Vacuum Hose and Secure Tools 1. Insert the end of the hose into the hose connector at the foot base inlet opening. 1. Wrap the hose around the upper hose clip. Note: Check that the tabbed end of the hose is connected and secured to the upper suction inlet. The vacuum will not operate properly unless the both hose ends are secure. 2. Check that the crevice tool is inserted into the extension wand in the storage post on the side of the vacuum. 3. Place the combo dusting/upholstery brush on the storage post located on the back of the unit under the wand release lever. 2. Crevice Tool 4. Wrap power cord around the cord wraps for storage. 4. WARNING Do not plug in your vacuum cleaner until you are familiar with all instructions and operating procedures. 2. 2. 4. TurboBrush® Tool 3. Combo Brush Power Cord Wrap www.bissell.com 800.237.7691 5
-
 1
1 -
 2
2 -
 3
3 -
 4
4 -
 5
5 -
 6
6 -
 7
7 -
 8
8 -
 9
9 -
 10
10 -
 11
11 -
12
-
13
-
14
-
15
-
16
 |
 |
