Bissell Carpet Cleaners User Guide - Page 6
Lower Handle
 |
View all Bissell Carpet Cleaners manuals
Add to My Manuals
Save this manual to your list of manuals |
Page 6 highlights
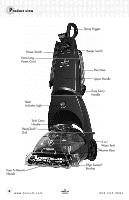
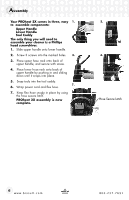
Assembly Your PROheat 2X comes in three, easy 1. to assemble components: Upper Handle Lower Handle Tool Caddy The only thing you will need to assemble your cleaner is a Phillips head screwdriver. 1. Slide upper handle onto lower handle. 2. Screw 3 screws into the marked holes. 3. 3. Place upper hose rack onto back of upper handle, and secure with screw. 4. Place lower hose rack onto back of upper handle by pushing in and sliding down until it snaps into place. 5. Snap tools into the tool caddy. 7. 6. Wrap power cord and flex hose. 7. Keep flex hose snugly in place by using the hose secure latch. PROheat 2X assembly is now complete. 2. 4. Hose Secure Latch 6 www.bissell.com 800.237.7691
-
 1
1 -
 2
2 -
 3
3 -
 4
4 -
 5
5 -
 6
6 -
 7
7 -
 8
8 -
 9
9 -
 10
10 -
 11
11 -
 12
12 -
13
-
14
-
15
-
16
-
17
-
18
-
19
-
20
-
21
-
22
-
23
-
24
 |
 |

www.bissell.com
800.237.7691
A
ssembly
6
Your
PROheat 2X comes in three, easy
to
assemble components:
Upper Handle
Lower Handle
Tool Caddy
The only thing you will need to
assemble your cleaner is a Phillips
head screwdriver.
1.
Slide upper handle onto lower handle.
2.
Screw 3 screws into the marked holes.
3.
Place upper hose rack onto back of
upper handle, and secure with screw.
4.
Place lower hose rack onto back of
upper handle by pushing in and sliding
down until it snaps into place.
5.
Snap tools into the tool caddy.
6.
Wrap power cord and flex hose.
7.
Keep flex hose snugly in place by using
the hose secure latch.
PROheat 2X assembly is now
complete.
Hose Secure Latch
1.
3.
2.
4.
7.