Bissell Vacuums User Guide - Page 5
Assembly
 |
View all Bissell Vacuums manuals
Add to My Manuals
Save this manual to your list of manuals |
Page 5 highlights
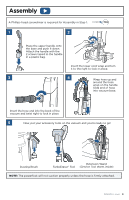
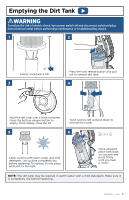
Assembly A Phillips-head screwdriver is required for Assembly in Step 1. 1 2 Place the upper handle onto the base and push it down. Attach the handle with the 2 screws taped to the handle in a plastic bag. Insert the lower cord wrap and turn it to the right to lock in place. 3 4 Wrap hose up and around the hose wrap on the handle. Slide end of hose into vacuum base. Insert the hose end into the back of the vacuum and twist right to lock in place. 5 Now, put your accessory tools on the vacuum and you're ready to go! Dusting Brush Extension Wand TurboEraser® Tool (Crevice Tool stores inside) NOTE: The powerfoot will not suction properly unless the hose is firmly attached. BISSELL.com 5
-
 1
1 -
 2
2 -
 3
3 -
 4
4 -
 5
5 -
 6
6 -
 7
7 -
 8
8 -
 9
9 -
 10
10 -
 11
11 -
12
 |
 |

BISSELL.com
5
Place the upper handle onto
the base and push it down.
Attach the handle with the
2 screws taped to the handle
in a plastic bag.
Assembly
Insert the lower cord wrap and turn
it to the right to lock in place.
Insert the hose end into the back of the
vacuum and twist right to lock in place.
NOTE:
The powerfoot will not suction properly unless the hose is firmly attached.
Wrap hose up and
around the hose
wrap on the handle.
Slide end of hose
into vacuum base.
TurboEraser® Tool
Dusting Brush
Extension Wand
(Crevice Tool stores inside)
Now, put your accessory tools on the vacuum and you’re ready to go!
A Phillips-head screwdriver is required for Assembly in Step 1.
1
5
2
3
4