Bissell Vacuums User Guide - Page 9
Replacing the Brush & Belt, Clearing a Clog
 |
View all Bissell Vacuums manuals
Add to My Manuals
Save this manual to your list of manuals |
Page 9 highlights
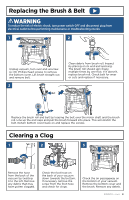
Replacing the Brush & Belt WARNING To reduce the risk of electric shock, turn power switch OFF and disconnect plug from electrical outlet before performing maintenance or troubleshooting checks. 1 2 Unplug vacuum, turn over and unscrew six (6) Phillips-head screws to remove the bottom cover. Lift brush straight out and remove belt. 3 Belt Clean debris from brush roll. Inspect by placing on its end and spinning. The brush roll should spin freely, multiple times by one flick. If it doesn't, replace brush roll. Check belt for wear or cuts and replace if necessary. End Cap Replace the brush roll and belt by looping the belt over the motor shaft and the brush roll. Line up the end caps and pull the brush forward into place. This will stretch the belt. Return bottom cover back on and replace the screws. Clearing a Clog 1 2 3 Remove the hose from the back of the vacuum by twisting it to the left. Remove any debris that may have gotten clogged. Check the foot hose on the back of your vacuum down towards the bottom. If necessary, remove the screw from the foot hose and check for clogs. Check the air passageway on the bottom of your vacuum. Remove the bottom cover and the brush. Remove any debris. BISSELL.com 9
-
 1
1 -
2
-
3
-
 4
4 -
 5
5 -
 6
6 -
 7
7 -
 8
8 -
 9
9 -
 10
10 -
 11
11 -
 12
12
 |
 |
