Bosch HEI7052U Installation Instructions - Page 18
Service - troubleshooting
 |
UPC - 825225842132
View all Bosch HEI7052U manuals
Add to My Manuals
Save this manual to your list of manuals |
Page 18 highlights
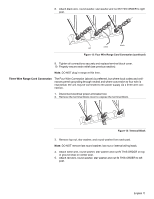
Check Back of Range for Proper Installation Adjust Front of Range for Proper Installation Test the Installation 3. Slide range into opening, being careful not to damage countertops, floors, or the range drawer front. Do not apply pressure to cooktop when sliding into position. Tip: Remove the drawer to prevent damage. 1. When properly installed, the cooktop trim around the back of the range will rest lightly on the countertop. 2. There should not be any gap between the countertop and the trim; however, the weight of the range must not rest on the countertop. Look under the range to verify that both back legs are resting solidly on the floor. Also verify that the left range leg is under the anti-tip bracket. Caution: Verify that the weight of the range is not resting on the counterrop. This could result in damage to the countertop and the appliance. 3. If the back legs are not resting solidly on the floor or the left leg is not under the anti-tip bracket, slide range out, adjust legs and slide back in. 1. Adjust front leveling legs so that the cooktop trim rests snugly against the countertop all the way around. 2. Verify that both front legs are resting solidly on the floor. 3. Use a level to verify that the range is level and plumb. Turn on Power at Breaker Caution: If the display flashes and beeps, the polarity of the wiring may be reversed. Reversed polarity can damage the range and can result in electrical shock hazard. Immediately switch off power at the breaker and return to "Connect Electric - Range Cord" on page 8. Service Before Calling Service See Use and Care Manual for troubleshooting information. Refer to the Warranty in the Use and Care Manual. To reach a service representative, see the contact information at the front of the manual. Please be prepared with the information printed on your product data plate when calling. English 16
-
 1
1 -
2
-
3
-
4
-
5
-
6
-
7
-
8
-
9
-
10
-
11
-
12
-
 13
13 -
 14
14 -
 15
15 -
 16
16 -
 17
17 -
 18
18 -
 19
19 -
 20
20 -
 21
21 -
 22
22 -
 23
23 -
24
-
25
-
26
-
27
-
28
-
29
-
30
-
31
-
32
-
33
-
34
-
35
-
36
-
37
-
38
-
39
-
40
-
41
-
42
-
43
-
44
-
45
-
46
-
47
-
48
-
49
-
50
-
51
-
52
-
53
-
54
-
55
-
56
 |
 |
