Bosch HEI7282U Installation Instructions - Page 4
Installation - parts
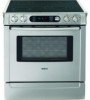 |
UPC - 825225844365
View all Bosch HEI7282U manuals
Add to My Manuals
Save this manual to your list of manuals |
Page 4 highlights
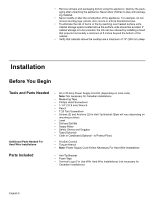
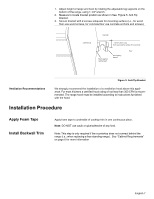
• Remove all tape and packaging before using the appliance. Destroy the packaging after unpacking the appliance. Never allow children to play with packaging material. • Never modify or alter the construction of the appliance. For example, do not remove leveling legs, panels, wire covers or anti-tip brackets/screws. • To eliminate the risk of burns or fire by reaching over heated surface units, cabinet storage space located above the surface units should be avoided. If cabinet storage is to be provided, the risk can be reduced by installing a hood that projects horizontally a minimum of 5 inches beyond the bottom of the cabinet. • Verify that cabinets above the cooktop are a maximum of 13" (330 mm) deep. Installation Before You Begin Tools and Parts Needed Additional Parts Needed For Hard Wire Installations Parts Included • 40 or 50 Amp Power Supply Cord Kit (depending on local code) Note: Not necessary for Canadian installations • Measuring Tape • Phillips Head Screwdriver • 1-1/4" (31.8 mm) Wrench • Pencil • T-20 Torx Screwdriver • Screws (2) and Anchors (2) for Anti-Tip Bracket (Style will vary depending on mounting surface) • Level • Drill and Drill Bit • Soapy Water • Safety Gloves and Goggles • Tape (Optional) • Cloth or Cardboard (Optional - to Protect Floor) • Flexible Conduit • Torque Wrench • Note: Power Supply Cord Kit Not Necessary For Hard Wire Installations • Anti-Tip Bracket • Foam Tape • Terminal Lugs (For Use With Hard Wire Installations) (not necessary for Canadian installations) English 2
-
 1
1 -
 2
2 -
 3
3 -
 4
4 -
 5
5 -
 6
6 -
 7
7 -
 8
8 -
 9
9 -
 10
10 -
11
-
12
-
13
-
14
-
15
-
16
-
17
-
18
-
19
-
20
-
21
-
22
-
23
-
24
-
25
-
26
-
27
-
28
-
29
-
30
-
31
-
32
-
33
-
34
-
35
-
36
-
37
-
38
-
39
-
40
-
41
-
42
-
43
-
44
-
45
-
46
-
47
-
48
-
49
-
50
-
51
-
52
-
53
-
54
-
55
-
56
 |
 |
