Bosch HES7132U Installation Instructions - Page 14
Completed Three Wire Flexible Conduit Connectiog
 |
UPC - 825225842439
View all Bosch HES7132U manuals
Add to My Manuals
Save this manual to your list of manuals |
Page 14 highlights
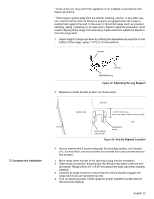
6. Insert stripped end of white wire into the center lug on top of the ground strap. Secure the clamping screw. . lug clamping screw wire Figure 17: Attaching Wire to Lug 7. Insert stripped end of red wire into the left lug. Secure clamping screw. 8. Insert stripped end of black wire into the right lug. Secure clamping screw. 9. Tighten each clamping screw with the appropriate torque (See table below). Table 3: Appropriate Torque Levels for Aluminum or Copper Wire Gauge Torque (in./lbs.) Torque (Nm) 6 35 3.95 8 25 2.82 10. Properly secure flexible conduit at knockout panel on range and at supply side junction box. The wiring is now complete. . green ground screw Figure 18: Completed Three Wire Flexible Conduit Connectiog 6) Attach anti-tip bracket to floor Note: DO NOT plug in range at this time. WARNING RANGE TIPPING HAZARD All ranges can tip and injury could result. To prevent accidental tipping of the range, attach it to the wall, floor or cabinet by installing the Anti-Tip Device supplied. English 12
-
 1
1 -
2
-
3
-
4
-
5
-
6
-
7
-
8
-
 9
9 -
 10
10 -
 11
11 -
 12
12 -
 13
13 -
 14
14 -
 15
15 -
 16
16 -
 17
17 -
 18
18 -
 19
19 -
20
-
21
-
22
-
23
-
24
-
25
-
26
-
27
-
28
-
29
-
30
-
31
-
32
-
33
-
34
-
35
-
36
-
37
-
38
-
39
-
40
-
41
-
42
-
43
-
44
-
45
-
46
-
47
-
48
 |
 |
