Bosch WFMC5301UC Installation and Use & Care (all languages) - Page 11
Caution - pedestal
 |
UPC - 825225852117
View all Bosch WFMC5301UC manuals
Add to My Manuals
Save this manual to your list of manuals |
Page 11 highlights
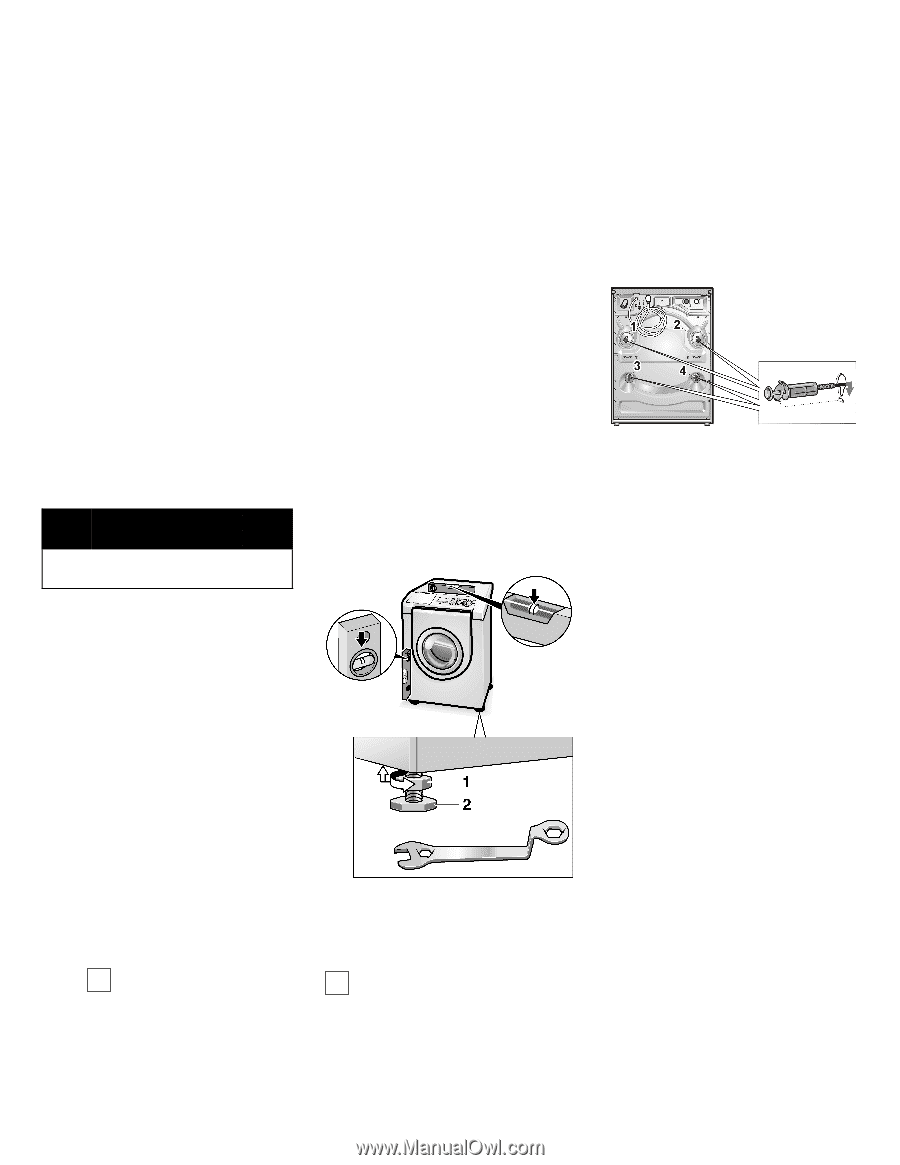
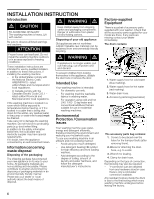
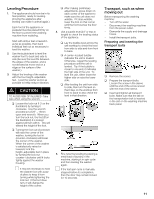
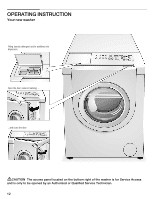
Leveling Procedure 1. The appliance should now be in its final position, ready for leveling (moving the appliance after leveling can make it unlevel again.) Each foot of the appliance or pedestal must be placed firmly on the floor to prevent the washing machine from wobbling. Start with all four feet screwed in as far as possible, then back individual feet out as necessary to level the washer. 2. Use the bubble level to level the washer front to back and side to side (be sure the level fits between the edges of the washer, and is not elevated at mone end on a ridge on the surface of the washer.) 3. Adjust the leveling of the washer with the four height-adjustable feet. Level the washer as low as possible to heklp reduce vibration. d CAUTION TO AVOID RISK OF INJURIES-Take care when using the wrench. q Loosen the lock nut 1 (1 on the illustration) by turning it clockwise. Use the wrench provided (or a 5/8" - 16mm open end wrench). When you turn the lock nut, the foot (2 on the illustration) it is locked against will turn with it. This will extend the height of the foot. q Turning the foot out (clockwise) will raise the corner of the washer, turning the foot in (counter-clockwise) will lower the corner of the washer. When the corner of the washer is satisfactorily raised or lowered, lock the height-adjustable feet in place by turning the lock nut counter-clockwise until it locks tightly against the washer housing. i It may be necessary to hold the washer foot with a pair of pliers to keep it from turning while tightening the lock nut. It the foot does turn, it will change the height of the corner. q After making preliminary adjustments, press down on each corner of the washer to make sure the unit does not wobble. If it does wobble, lower the foot on that corner until the foot touches the floor firmly. 4. Use a bubble level (24" or less in length) to check the leveling status of the appliance. q Lay the bubble level across the unit worktop to check the level from side to side and from front to back. q A center-located bubble indicates the unit is leveled. Otherwise, repeat the leveling procedure until the unit is leveled. Tip: if the bubble is closer to one end, it indicates the high side of the unit. To level the unit, either lower the higher side or raise the lower side. q After leveling the unit from side to side, then turn the level so that it lays on the worktop from front to back to also check the level in that direction. 5. Fine tune the leveling by placing a small load of laundry in the machine, starting it in spin cycle and then leveling the washer again. i If the test spin cycle is manually stopped before its completion, then the door may remain locked for 10 seconds. Transport, such as when moving out Before transporting the washing machine: - Turn off the water. - Disconnect the washing machine from the power outlet. - Dismantle the supply and drainage hoses. - Install the transport bolts. Preparing and inserting the transport bolts q Remove the covers. q Prepare the transport bolts: Loosen the screw in the sleeve until the end of the screw is level with the end of the sleeve. q Insert and tighten all transport bolts. Make sure that the tab on the transportation bolt is inserted in the slot on the washing machine back panel. 11
-
 1
1 -
2
-
3
-
4
-
5
-
 6
6 -
 7
7 -
 8
8 -
 9
9 -
 10
10 -
 11
11 -
 12
12 -
 13
13 -
 14
14 -
 15
15 -
 16
16 -
17
-
18
-
19
-
20
-
21
-
22
-
23
-
24
-
25
-
26
-
27
-
28
-
29
-
30
-
31
-
32
-
33
-
34
-
35
-
36
-
37
-
38
-
39
-
40
-
41
-
42
-
43
-
44
-
45
-
46
-
47
-
48
-
49
-
50
-
51
-
52
-
53
-
54
-
55
-
56
-
57
-
58
-
59
-
60
-
61
-
62
-
63
-
64
-
65
-
66
-
67
-
68
-
69
-
70
-
71
-
72
-
73
-
74
-
75
-
76
-
77
-
78
-
79
-
80
-
81
-
82
-
83
-
84
-
85
-
86
-
87
-
88
 |
 |