Bosch WFMC5301UC Installation and Use & Care (all languages) - Page 7
Warning - not spinning
 |
UPC - 825225852117
View all Bosch WFMC5301UC manuals
Add to My Manuals
Save this manual to your list of manuals |
Page 7 highlights
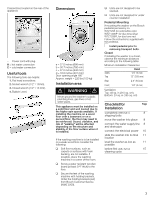
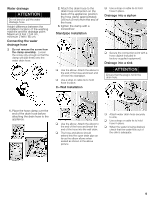
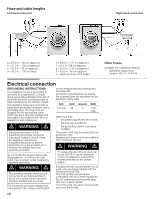
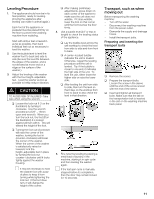
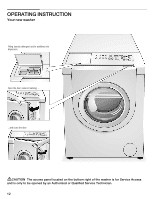
Connections located on the rear of the appliance: - Power cord with plug. H = hot water connection C = cold water connection Useful tools The following tools are helpful: 1. Flat head screwdriver. 2. Socket wrench (1/2" / 13mm). 3. Closed wrench (1/2" / 13 mm). 4. Bubble Level. Dimensions a = 27.0 inches (686 mm) b = 30.7 inches (780 mm) c = 37.0 inches (940 mm) d = 16.0 inches (407 mm) Door opening angle 180° Approx. weight = 220 lbs (100 kg) Installation area d WARNING d Never ground the washer to plastic plumbing lines, gas lines or hot water pipes. This appliance must be installed on a solid floor and well leveled due to the higher spin speeds available. If installing the machine on a wood floor over a basement or on a second floor, the floor may need to be reinforced. Sound, vibration, and risk of walking" will be affected depending on the structure and stability of the floor surface where it is installed. If the washing machine is to be installed on a weak wood floor consider the following: q Soft floor surfaces, such as carpets or surfaces with foam backing, are not suitable. If possible, place the washing machine in a corner of the room. q Screw a water resistant wooden board (at least 3/4" thick) to the floor. q Secure the feet of the washing machine with holding brackets. Order the holding brackets (set) from Bosch Customer Service (WMZ 2200). q Units are not designed to be stacked. q Units are not designed for under counter installation Pedestal Mounting If mounting the washer on the Bosch pedestal (accessory no. WTZ1295 for solid white color WTZ 1295P for duo tone silver WTZ1295R, for duo tone red Follow the instructions supplied with the pedestal. i Install pedestal prior to removing transport bolts. Closet If installing the washer in a closet, observe the minimum distances according to the following table: Minimum Installation Clearances Closet Sides 1/4" (6 mm) Top 12" (3O5 mm) Rear 2.5" (64 mm) Front 1/4" (6 mm) Ventilation: Top: 48 sq. in (310 sq. cm), Bottom: 24 sq. in (155 sq. cm) Checklist for Page Installation completely remove 4 8 shipping bolts move the washer into place 8 connect the water supply line 8 and drain pipe connect the electrical power 10 slide the washer into its final 11 location level the washer as low as 11 possible before first use, run a 15 cleaning cycle 7
-
 1
1 -
 2
2 -
 3
3 -
 4
4 -
 5
5 -
 6
6 -
 7
7 -
 8
8 -
 9
9 -
 10
10 -
 11
11 -
 12
12 -
13
-
14
-
15
-
16
-
17
-
18
-
19
-
20
-
21
-
22
-
23
-
24
-
25
-
26
-
27
-
28
-
29
-
30
-
31
-
32
-
33
-
34
-
35
-
36
-
37
-
38
-
39
-
40
-
41
-
42
-
43
-
44
-
45
-
46
-
47
-
48
-
49
-
50
-
51
-
52
-
53
-
54
-
55
-
56
-
57
-
58
-
59
-
60
-
61
-
62
-
63
-
64
-
65
-
66
-
67
-
68
-
69
-
70
-
71
-
72
-
73
-
74
-
75
-
76
-
77
-
78
-
79
-
80
-
81
-
82
-
83
-
84
-
85
-
86
-
87
-
88
 |
 |
