Bosch WTMC3321US Use & Care Manual (all languages) - Page 6
Warning - accessories
 |
UPC - 825225844761
View all Bosch WTMC3321US manuals
Add to My Manuals
Save this manual to your list of manuals |
Page 6 highlights
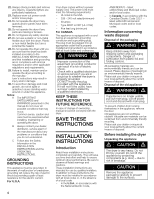
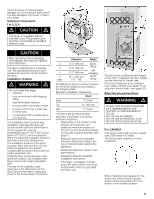
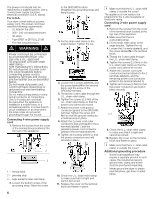
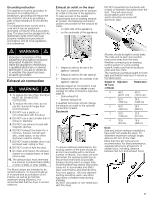
The power cord should only be replaced by a qualified person. Use a 4Ćwire power supply cord (see electrical connection U.S.A. below). For U.S.A. Your dryer comes without a power supply cord. The power cord must meet the following requirements: - UL listed in the USA - 208 ć 240 volt rated (minimum) - 30 amps - Type SRDT or DRT (UL 2158) - Five feet long (minimum) d WARNING d Power cord must be connected by a licensed electrician only. Use only a U.L. approved 30 amp power cord with strain relief clamp note manufacturer's instructions. Do not plug end of power cord into a live receptacle before connecting power cord to appliance terminals and closing junction/splitter box as described below. Do not reuse old power cord. Cord must have closed loop or upturned end wire terminating connectors. Do not make a sharp bend or crimp wiring/conductor at connections. Only a 4Ćconductor cord shall be used when the appliance is installed in a mobile home, in a recreational vehicle, in a new branch circuit installation or an area where the local codes do not permit grounding through the neutral. Connecting 4Ćwire power supply cord 1. Remove the screws from the cover of the terminal block located at the top rear of the appliance. 1 2 3 1 - terminal block 2 - grounding strap 3 - Angle bracket for strain relief clamp 2. Loosen the bottom screw of the grounding strap. Place the screw 6 to the GROUND location. Straighten the grounding strap and hang loosely. 3. Fix the strain relief clamp to the angle bracket. Tighten the nut. 4. Loosen the 2 screws labeled L and the screw labeled N in the terminal block. and the screw of the GROUND terminal. 5. Thread the 4 wire cable through the U.L. strain relief clamp. 6. Tighten the screws (2.5 Nm) of the U.L. strain relief clamp so that the power cord cannot be moved. 7. Attach the power cord ground conductor (green) to the GROUND terminal. Tighten the screw (2.5 Nm) so that the ground conductor is held securely in place. 8. Attach the 2 power cord outer conductors (red and black) to the 2 terminals labeled L and the remaining power cord conductor (white) to the terminal labeled N. 9. Tighten all 3 screws (3 Nm) so that the power conductors are held securely in place . 10. Check the U.L. strain relief clamp to make sure that it is tight and cannot be turned. 11. Replace the cover on the terminal block and fasten in place. i Make sure that the U.L. strain relief clamp is outside the cover! The appliance is now ready to be plugged into the 4Ćwire receptacle of the power rating. Connecting 3Ćwire power supply cord 1. Remove the screws from the cover of the terminal block located at the top rear of the appliance. 2. Make sure that there is a grounding strap. 3. Fix the strain relief clamp to the angle bracket. Tighten the nut. 4. Loosen the 2 screws labeled L and the screw labeled N in the terminal block. 5. Thread the 3Ćwire cable through the U.L. strain relief clamp. 6. Tighten the screws (2.5 Nm) on the U.L. strain relief clamp so that the power cord cannot be moved. 7. Attach the 2 power cord outer conductors (red and black) to the 2 terminals labeled L and the remaining power cord conductor (white) to the terminal labeled N. 8. Tighten all 3 screws (3 Nm) so that the power conductors are held in place securely. 9. Check the U.L. strain relief clamp to make sure that it is tight and cannot be turned. 10. Replace the cover on the terminal block and fasten in place. i Make sure that the U.L. strain relief clamp is outside the cover! Additional grounding procedure - Some local regulations may require a separate ground. In such cases, the required accessory ground wire, clamp and screw must be purchased separately. - Never ground the dryer to plastic plumbing lines, gas lines or water pipes.
-
 1
1 -
 2
2 -
 3
3 -
 4
4 -
 5
5 -
 6
6 -
 7
7 -
 8
8 -
 9
9 -
 10
10 -
 11
11 -
 12
12 -
13
-
14
-
15
-
16
-
17
-
18
-
19
-
20
-
21
-
22
-
23
-
24
-
25
-
26
-
27
-
28
-
29
-
30
-
31
-
32
-
33
-
34
-
35
-
36
-
37
-
38
-
39
-
40
-
41
-
42
-
43
-
44
-
45
-
46
-
47
-
48
-
49
-
50
-
51
-
52
-
53
-
54
-
55
-
56
-
57
-
58
-
59
-
60
-
61
-
62
-
63
-
64
 |
 |
