Bose Acoustimass 10 Series II Owner's guide - Page 14
Check the connections, Attach the module end cover, if desired - system speakers
 |
View all Bose Acoustimass 10 Series II manuals
Add to My Manuals
Save this manual to your list of manuals |
Page 14 highlights
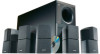
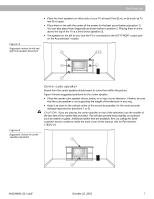
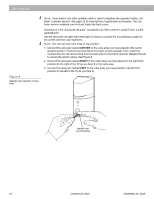
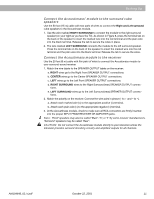
English Setting Up Figure 9 Completed connections Check the connections Check all connections from the receiver to the Acoustimass® module and the module to the cube speakers (Figure 9). Make sure all speakers are connected to the proper terminals according to their position in your room. At the receiver, check that the wires are connected in phase (+ to + and - to -). Incorrect wiring can result in a total loss of Acoustimass module output. Be sure to correct any wiring problems before you plug your receiver in and turn it on. CAUTION: Do not allow exposed wires to brush against each other; this could damage your receiver. R C L FRONT SPEAKERS R L SURROUND SPEAKERS R REAR L CENTER OUTPUTS TO CUBE SPEAKERS L C R LS RS LEFT CENTER RIGHT LEFT RIGHT SURROUND SURROUND INPUTS FROM RECEIVER OR AMPLIFIER L C R LS RS RS LS Figure 10 The module end cover fits over the cables Attach the module end cover, if desired The module end cover is designed to hide the cabling and extend the smooth, clean lines of the Acoustimass module. However, because the cover has a beveled surface, you cannot stand the module on that end with the cover in place. If you plan to use the cover, attach it to the cable end after all connections have been checked (Figure 9). Gently push the end cover into the grommets on the Acoustimass module (Figure 10). Your set-up is complete. Enjoy your Acoustimass 10 Series II speaker system. 12 October 22, 2001 AM19464_02_V.pdf
-
 1
1 -
2
-
3
-
4
-
5
-
6
-
7
-
8
-
 9
9 -
 10
10 -
 11
11 -
 12
12 -
 13
13 -
 14
14 -
 15
15 -
 16
16 -
 17
17 -
 18
18 -
 19
19 -
20
-
21
 |
 |