Brother International ADS-1700W BR-Receipts Users Guide Windows - Page 29
Creating Reports, Include Cover
 |
View all Brother International ADS-1700W manuals
Add to My Manuals
Save this manual to your list of manuals |
Page 29 highlights
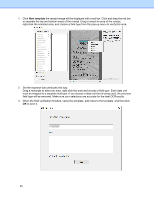
Creating Reports After all of your receipts are entered and edited in BR-Receipts, you can generate reports that will show the data in an organized way. Select options as described below, and then click Create Report. 1. Click the Receipt menu and select Create Report... (or click on the toolbar or right-click a folder and choose Create Report...). The Report Wizard appears. 2. Type a title for your report in the Title field. Select the Show Subheader check box to display a subheader. 3. The default Reporting Type is Expense. To change to a Spending Report, select Spending. • In the Spending by drop-down list whatever is selected determines how receipt information is summarized. For example, if Payment Type is selected, the report information will be summarized by the payment type in the first field; if Vendor is selected, the report will be summarized by vendor names in the first field. 4. In the Formatting section: • Select Include Cover Page if you want a cover page that includes receipt date, user profile and summary. • Select Include Receipt if you want your report to display groups by spending type, with detailed information for each group. • Select Include Image if you want the receipt images to be printed in the report. 5. When finished, click Continue. 25
-
 1
1 -
2
-
3
-
4
-
5
-
6
-
7
-
8
-
9
-
10
-
11
-
12
-
13
-
14
-
15
-
16
-
17
-
18
-
19
-
20
-
21
-
22
-
23
-
 24
24 -
 25
25 -
 26
26 -
 27
27 -
 28
28 -
 29
29 -
 30
30 -
 31
31 -
 32
32
 |
 |
