Brother International BAS-342E Instruction Manual - English - Page 43
Presser, adjustment
 |
View all Brother International BAS-342E manuals
Add to My Manuals
Save this manual to your list of manuals |
Page 43 highlights
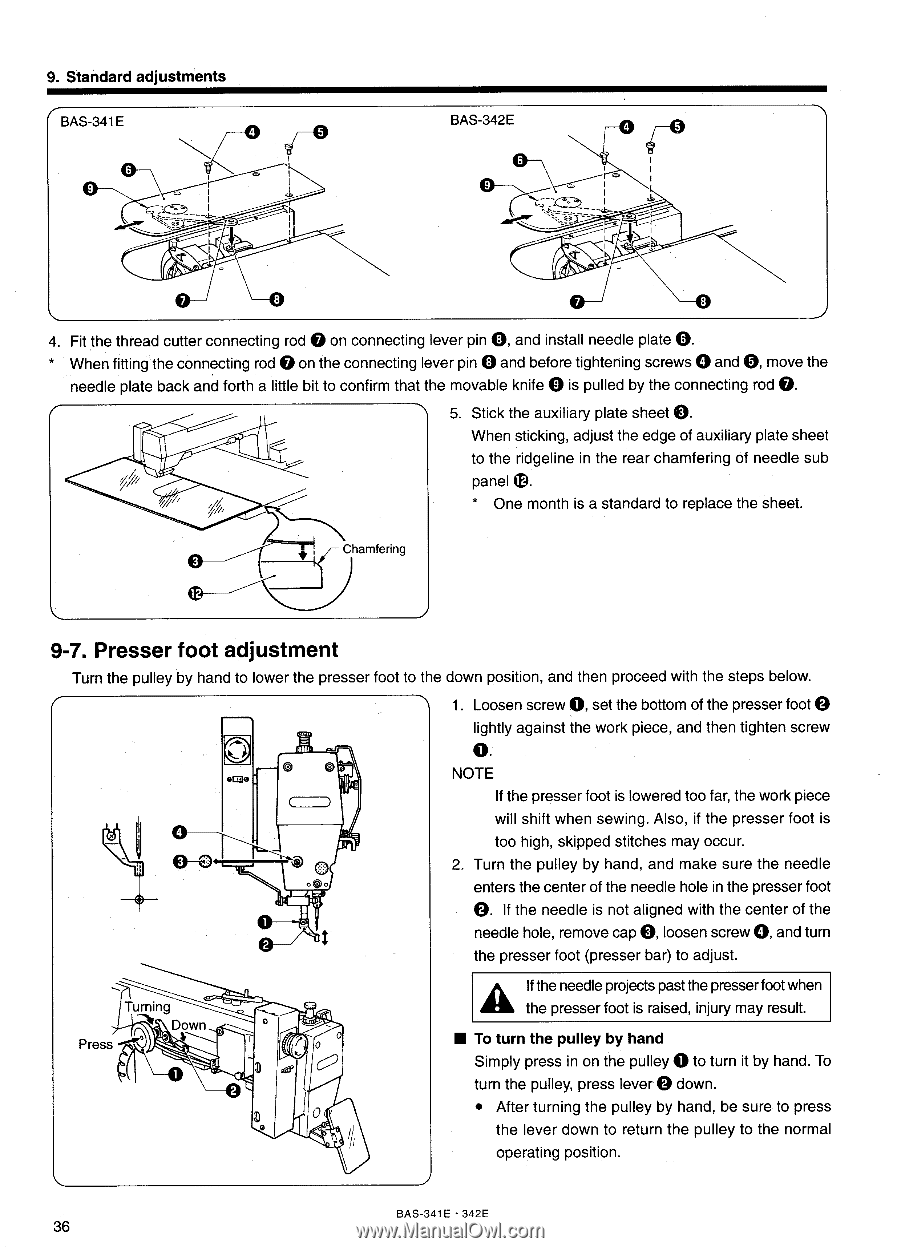
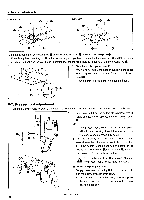
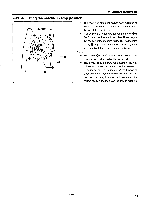
9. Standard adjustments BAS-341E --- BAS-342E r, 4. Fit the thread cutter connecting rod 0 on connecting lever pin 0, and install needle plate 0. When fitting the connecting rod 0 on the connecting lever pin 0 and before tightening screws 0 and 0, move the needle plate back and forth a little bit to confirm that the movable knife 0 is pulled by the connecting rod 0. 5. Stick the auxiliary plate sheet 0. When sticking, adjust the edge of auxiliary plate sheet to the ridgeline in the rear chamfering of needle sub panel * One month is a standard to replace the sheet. Chamfering 9-7. Presser foot adjustment Turn the pulley by hand to lower the presser foot to the down position, and then proceed with the steps below. 1. Loosen screw 0, set the bottom of the presser foot 0 lightly against the work piece, and then tighten screw tl ao® 0-0 OIW 0 0. NOTE If the presser foot is lowered too far, the work piece will shift when sewing. Also, if the presser foot is too high, skipped stitches may occur. 2. Turn the pulley by hand, and make sure the needle enters the center of the needle hole in the presser foot 0. If the needle is not aligned with the center of the needle hole, remove cap 0, loosen screw 0, and turn the presser foot (presser bar) to adjust. Turning Down Press ---"r 0 0 cor C5) 0 0 If the needle projects past the presser foot when the presser foot is raised, injury may result. • To turn the pulley by hand Simply press in on the pulley 0 to turn it by hand. To turn the pulley, press lever 0 down. • After turning the pulley by hand, be sure to press the lever down to return the pulley to the normal operating position. BAS-341E • 342E 36
-
 1
1 -
2
-
3
-
4
-
5
-
6
-
7
-
8
-
9
-
10
-
11
-
12
-
13
-
14
-
15
-
16
-
17
-
18
-
19
-
20
-
21
-
22
-
23
-
24
-
25
-
26
-
27
-
28
-
29
-
30
-
31
-
32
-
33
-
34
-
35
-
36
-
37
-
 38
38 -
 39
39 -
 40
40 -
 41
41 -
 42
42 -
 43
43 -
 44
44 -
 45
45 -
 46
46 -
 47
47 -
 48
48 -
49
-
50
-
51
-
52
-
53
-
54
-
55
-
56
-
57
-
58
-
59
-
60
-
61
-
62
-
63
-
64
-
65
-
66
-
67
 |
 |