Brother International BAS-342E Instruction Manual - English - Page 6
Contents
 |
View all Brother International BAS-342E manuals
Add to My Manuals
Save this manual to your list of manuals |
Page 6 highlights
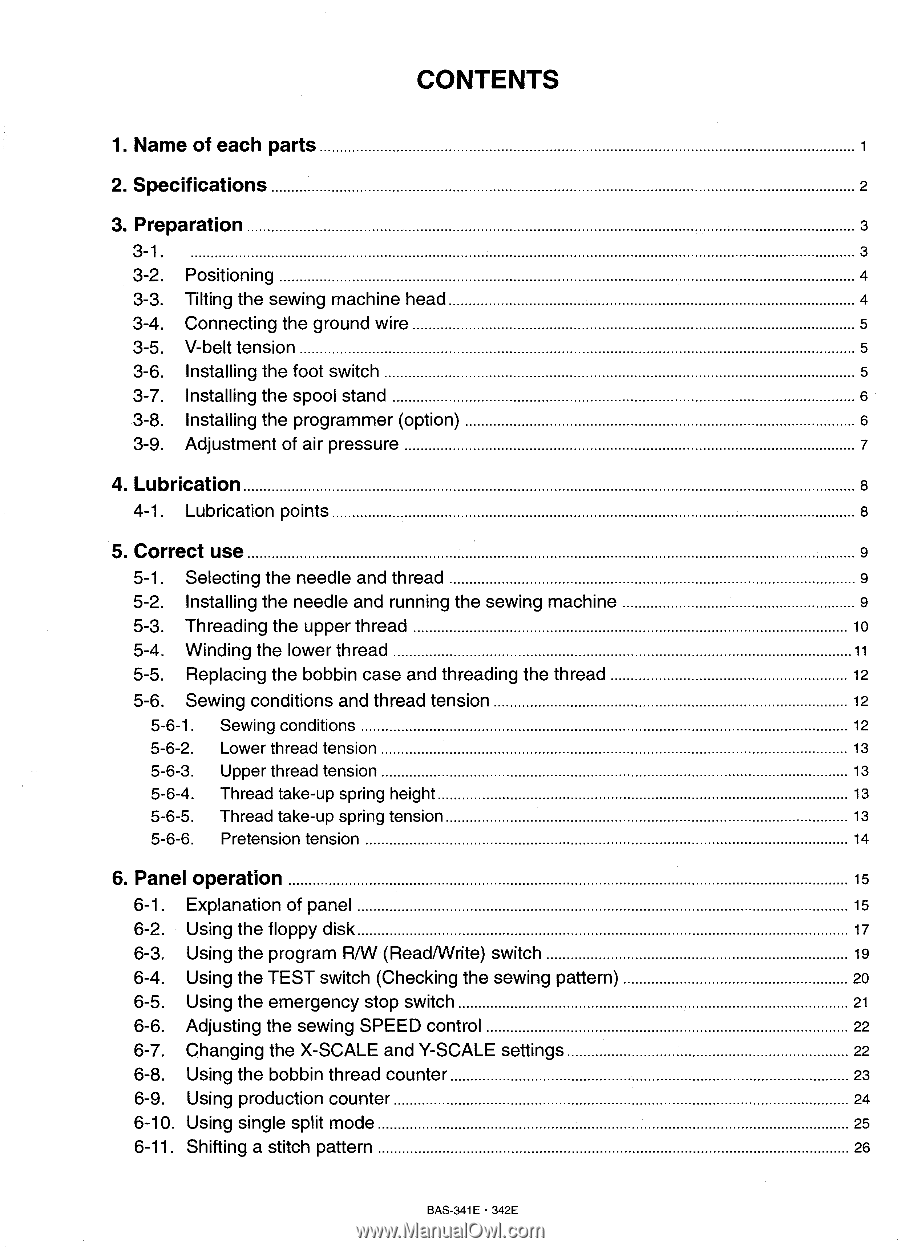
CONTENTS 1. Name of each parts 2. Specifications 2 3. Preparation 3 3-1. 3 3-2. Positioning 4 3-3. Tilting the sewing machine head 4 3-4. Connecting the ground wire 5 3-5. V-belt tension 5 3-6. Installing the foot switch 5 3-7. Installing the spool stand 6 3-8. Installing the programmer (option) 6 3-9. Adjustment of air pressure 7 4. Lubrication 8 4-1. Lubrication points 8 5. Correct use 9 5-1. Selecting the needle and thread 9 5-2. Installing the needle and running the sewing machine 9 5-3. Threading the upper thread 10 5-4. Winding the lower thread 11 5-5. Replacing the bobbin case and threading the thread 12 5-6. Sewing conditions and thread tension 12 5-6-1. Sewing conditions 12 5-6-2. Lower thread tension 13 5-6-3. Upper thread tension 13 5-6-4. Thread take-up spring height 13 5-6-5. Thread take-up spring tension 13 5-6-6. Pretension tension 14 6. Panel operation 15 6-1. Explanation of panel 15 6-2. Using the floppy disk 17 6-3. Using the program R/W (Read/Write) switch 19 6-4. Using the TEST switch (Checking the sewing pattern) 20 6-5. Using the emergency stop switch 21 6-6. Adjusting the sewing SPEED control 22 6-7. Changing the X-SCALE and Y-SCALE settings 22 6-8. Using the bobbin thread counter 23 6-9. Using production counter 24 6-10. Using single split mode 25 6-11. Shifting a stitch pattern 26 BAS-341E • 342E
-
 1
1 -
 2
2 -
 3
3 -
 4
4 -
 5
5 -
 6
6 -
 7
7 -
 8
8 -
 9
9 -
 10
10 -
 11
11 -
 12
12 -
13
-
14
-
15
-
16
-
17
-
18
-
19
-
20
-
21
-
22
-
23
-
24
-
25
-
26
-
27
-
28
-
29
-
30
-
31
-
32
-
33
-
34
-
35
-
36
-
37
-
38
-
39
-
40
-
41
-
42
-
43
-
44
-
45
-
46
-
47
-
48
-
49
-
50
-
51
-
52
-
53
-
54
-
55
-
56
-
57
-
58
-
59
-
60
-
61
-
62
-
63
-
64
-
65
-
66
-
67
 |
 |