Brother International BAS-342E Instruction Manual - English - Page 62
forward.tube.
 |
View all Brother International BAS-342E manuals
Add to My Manuals
Save this manual to your list of manuals |
Page 62 highlights
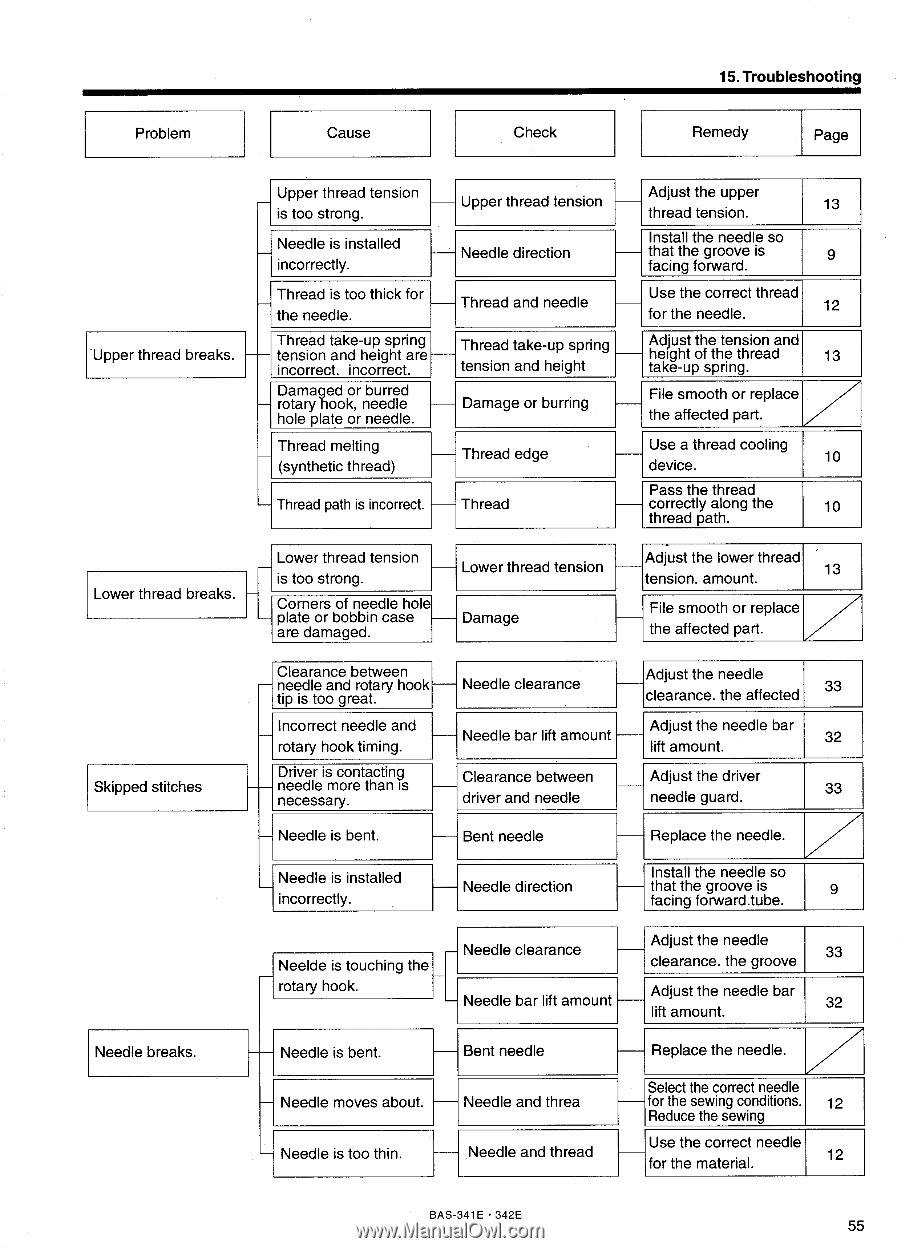
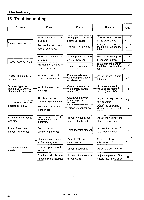
15. Troubleshooting Problem Cause Check Remedy Page Upper thread breaks. Lower thread breaks. Skipped stitches Needle breaks. Upper thread tension is too strong. Needle is installed incorrectly. Thread is too thick for the needle. Thread take-up spring tension and height are incorrect. incorrect. Damaged or burred rotary hook, needle hole plate or needle. Thread melting (synthetic thread) Thread path is incorrect. Upper thread tension Needle direction Thread and needle Thread take-up spring tension and height Damage or burring Thread edge Thread Lower thread tension is too strong. Corners of needle hole plate or bobbin case are damaged. Lower thread tension Damage Clearance between needle and rotary hook tip is too great. Incorrect needle and rotary hook timing. Driver is contacting needle more than is necessary. Needle is bent. Needle clearance Needle bar lift amount Clearance between driver and needle Bent needle Needle is installed incorrectly. Needle direction NeeIde is touching the rotary hook. Needle clearance Needle bar lift amount Needle is bent. Bent needle Needle moves about. Needle and threa Needle is too thin. Needle and thread 9 Use the correct thread for the needle. 12 Adjust the tension and height of the thread 13 take-up spring. File smooth or replace the affected part. Use a thread cooling device. 10 Pass the thread correctly along the 10 thread path. Adjust the lower thread tension. amount. 13 File smooth or replace the affected part. Adjust the needle clearance. the affected 33 Adjust the needle bar lift amount. Adjust the driver needle guard. Replace the needle. Install the needle so that the groove is 9 facing forward.tube. Adjust the needle clearance. the groove 33 Adjust the needle bar lift amount. 32 Replace the needle. Select the correct needle for the sewing conditions. 12 Reduce the sewing Use the correct needle for the material. 12 BAS-341E • 342E 55
-
 1
1 -
2
-
3
-
4
-
5
-
6
-
7
-
8
-
9
-
10
-
11
-
12
-
13
-
14
-
15
-
16
-
17
-
18
-
19
-
20
-
21
-
22
-
23
-
24
-
25
-
26
-
27
-
28
-
29
-
30
-
31
-
32
-
33
-
34
-
35
-
36
-
37
-
38
-
39
-
40
-
41
-
42
-
43
-
44
-
45
-
46
-
47
-
48
-
49
-
50
-
51
-
52
-
53
-
54
-
55
-
56
-
 57
57 -
 58
58 -
 59
59 -
 60
60 -
 61
61 -
 62
62 -
 63
63 -
 64
64 -
 65
65 -
 66
66 -
 67
67
 |
 |