Brother International BAS-761 Instruction Manual - English - Page 16
Correct operation, 5-1. Installing the needle, 5-2. Upper threading
 |
View all Brother International BAS-761 manuals
Add to My Manuals
Save this manual to your list of manuals |
Page 16 highlights
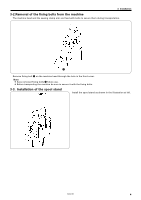
5. Correct operation 5. Correct operation 5-1. Installing the needle w q Fully insert needle q, with its long groove to the left, and secure it with screw w. Note: If the angle is incorrect, the needle an rotary hook will lock when the needle bar is at its lowest position, so make sure that the needle and rotary hook do not lock. 5-2. Upper threading 1. Apply air pressure and turn on power switch. 2. Press the FOLDER RESET button !9 to move the machine head back to the home position. 3. Press FOOT button !1 and lower presser foot w. 4. Pass the upper thread as illustrated below. After threading, be sure to press FOOT button !1 and lift presser foot w. 5. After threading, turn the pulley and lift the needle-bar to the uppermost position. !9 !1 6 7 N/thread cooler assy s x2.4 rotary hook 11 13 9 10 9 10 14 s x1.7 rotary hook 9 s x2.4 rotary hook 1 2 7 65 3 12 4 8 13 11 9 10 Leave about 50 mm of thread end with the thread take-up at its highest position. 50mm 14 15 16 w BAS-761 11 9 10 s x1.7 rotary hook
-
 1
1 -
2
-
3
-
4
-
5
-
6
-
7
-
8
-
9
-
10
-
 11
11 -
 12
12 -
 13
13 -
 14
14 -
 15
15 -
 16
16 -
 17
17 -
 18
18 -
 19
19 -
 20
20 -
 21
21 -
22
-
23
-
24
-
25
-
26
-
27
-
28
-
29
-
30
-
31
-
32
-
33
-
34
-
35
-
36
-
37
-
38
-
39
-
40
-
41
-
42
-
43
-
44
-
45
-
46
-
47
 |
 |
