Brother International BM-917B Instruction Manual - English - Page 6

Contents - 20

Page 6 highlights

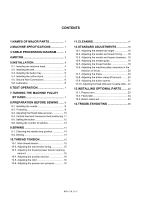
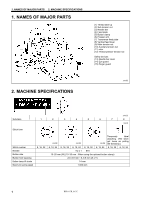
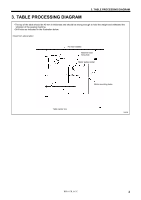
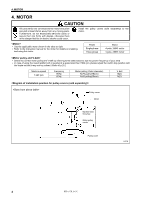
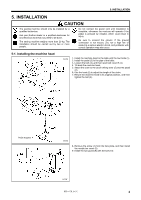
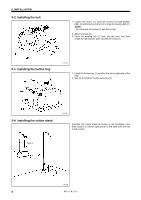
CONTENTS 1.NAMES OF MAJOR PARTS 1 2.MACHINE SPECIFICATIONS 1 3.TABLE PROCESSING DIAGRAM ......... 2 4.MOTOR 3 5.INSTALLATION 4 5-1. Installing the machine head 4 5-2. Installing the belt 5 5-3. Installing the button tray 5 5-4. Installing the cotton stand 5 5-5. Ground Wire Connections 6 5-6. Lubrication 6 6.TEST OPERATION 7 7.TURNING THE MACHINE PULLEY BY HAND 7 8.PREPARATION BEFORE SEWING ...... 8 8-1. Installing the needle 8 8-2. Threading 9 8-3. Adjusting the thread take-up lever 10 8-4. Vertical feed and transverse feed positioning 11 8-5. Setting the button 12 8-6. Setting the number of stitches 13 9.SEWING 14 9-1. Checking the needle drop position 14 9-2. Sewing 14 10.THREAD TENSION 15 10-1. Main thread tension 15 10-2. Adjusting the sub tension timing 15 10-3. Adjusting the thread presser tension opening amount 15 10-4. Adjusting the auxiliary tension 16 10-5. Adjusting the rotor 16 10-6. Adjusting the presser arm pressure 16 11.CLEANING 17 12.STANDARD ADJUSTMENTS 18 12-1. Adjusting the needle bar height 18 12-2. Adjusting the needle and looper timing.........18 12-3. Adjusting the needle and looper clearance...19 12-4. Adjusting the needle guide 19 12-5. Adjusting the thread handler 19 12-6. Adjusting the machine pulley clearance in the direction of thrust 20 12-7. Adjusting the brake 20 12-8. Adjusting the button clamp lift amount..........20 12-9. Adjusting the button opener 21 12-10. Adjusting the fixed knife and movable knife ...22 13.INSTALLING OPTIONAL PARTS........23 13-1. Presser arm 23 13-2. Feed plate 24 13-3. Button clamp set 24 14.TROUBLESHOOTING 25 BM-917B, 917C

  • 1
  • 2
  • 3
  • 4
  • 5
  • 6
  • 7
  • 8
  • 9
  • 10
  • 11
  • 12
  • 13
  • 14
  • 15
  • 16
  • 17
  • 18
  • 19
  • 20
  • 21
  • 22
  • 23
  • 24
  • 25
  • 26
  • 27
  • 28
  • 29
  • 30
  • 31
  • 32
  • 33
  • 34
  • 35
  • 36

BM-917B, 917C
CONTENTS
1.NAMES OF MAJOR PARTS
..................
1
2.MACHINE SPECIFICATIONS
................
1
3.TABLE PROCESSING DIAGRAM
.........
2
4.MOTOR
...................................................
3
5.INSTALLATION
......................................
4
5-1. Installing the machine head
............................
4
5-2. Installing the belt
.............................................
5
5-3. Installing the button tray
.................................
5
5-4. Installing the cotton stand
...............................
5
5-5. Ground Wire Connections
..............................
6
5-6. Lubrication
......................................................
6
6.TEST OPERATION
.................................
7
7.TURNING THE MACHINE PULLEY
BY HAND
................................................
7
8.PREPARATION BEFORE SEWING
......
8
8-1. Installing the needle
........................................
8
8-2. Threading
........................................................
9
8-3. Adjusting the thread take-up lever
..................
10
8-4. Vertical feed and transverse feed positioning
11
8-5. Setting the button
...........................................
12
8-6. Setting the number of stitches
........................
13
9.SEWING
.................................................
14
9-1. Checking the needle drop position
.................
14
9-2. Sewing
............................................................
14
10.THREAD TENSION
..............................
15
10-1. Main thread tension
......................................
15
10-2. Adjusting the sub tension timing
...................
15
10-3. Adjusting the thread presser tension opening
amount
..........................................................
15
10-4. Adjusting the auxiliary tension
......................
16
10-5. Adjusting the rotor
........................................
16
10-6. Adjusting the presser arm pressure
.............
16
11.CLEANING
...........................................
17
12.STANDARD ADJUSTMENTS
..............
18
12-1. Adjusting the needle bar height
....................
18
12-2. Adjusting the needle and looper timing
.........
18
12-3. Adjusting the needle and looper clearance...19
12-4. Adjusting the needle guide
............................
19
12-5. Adjusting the thread handler
.........................
19
12-6. Adjusting the machine pulley clearance in the
direction of thrust
...........................................
20
12-7. Adjusting the brake
.......................................
20
12-8. Adjusting the button clamp lift amount
..........
20
12-9. Adjusting the button opener
..........................
21
12-10.
Adjusting the fixed knife and movable knife ...
22
13.INSTALLING OPTIONAL PARTS
........
23
13-1. Presser arm
...................................................
23
13-2. Feed plate
.....................................................
24
13-3. Button clamp set
...........................................
24
14.TROUBLESHOOTING
.........................
25