Brother International HL 2060 Service Manual - Page 59
Cartridge Stopper ASSY,
 |
UPC - 012502525325
View all Brother International HL 2060 manuals
Add to My Manuals
Save this manual to your list of manuals |
Page 59 highlights
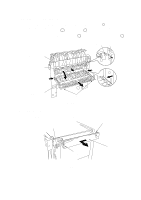
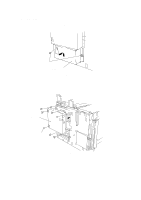
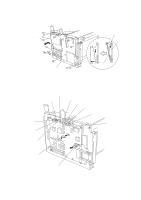
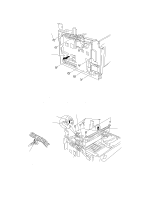
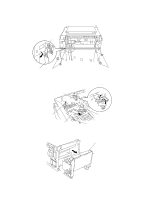
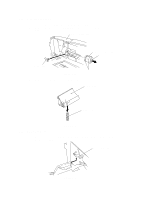
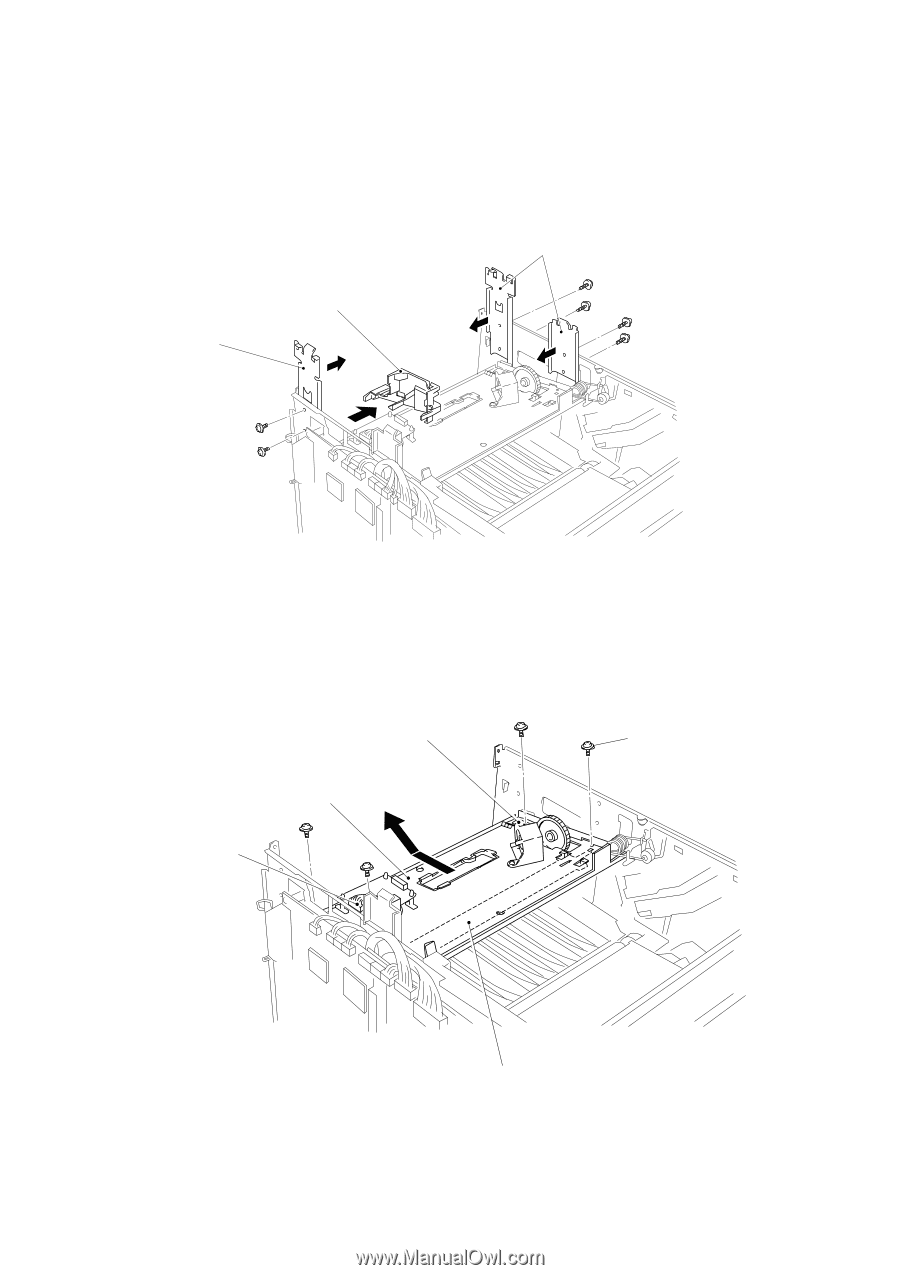
1.11 Cartridge Stopper ASSY (1) Remove LSR harness 5P, the Paper eject sensor harness and DC fan motor harness from the cable clump. (2) Remove the Duct by releasing the 2 hooks. (3) Remove 3 M holders by loosening the screws. M holder M holder Duct Figure 4.20 (4) Remove the screw for the Laser fan motor and remove it. (5) Remove the Laser flat cable form the ferrite core. (6) Loosen 4 screws and remove the Laser unit mount plate in the direction of the arrow (the Ground leaf spring is also released at the same time.) < Rear > Ground leaf spring Laser unit mount plate Screws < Right side > LSR harness 5P < Left side > Cartridge stopper ASSY Figure 4.21 IV-12 < Front >
-
 1
1 -
2
-
3
-
4
-
5
-
6
-
7
-
8
-
9
-
10
-
11
-
12
-
13
-
14
-
15
-
16
-
17
-
18
-
19
-
20
-
21
-
22
-
23
-
24
-
25
-
26
-
27
-
28
-
29
-
30
-
31
-
32
-
33
-
34
-
35
-
36
-
37
-
38
-
39
-
40
-
41
-
42
-
43
-
44
-
45
-
46
-
47
-
48
-
49
-
50
-
51
-
52
-
53
-
 54
54 -
 55
55 -
 56
56 -
 57
57 -
 58
58 -
 59
59 -
 60
60 -
 61
61 -
 62
62 -
 63
63 -
 64
64 -
65
-
66
-
67
-
68
-
69
-
70
-
71
-
72
-
73
-
74
-
75
-
76
-
77
-
78
-
79
-
80
-
81
-
82
-
83
-
84
-
85
-
86
-
87
-
88
-
89
-
90
-
91
-
92
-
93
-
94
-
95
-
96
-
97
-
98
-
99
-
100
-
101
-
102
-
103
-
104
-
105
-
106
-
107
-
108
-
109
-
110
-
111
-
112
-
113
-
114
-
115
-
116
-
117
-
118
-
119
-
120
-
121
-
122
-
123
-
124
-
125
-
126
-
127
-
128
-
129
-
130
-
131
-
132
-
133
-
134
-
135
-
136
-
137
-
138
-
139
-
140
-
141
-
142
-
143
-
144
-
145
-
146
-
147
-
148
-
149
-
150
-
151
-
152
-
153
-
154
-
155
-
156
-
157
-
158
-
159
-
160
-
161
-
162
-
163
-
164
-
165
-
166
-
167
-
168
-
169
-
170
-
171
 |
 |
IV-12
1.11
Cartridge Stopper ASSY
(1)
Remove LSR harness 5P, the Paper eject sensor harness and DC fan motor
harness from the cable clump.
(2)
Remove the Duct by releasing the 2 hooks.
(3)
Remove 3 M holders by loosening the screws.
Figure 4.20
(4)
Remove the screw for the Laser fan motor and remove it.
(5)
Remove the Laser flat cable form the ferrite core.
(6)
Loosen 4 screws and remove the Laser unit mount plate in the direction of the
arrow (the Ground leaf spring is also released at the same time.)
Figure 4.21
M holder
Ground leaf spring
Screws
< Front >
< Rear >
< Left side >
< Right side >
Laser unit mount plate
Cartridge stopper ASSY
LSR harness
5P
Duct
M holder