Brother International HL-5255DN-MICR MICR Owners Manual - English - Page 100
abcde, Lines across
 |
View all Brother International HL-5255DN-MICR manuals
Add to My Manuals
Save this manual to your list of manuals |
Page 100 highlights
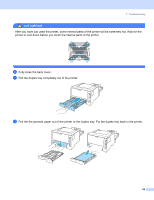
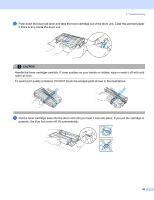
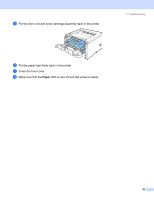
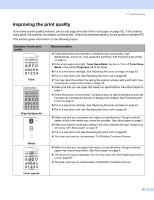
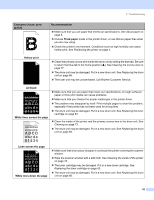
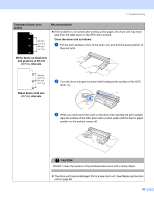
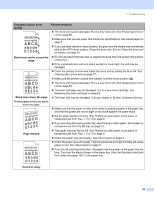
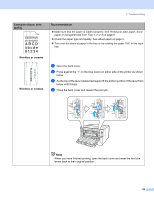
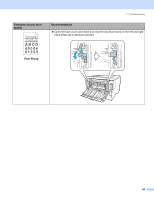
7. Troubleshooting Examples of poor print quality Recommendation „ Make sure that you use paper that meets our specifications. See About paper on page 5. „ Choose Thick paper mode in the printer driver, or use thinner paper than what you are now using. „ Check the printer's environment. Conditions such as high humidity can cause hollow print. See Positioning the printer on page 4. Hollow print „ Clean the primary corona wire inside the drum unit by sliding the blue tab. Be sure to return the blue tab to the home position (a). See Cleaning the corona wire on page 77. „ The drum unit may be damaged. Put in a new drum unit. See Replacing the drum unit on page 68. „ The fuser unit may be contaminated. Call Brother Customer Service. All black ABCDEFGH abcdefghijk ABCD abcde 01234 White lines across the page ABCDEFGH abcdefghijk ABCD abcde 01234 „ Make sure that you use paper that meets our specifications. A rough surfaced paper or thick print media can cause problems. „ Make sure that you choose the proper media type in the printer driver. „ The problem may disappear by itself. Print multiple pages to clear this problem, especially if the printer has not been used for a long time. „ The drum unit may be damaged. Put in a new drum unit. See Replacing the toner cartridge on page 63. „ Clean the inside of the printer and the primary corona wire in the drum unit. See Cleaning on page 73. „ The drum unit may be damaged. Put in a new drum unit. See Replacing the drum unit on page 68. Lines across the page ABCDEFGH abcdefghijk ABCD abcde 01234 White lines down the page „ Make sure that a torn piece of paper is not inside the printer covering the scanner window. „ Wipe the scanner window with a soft cloth. See Cleaning the inside of the printer on page 74. „ The toner cartridge may be damaged. Put in a new toner cartridge. See Replacing the toner cartridge on page 63. „ The drum unit may be damaged. Put in a new drum unit. See Replacing the drum unit on page 68. 92
-
 1
1 -
2
-
3
-
4
-
5
-
6
-
7
-
8
-
9
-
10
-
11
-
12
-
13
-
14
-
15
-
16
-
17
-
18
-
19
-
20
-
21
-
22
-
23
-
24
-
25
-
26
-
27
-
28
-
29
-
30
-
31
-
32
-
33
-
34
-
35
-
36
-
37
-
38
-
39
-
40
-
41
-
42
-
43
-
44
-
45
-
46
-
47
-
48
-
49
-
50
-
51
-
52
-
53
-
54
-
55
-
56
-
57
-
58
-
59
-
60
-
61
-
62
-
63
-
64
-
65
-
66
-
67
-
68
-
69
-
70
-
71
-
72
-
73
-
74
-
75
-
76
-
77
-
78
-
79
-
80
-
81
-
82
-
83
-
84
-
85
-
86
-
87
-
88
-
89
-
90
-
91
-
92
-
93
-
94
-
 95
95 -
 96
96 -
 97
97 -
 98
98 -
 99
99 -
 100
100 -
 101
101 -
 102
102 -
 103
103 -
 104
104 -
 105
105 -
106
-
107
-
108
-
109
-
110
-
111
-
112
-
113
-
114
-
115
-
116
-
117
-
118
-
119
-
120
-
121
-
122
-
123
-
124
-
125
-
126
-
127
-
128
-
129
-
130
-
131
-
132
-
133
-
134
-
135
-
136
-
137
-
138
 |
 |
